Edit: With the Rig no longer being obtainable, this tools only useful if you happen to have the Rig installed and still somewhat functional!
Preamble
Twitch decided to deprecate the Extension Developer Rig, which is fine, just about everything that the rig could do is avialable via the API now. You can read about the Deprecation on the Developer Forums.
The final thing that was API enabled was bits product management, which for a while was rig only, but is now available in the API and more recently in the developer console, so if you don’t want to write or use a tool, you can use the developer console instead.
You can read more about the Bits product management announcement over on the Twitch Developer Forums.
So What Now?
For those working with Twitch Extensions, you can either write you own tools to talk to various things via the API, such as the Config service or Bits product management or you can use a tool that someone else wrote such as my own Twitch Extension Tools. But that leaves out the one thing that the Rig can do but nothing else can, which is view testing.
View Testing
The optimal way, in my opinion, to do view testing is to get your Testing Base URI setup over SSL, either via using a real URL, or a reverse proxy tool such as NGROK.
But there are times where you don’t want to do that or just want to quickly test a video or component slot extension without going live, which is where the Rig comes in, you can test those sort of extensions without going live, or even by putting the “wrong” channel behind you extension (listen to Monstercat whilst working on your extension for example….)
The rig is still available for doing that sort of testing, but you may need to reimport/reopen a project or refresh the projects manifest into the rig, or you have started a new Extension and need to test.
That part of the rig is broken, you’ll hit the buttons and nothing will work as the API’s the Rig are trying to talk to just no longer work if they exist at all, to that end I devised a little tool to cover.
A Screenshot of the Manifester. It’s ok the userID is mine I can leak my ID all I want mom!
Which provides the following tools:
Import a Project, generate a new project file from an Extension and add it to the Developer Rig
Refresh Manifest, update an existing project file or change the active version,
Reopen Project, when you import an extension into the rig it generates a project file saving with it the views you made, you can then close the project in the rig, this file tool lets you reopen that project file and add it back to the rig.
Thats the three main things “broken” in the rig that can be replaced.
The other thing missing is “create a new extension and add it to the rig”, for that you need to use the developer console and then import to the rig via the Manifester.
Just remember to close the developer rig first before trying to use the manifester to do actions.
Notes
It’s a quick and simple Electron app licensed under WTFPL so go wild!
Summary
So, for helping with your Twitch Extension Development either:
test your extensions on the Twitch website with the testing base URI behind SSL (and don’t forget to have it in a subfolder to model hosted test and above best)
Around the time that Kraken was dying, I was doing something (I forget what, probably bits products), and found that the Twitch Developer Rig was totally hosed, since it was calling Kraken and hadn’t been patched. (It since has been but still being a little weird with some stuff with some of my Extensions, but I digress).
So I was like “screw it I’ll build my own tool with Blackjack and Hookers”.
So I went and built my own tool, it’s part “API testing tool” part “useful things for managing Extensions”. And released Open Source over on GitHub under the WTFPL aka – “Do What the F*ck you Want to Public License”.
Main reason for making a tool rather than a bunch of test scripts, was I wanted to easily store and recall my Extension Client ID’s Extension secrets, and easily generate App Access Tokens for the relevant API’s that needed.
It should offer just about every “useful feature” from the Developer Rig, that there is a public API for, except for “Views” and “Start my servers for me”. For a easy summary of the Features Available, checkout the Readme on the GitHub!
In part 5 we wrote about a suitable testing platform for building your extensions on, essentially we create a static content server, that mimics the Twitch CDN for testing with.
Twitch Announced on the Forums that they are revising the CSP (Content Security Policy) that extensions use to protect and control what can be loaded. I wrote about this in the previous blog post.
I’m currently waiting on a response from Twitch (via the forums) about any other changes to the CSP, but for now, you can test the changes today!
What Even is CSP
First lets do a quick explanation of what CSP, CSP is Content Security Policy, a browser technology to help control what a given Website can load and what browser functions are allowed.
The HTTP Content-Security-Policy response header allows web site administrators to control resources the user agent is allowed to load for a given page. With a few exceptions, policies mostly involve specifying server origins and script endpoints. This helps guard against cross-site scripting attacks (Cross-site_scripting).
You can read more about CSP and the various things it can do over on the MDN Web Docs. There is a lot more that can and can’t be done with CSP more than just controlling what content can be loaded from where, but for Twitch Extensions we only need to consider the parts of the Policy that affect Twitch Extensions.
Twitch Extension CSP Policy
Twitch is requiring Extension developer to declare the Connect, Img, and Media domains, which in the policy are connect-src, img-src and media-src. You can declare this in the Developer Console for a version of your extension, under the Capabilities tab.
The new Extension Dashboard fields
Now, the items you enter here only apply when you are using Hosted Test (or release), since Hosted Test will use Twitch’s CDN, and thus Twitch’s Server which can load and use the relevant fields, but in localtesting (aka not the CDN) we need to set this up ourselves.
Local Testing a CSP
If you have been following this series, then you already have a Node/Express server that will run a static output for you. We can easily add CSP headers to this server using a module called Helmet, generally speaking it’s wise to consider adding helmet (or CSP Headers in general) to any website you run to protect your users, but I digress!
So, how to set this up for Testing with.
Normally I’d say, on server start call the API to get the current extension settings from the console, however, the API at this time has not been updated to include the new fields, I raised a UserVoice requesting the new fields be added to the endpoints. And you can upvote that here.
So for now, we’ll need to populate the CSP for Helmet manually.
Configuring Helmet for CSP
The first thing I did was look at a released extension to see what the current CSP is, which I then split out into a object for configuring Helmet with. Then I looked at what the rig needs, and then looked at what you need to add to correctly simulate a CSP.
The base CSP for a Twitch Extension is, here twitch.client_id is loaded from an external config file, and represents the location that Hosted Test and Release use to host your files. Which I’ll touch on later.
/*
Current base CSP rules subject to change

See:
https://discuss.dev.twitch.tv/t/new-extensions-policy-for-content-security-policy-csp-directives-and-timeline-for-enforcement/33695/2

This example is based off a live extension
*/

let contentSecurityPolicy = {
    directives: {
        defaultSrc: [
            "'self'",
            `https://${twitch.client_id}.ext-twitch.tv`
        ],
        connectSrc: [
            "'self'",
            `https://${twitch.client_id}.ext-twitch.tv`,
            'https://extension-files.twitch.tv',
            'https://www.google-analytics.com',
            'https://stats.g.doubleclick.net'
        ],
        fontSrc:    [
            "'self'",
            `https://${twitch.client_id}.ext-twitch.tv`,
            'https://fonts.googleapis.com',
            'https://fonts.gstatic.com'
        ],
        imgSrc:     [
            "'self'",
            'data:',
            'blob:'
        ],
        mediaSrc:   [
            "'self'",
            'data:',
            'blob:'
        ],
        scriptSrc:  [
            "'self'",
            `https://${twitch.client_id}.ext-twitch.tv`,
            'https://extension-files.twitch.tv',
            'https://www.google-analytics.com',
            'https://stats.g.doubleclick.net'
        ],
        styleSrc:   [
            "'self'",
            "'unsafe-inline'",
            `https://${twitch.client_id}.ext-twitch.tv`,
            'https://fonts.googleapis.com'
        ],

        frameAncestors: [
            'https://supervisor.ext-twitch.tv',
            'https://extension-files.twitch.tv',
            'https://*.twitch.tv',
            'https://*.twitch.tech',
            'https://localhost.twitch.tv:*',
            'https://localhost.twitch.tech:*',
            'http://localhost.rig.twitch.tv:*'
        ]
    }
}

const helmet = require('helmet');
/*
You can use Security Headers to test your server, if this server is web accessible
https://securityheaders.com/
It'll test that your CSP is valid.
Best testing done with an extension, on Twitch or in the rig!
*/

console.log('Going to use the following CSP', contentSecurityPolicy);

app.use(helmet({
    contentSecurityPolicy
}));
This I add after app.listen and before anything else! It does need to go before your app.use for express.static
This will configure your test server to use the base/default CSP. And will log it out the full CSP to the console when you start the server.
The Extension Developer Rig
So the next step is how to enable your test server to work in the Twitch Extension Developer Rig. I don’t often use the rig, but it’s handy for spot testing views and mobile when I don’t have my phone handy (or the Extension has not been iOS allow listed yet!)
The Extension Rig is built in Electron, which means it will include calls to file and in testing it spot calls some other things.
For the rig I add the following rules, which I append to the default CSP using a Config Switch.
/*
should we enable the Rig?

The rig being an electron app, will call some other things
As well as having a file:// based parent
*/
if (csp_options.enable_rig) {
    let rig_sources = {
        connectSrc: [
            'wss://pubsub-edge.twitch.tv'
        ],
        frameAncestors: [
            'http://localhost:*',
            'file://*',
            'filesystem:'
        ]
    }

    // append these to the CSP
    for (let sourceType in rig_sources) {
        for (let x=0;x<rig_sources[sourceType].length;x++) {
            contentSecurityPolicy.directives[sourceType].push(rig_sources[sourceType][x]);
        }
    }
}
Nothing to silly there, but important if you are testing in the rig. Only enable this in your server when rig testing not testing on the Twitch website, as it’s overly permissive and might catch you out later.
My Sources
The final thing to do is to setup your sources, now this gets a little weird, as a valid CSP rule can omit the schema of the URL (see note).
For this example/setup we are adding the content domains to all three CSP directives. Using this example you can adjust and modify this as granularly as you want.
/*
Did we configure places that we can/may load media from
And yes we are just gonna glob them to all three groups
For example purposes
*/
csp_options.content_domains.forEach(domain => {
    contentSecurityPolicy.directives.imgSrc.push(domain);
    contentSecurityPolicy.directives.mediaSrc.push(domain);
    contentSecurityPolicy.directives.connectSrc.push(domain);
});
Note: In testing browsers will not enable/allow WSS if you declare a schema-less domain of www.example.com. So if you want WSS you need to declare it explicitly, for this I declare wss://www.example.com and https://www.example.com in the rule (not the lack of a trailing /).
I configure these schema+domains in an external configuration file for the server. Here is an example config.json:
If your extension utilizes an EBS you’ll need to declare that and add it to your connect-src, however if you also load images from your EBS you can skip this step.
I generally put my images and assets on a seperate server to my EBS, but for test purposes, this server example adds the EBS domain to all three declarations, for both schemas:
/*
Did we configure an EBS to call
*/
if (csp_options.ebs_domain) {
    console.log('Appending EBS Domain');
    let ebs_rules = {
        imgSrc: [
            'https://' + csp_options.ebs_domain,
            'wss://' + csp_options.ebs_domain
        ],
        mediaSrc: [
            'https://' + csp_options.ebs_domain,
            'wss://' + csp_options.ebs_domain
        ],
        connectSrc: [
            'https://' + csp_options.ebs_domain,
            'wss://' + csp_options.ebs_domain
        ]
    }

    for (let sourceType in ebs_rules) {
        for (let x=0;x<ebs_rules[sourceType].length;x++) {
            contentSecurityPolicy.directives[sourceType].push(ebs_rules[sourceType][x]);
        }
    }
}
Full Example!
I put all of this together as a full example over on my GitHub. See Part 6 of the repository. This provides a “rig” as described in Part 5 but with the additional CSP Fields included.
To set this up do as follows
Download the Example from GitHub
Copy config_sample.json to config.json
Populate the twitch->client_id with your Extension Client ID
Revise the listen port if needed
Configure Your CSP options as needed, add the content domains as needed. And you EBS domain as needed.
If you load content from your EBS domain, set the ebs_domain to false, to avoid a duplicate declaration of a domain, or do not include your ebs_domain in your content_domains
Once you have setup the server, you can the test your Rig via Security Headers which will test that your CSP is valid, however this only works if your Test Server is accessible from the internet! Which if you follow Part 5’s note will be for SSL testing purposes! And will only test that your CSP looks correct, not that it functions as intended!
Then you can move on to testing your Extension and check that your CSP works as intended, then you do not have to move to hosted test and back to test changes to your CSP!
If/when the API is updated to return the new fields, I’ll add a part 6.5 (probably) which will use the API to get the details instead. Sods law you’ll add a domain to your Test Rig/Server, and then forget to add the same domain to your Capabilities tab!
DEADLINE
Twitch will begin to Enforce the new CSP policy on January 25th.
Twitch closes for the holidays between Friday, 12/17/21 – Monday, 1/3/22. Twitch requests that Developers submit their extensions for review no later than Wednesday, 15th of December at 3PM PST.
Upcoming Winter Break
Attention, developers! Please note that the review team will be observing a winter holiday break from Friday, 12/17/21 – Monday, 1/3/22 and will not be performing Organization, Game, Chatbot Verification, or Extension reviews during this period of time. If you need a review completed prior to the holiday break, please submit your review request by no later than Wednesday, 12/15 at 3PM PST. Thank you for your understanding & happy holidays!
Well what about the report_uri, that you saw in the config.json example?
Well CSP provides a method to report CSP errors to a defined HTTPS POST endpoint. So whenever a CSP error occurs it can be reported to that HTTPS URL, very handy to help debug issues.
So if you configure your report_uri to be the same URL as your Extension Test rig, but with /csp/ on the end, so if your rig is at https://mytestrig.com/ then your CSP Report URI is https://mytestrig.com/csp/
You can capture and log these reports, for Express you will need to use the following code snippet, please note that a JSON payload is posted but using an alternative content-type, so you need to tell express.json to trigger on that content-type of application/csp-report
/*
This will capture any CSP Report and dump log it to console
*/
app.post('/csp/', express.json({
    type: 'application/csp-report'
}), (req,res) => {
    console.log(req.body);

    res.send('Ok');
});
Added a small update to this post for easier testing with, first I took the entire CSP component and seperated it into a NPM module for easier usage and configuration.
The module, `twitchextensioncsp` can be found over on NPM and on GitHub and essentially just wraps Helmet for you and passes in the CSP Configuration with much less copy/paste between extensions if you are working on multiples.
For “ease” of use heres an “quick” static Express Server implementing the module, it will do the following:
Create an Express Server on port 8050
Invoke twitchextensioncsp
Enable the Extension CSP to support the Twitch Extensions Rig
Add Img and Media and connect example domains
Static mount the build directory onto extension so your testing base URI is http://localhost:8050/extension/ swap as needed depending on your SSL solution
If you refer to the README for twitchextensioncsp there are a handful of quick start examples for the CSP setup. As you do need to explicitly declare the Twitch CDN and Twitch API if you wish to use those in your Extension frontend!
This will be the first post in a two/three parter on this extension since it also serves as a good example on how to utilise a number of Twitch and IGDB products/API’s to achieve the end solution! But today just an announcement post!
One of the features of the Dropped Frames Extension, that is used during Dropped Frames on itmeJP’s channel on Wednesday’s, is that I’ll push a Game Information box to the extension that shows information about the game the panel is talking about. That information box will collect information from the IGDB.com API and then present that information to the viewer. Heres a quick example screenshot for Mind Scanners:
Dropped Frames example of the IGDB.com information widget
You can see on the left the “box” with the cover art appears on the left over the Game name that is baked into the overlay and on user mouse over of the box the game information box is then displayed. Title, brief synopsis, cover art and store information are presented.
When I showed this off in the IGDB discord (prior to E3), I was asked, if this was a publicly available thing, and I replied, sorta but not really. Which then led me to go and create a seperate extension for anyone to use, during a smidge of down time I had recently!
So I present the IGDB.com Game Information Extension!
The first IGDB.com Game Information Extension screenshot
It is availble to both Twitch Mobile and Desktop users. On Desktop both Component and Panel are supported. I usually recommend the Component slot as it saves users having to scroll down, and it’s auto collapsed out of the way until a user clicks on the [IGDB] taskbar icon. And generally speaking most streamers have the Component slots free anyway. ITS FREE REAL ESTATE MAN!
The three views of the Extension. Information, Screenshots, Stores and Platforms.
Via the power of Twitch EventSub, it will even automatically self refresh if you change games during a stream and will gracefully fail back if you pick a game that is not on IGDB.com or a category that is not a game, such as Special Events or Just Chatting, it’ll just show the Twitch Box art/title instead.
Streamers will just need to link their Twitch accounts via the Extensions Configuration view, or the Extension Mini site, to enable auto updating!
Examples using Microsoft Flight Simulator, Elite Dangerous and the non game category Just Chatting.
To checkout the extension, or to see live streamers running the Extension, and to see the install instructions pop over to the mini site for the extension over at twitch.extensions.barrycarlyon.co.uk/igdb/ or visit the extension directly on Twitch.
The beauty of IGDB.com is that it POWERS Twitch’s categories and being crowd sourced, if the information is wrong, outdated or missing, anyone can submit a fix or change and await an IGDB Admin to accept the change.
This week we are actually going to write some code! Amazing I know! We’ll be using nodeJS and some basic shell scripting, here just for some simplicity.
First off apologies for being 3 days late on this entry in the series!
In Part 4 we wrote about the Twitch Developer Rig and what it can/can’t do. One of the useful thing’s it can do for you is “host your files” for you when your extension is in Local test.
The Hosting options in the Developer rig.
The Developer Rig, will either just “dumb serve” a folder of static files, or you can give it a full command to run, handy for WebPack/React/JS things that people need to pre-compile first.
But the big thing it won’t do is SSL Termination so whilst you can easily test your extension in the Rig, you won’t be able to easily test it on Twitch, which is the purpose of this little Dev Environment.
Personally at the moment I tend to write my Extensions in pure/vanilla JavaScript without libraries, since in most cases I’m just running a few fetch requests and drawing DOM elements, but the more interesting parts come with my compilation/bundling for hosting. The “rig” that I use is Developer Rig compatible since it is just a node command. But I’ve normally started it in a terminal as I’m testing on the actual Twitch website.
So what is the aim here?
To create a nodeJS Server that will
“static” host the HTML, JS and CSS for an extension,
do some clean up on JS/CSS, both for development and production,
work behind (a real) SSL for testing on the Twitch website (or rig)
be representative of Hosted test and above
What does that look like?
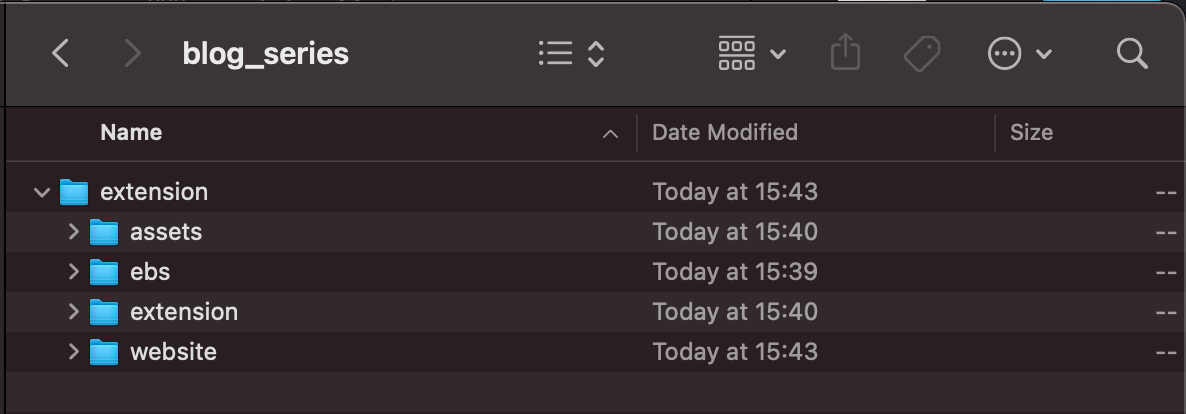
Well first we need to setup a bunch of folders, and we’ll set it up in a “nice” way for using Version control, some people may prefer to keep a separate repo for their EBS from their frontend for easier deploy. The choice is yours there! I use a mix, because being inconsistent is fun!
Proposed folder structure for your extension repository
assets – for storing your screenshots, discovery images, icons and other bits and pieces that live on “Version Details”
ebs – the folder for building you EBS in
website – the folder for building a website in if your Extension has/needs one, usually would include your Privacy Policy.
extension – this is where our extension actually lives and is the folder we’ll be poking about in today.
The Extension Folder
The Folders in the Extension Folder
assets – another assets folders? For storing any front end specific bits and pieces. You probably don’t need this.
build/release – build is where our “compiled” extension will sit
releases – I like to store my old/previous versions of the extension here for future reference
develop – the place we actually write our code
For Version Control, you would generally, touch build and release with a blank file (or .gitkeep if using Git) and then ignore those folders from version control.
We are going to be using the “static” part of NodeJS Express to serve the build folder, and use a super exciting bash script to populate the build folder from the develop folder.
Usually I’ll keep a dev folder in the develop folder, as I’ll keep the “pre-release” version of the extension in develop and the compiled/zip’ed version in releases.
The Bash Script though?
yeah, I use a bash script, it’s my preferred method, but anything it can do you can achieve in similar stuff such as WebPack, but you may want to run all sorts of things when you “deploy” you Extension Frontend during testing. And whilst I am considering other methods, I prefer the simple Bash script.
The Server
The server itself is relatively straight forward, you can refer to the Code on Github, but here is the key part we are interested in
const listen = 8050;

const express = require('express');
const app = express();

/*
Setup Express to Listen on a Port
*/
app.listen(listen, function () {
console.log('booted express on', listen);
})

/*
Setup a "Log" Event for file loading.
So you can see what is trying to be loaded
*/
app.use(function(req, res, next) {
console.log('received from', req.get('X-Forwarded-For'), ':', req.method, req.originalUrl);
next();
});
/*
Setup express Static to server those files
*/
app.use('/extension/', express.static(__dirname + '/build/'));
This will raise an express static server on port 8050, and then prepare to host the contents of build on the route extension.
So this will give us a URL of http://127.0.0.1/extension/ and if you remember in Part 3, we wrote about the structure of a URL of a Hosted test/Live extension being https://ClientID.ext-twitch.tv/ClientID/md5/yourHTML instantly our Development Environment is closer to the Production Environment.
To further this, I like to put my views into different folders. So the viewer will be in panel or video and if I offer both I’ll have both. The Config will be in config or something random for extra security on private Extensions. And Mobile in mobile if I need to serve different JS to the user.
Which then makes it even easier or a developer to remember to use relative links to their CSS/JS from the HTML, since my views are in sub folders, and the whole Dev Server is serving from a sub folder.
But what about the rest of the file? That is a basic Folder watcher, using Chokiar, that will watch for any change in the develop/dev directly and then run script.sh
This script will
dump the current contents of build,
copy the folder structure
copy over any “common” assets in the assets folder (background images/icons for example)
copy over each HTML file, in some cases run a minify process
compile each JS file and CSS file together into one file and run it thru minifies (but not mangles*)
*Twitch disallows manglification, except in some super limited cases
The script will call the NPM globally installed instances of:
html-minifier (not in this example but I use it on occasion)
uglify-es which provides uglifyjs
uglicfycss
I like to build different parts of my extensions into different script/css files and then use my develop/build process to combine them into one file. Here is FlightSimTrack’s current layout for example. Left being the built/compiled and right being the Development version.
FlightSimTracks structure
You can see how my many JS/CSS on the right are folded down into singular files. And make it easy to include CSS Resets/grid systems into each view when loading/merging those files from a common folder, which only exists on the right/develop side.
FlightSimTrack, for example, has a few parts, such as
the maps,
the player information
Twitch Auth and PubSub handler
Which I’ve split into three files for ease of reading and modification, you can use one mega JS file or whatever compilation method you want, or not at all an include many script files! You just need to avoid magnification.
The only difference between my script.sh and my build.sh is build will generally HTML Minify where script doesn’t and build will compile the JS and drop and console.log commands, they don’t work on a released extension (and are disallowed by policy), so you may as well drop them from the files to keep the file size down! Great for Mobile users.
Summary
This will then give us a Development server, running on a Sub Folder, with files similar to what you would use in production. So this should be analogous to the Production result for your Extension.
Just one more thing
We forgot one thing, what about SSL? Oh that old chestnut! The final piece of the puzzle for if you want to test your Extension more realistically on the Twitch Website, rather than in the rig (where SSL is not required)!
There are two easy ways to provide SSL Termination, both have their nuances but I prefer the second.
Method 1
NGROK, is a Free (or paid for product), that will create a temporary public URL to a running service on your machine.
So in this example you’d just do ./ngrok http 8050 and then the UI will display a URL to copy/paste into the Twitch Developer Console for your “Testing Base URI” just remember to add /extension/ to the end, since that is the mount point for your build. And now you have SSL Termination!
The Dev Console configured with a NGROK URL
NGROK may have some other funnies such as rate limits, but for current limits please refer to their website and pricing structures.
Method 2
This is my preferred method, instead of using NGROK (or paying for a constant URL with NGROK).
I use a reverse SSH Tunnel, and get NGINX on a server to handle SSL Termination with a “real” free from LetsEncrypt Certificate.
Setup is the same on the user side, instead of running ngrok I ssh -R 8050:127.0.0.1:8050 username@example.com
This means I never have to update the Developer Console with a new URL, and for testing purposes all my Extensions use the Same URL. I just change the server running at the end of the tunnel. And if I start work on a new extension, I can use the exact same hosting settings.
NGINX is configured to do the normal SSL Termination stuff, then I just proxypass. Here is a config example from my live server that handles my Extension hosting.
I’ll usually use a second port/SSH tunnel/SSL’ed domain to talk to my EBS running locally. And my script.sh/build.sh can be configured to use different EBS URL’s in the fetch commands you may do. One less thing to forget to swap when building for release/review queuing.
Summary, for real
That is it for this weeks post, you can have a poke about in the GitHub Repository at BarryCarlyon/twitch_extension_blog_series both for the Server.js and script files and the folder structure.
Now you should be able to setup a local test server, that is similar in URL structure to a released Twitch Extension, and provide SSL to that test server, so you can test the Extension on Twitch, OR in the Rig, two of the most common pitfalls Developers face when starting to build extensions.
BUT MOTHER I CRAVE VIOLENCE
Well, until I write the next part if you want to read more about the Developer Side of Extensions, you can pop a visit over the to the Documentation or take a look at Twitch’s Introductory Page and you can always join us on the “TwitchDev Discord Server”, visit the Developer Support Page for the current invite link!