In part 5 we wrote about a suitable testing platform for building your extensions on, essentially we create a static content server, that mimics the Twitch CDN for testing with.
Twitch Announced on the Forums that they are revising the CSP (Content Security Policy) that extensions use to protect and control what can be loaded. I wrote about this in the previous blog post.
I’m currently waiting on a response from Twitch (via the forums) about any other changes to the CSP, but for now, you can test the changes today!
What Even is CSP
First lets do a quick explanation of what CSP, CSP is Content Security Policy, a browser technology to help control what a given Website can load and what browser functions are allowed.
The HTTP
https://developer.mozilla.org/en-US/docs/Web/HTTP/Headers/Content-Security-PolicyContent-Security-Policyresponse header allows web site administrators to control resources the user agent is allowed to load for a given page. With a few exceptions, policies mostly involve specifying server origins and script endpoints. This helps guard against cross-site scripting attacks (Cross-site_scripting).
You can read more about CSP and the various things it can do over on the MDN Web Docs. There is a lot more that can and can’t be done with CSP more than just controlling what content can be loaded from where, but for Twitch Extensions we only need to consider the parts of the Policy that affect Twitch Extensions.
Twitch Extension CSP Policy
Twitch is requiring Extension developer to declare the Connect, Img, and Media domains, which in the policy are connect-src, img-src and media-src. You can declare this in the Developer Console for a version of your extension, under the Capabilities tab.
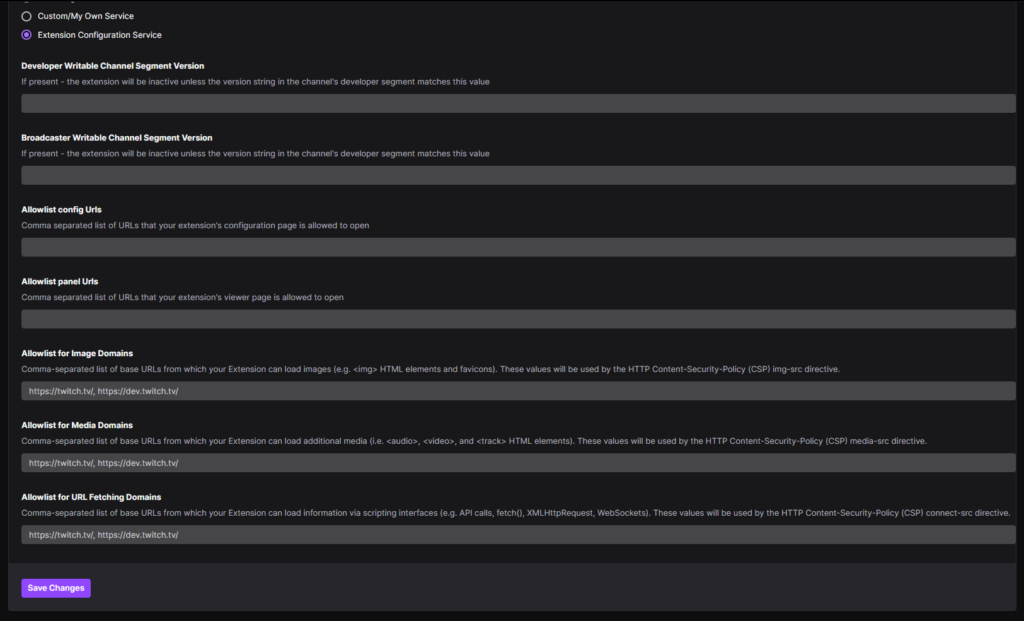
Now, the items you enter here only apply when you are using Hosted Test (or release), since Hosted Test will use Twitch’s CDN, and thus Twitch’s Server which can load and use the relevant fields, but in localtesting (aka not the CDN) we need to set this up ourselves.
Local Testing a CSP
If you have been following this series, then you already have a Node/Express server that will run a static output for you. We can easily add CSP headers to this server using a module called Helmet, generally speaking it’s wise to consider adding helmet (or CSP Headers in general) to any website you run to protect your users, but I digress!
So, how to set this up for Testing with.
Normally I’d say, on server start call the API to get the current extension settings from the console, however, the API at this time has not been updated to include the new fields, I raised a UserVoice requesting the new fields be added to the endpoints. And you can upvote that here.
So for now, we’ll need to populate the CSP for Helmet manually.
Configuring Helmet for CSP
The first thing I did was look at a released extension to see what the current CSP is, which I then split out into a object for configuring Helmet with. Then I looked at what the rig needs, and then looked at what you need to add to correctly simulate a CSP.
The base CSP for a Twitch Extension is, here twitch.client_id is loaded from an external config file, and represents the location that Hosted Test and Release use to host your files. Which I’ll touch on later.
/*
Current base CSP rules subject to change

See:
https://discuss.dev.twitch.tv/t/new-extensions-policy-for-content-security-policy-csp-directives-and-timeline-for-enforcement/33695/2

This example is based off a live extension
*/

let contentSecurityPolicy = {
    directives: {
        defaultSrc: [
            "'self'",
            `https://${twitch.client_id}.ext-twitch.tv`
        ],
        connectSrc: [
            "'self'",
            `https://${twitch.client_id}.ext-twitch.tv`,
            'https://extension-files.twitch.tv',
            'https://www.google-analytics.com',
            'https://stats.g.doubleclick.net'
        ],
        fontSrc:    [
            "'self'",
            `https://${twitch.client_id}.ext-twitch.tv`,
            'https://fonts.googleapis.com',
            'https://fonts.gstatic.com'
        ],
        imgSrc:     [
            "'self'",
            'data:',
            'blob:'
        ],
        mediaSrc:   [
            "'self'",
            'data:',
            'blob:'
        ],
        scriptSrc:  [
            "'self'",
            `https://${twitch.client_id}.ext-twitch.tv`,
            'https://extension-files.twitch.tv',
            'https://www.google-analytics.com',
            'https://stats.g.doubleclick.net'
        ],
        styleSrc:   [
            "'self'",
            "'unsafe-inline'",
            `https://${twitch.client_id}.ext-twitch.tv`,
            'https://fonts.googleapis.com'
        ],

        frameAncestors: [
            'https://supervisor.ext-twitch.tv',
            'https://extension-files.twitch.tv',
            'https://*.twitch.tv',
            'https://*.twitch.tech',
            'https://localhost.twitch.tv:*',
            'https://localhost.twitch.tech:*',
            'http://localhost.rig.twitch.tv:*'
        ]
    }
}

const helmet = require('helmet');
/*
You can use Security Headers to test your server, if this server is web accessible
https://securityheaders.com/
It'll test that your CSP is valid.
Best testing done with an extension, on Twitch or in the rig!
*/

console.log('Going to use the following CSP', contentSecurityPolicy);

app.use(helmet({
    contentSecurityPolicy
}));
This I add after app.listen and before anything else! It does need to go before your app.use for express.static
This will configure your test server to use the base/default CSP. And will log it out the full CSP to the console when you start the server.
The Extension Developer Rig
So the next step is how to enable your test server to work in the Twitch Extension Developer Rig. I don’t often use the rig, but it’s handy for spot testing views and mobile when I don’t have my phone handy (or the Extension has not been iOS allow listed yet!)
The Extension Rig is built in Electron, which means it will include calls to file and in testing it spot calls some other things.
For the rig I add the following rules, which I append to the default CSP using a Config Switch.
/*
should we enable the Rig?

The rig being an electron app, will call some other things
As well as having a file:// based parent
*/
if (csp_options.enable_rig) {
    let rig_sources = {
        connectSrc: [
            'wss://pubsub-edge.twitch.tv'
        ],
        frameAncestors: [
            'http://localhost:*',
            'file://*',
            'filesystem:'
        ]
    }

    // append these to the CSP
    for (let sourceType in rig_sources) {
        for (let x=0;x<rig_sources[sourceType].length;x++) {
            contentSecurityPolicy.directives[sourceType].push(rig_sources[sourceType][x]);
        }
    }
}
Nothing to silly there, but important if you are testing in the rig. Only enable this in your server when rig testing not testing on the Twitch website, as it’s overly permissive and might catch you out later.
My Sources
The final thing to do is to setup your sources, now this gets a little weird, as a valid CSP rule can omit the schema of the URL (see note).
For this example/setup we are adding the content domains to all three CSP directives. Using this example you can adjust and modify this as granularly as you want.
/*
Did we configure places that we can/may load media from
And yes we are just gonna glob them to all three groups
For example purposes
*/
csp_options.content_domains.forEach(domain => {
    contentSecurityPolicy.directives.imgSrc.push(domain);
    contentSecurityPolicy.directives.mediaSrc.push(domain);
    contentSecurityPolicy.directives.connectSrc.push(domain);
});
Note: In testing browsers will not enable/allow WSS if you declare a schema-less domain of www.example.com. So if you want WSS you need to declare it explicitly, for this I declare wss://www.example.com and https://www.example.com in the rule (not the lack of a trailing /).
I configure these schema+domains in an external configuration file for the server. Here is an example config.json:
{
    "listen": 8050,

    "csp_options": {
        "enable_rig": true,
        "report_uri": false,
        "ebs_domain": "myebs.com",
        "content_domains": [
            "https://mywebsite.com",
            "wss://mywebsite.com"
        ]
    },

    "twitch": {
        "client_id": "abcdefg"
    }
}
EBS?
If your extension utilizes an EBS you’ll need to declare that and add it to your connect-src, however if you also load images from your EBS you can skip this step.
I generally put my images and assets on a seperate server to my EBS, but for test purposes, this server example adds the EBS domain to all three declarations, for both schemas:
/*
Did we configure an EBS to call
*/
if (csp_options.ebs_domain) {
    console.log('Appending EBS Domain');
    let ebs_rules = {
        imgSrc: [
            'https://' + csp_options.ebs_domain,
            'wss://' + csp_options.ebs_domain
        ],
        mediaSrc: [
            'https://' + csp_options.ebs_domain,
            'wss://' + csp_options.ebs_domain
        ],
        connectSrc: [
            'https://' + csp_options.ebs_domain,
            'wss://' + csp_options.ebs_domain
        ]
    }

    for (let sourceType in ebs_rules) {
        for (let x=0;x<ebs_rules[sourceType].length;x++) {
            contentSecurityPolicy.directives[sourceType].push(ebs_rules[sourceType][x]);
        }
    }
}
Full Example!
I put all of this together as a full example over on my GitHub. See Part 6 of the repository. This provides a “rig” as described in Part 5 but with the additional CSP Fields included.
To set this up do as follows
- Download the Example from GitHub
- Copy
config_sample.jsontoconfig.json - Populate the twitch->client_id with your Extension Client ID
- Revise the listen port if needed
- Configure Your CSP options as needed, add the content domains as needed. And you EBS domain as needed.
- If you load content from your EBS domain, set the
ebs_domaintofalse, to avoid a duplicate declaration of a domain, or do not include yourebs_domainin yourcontent_domains
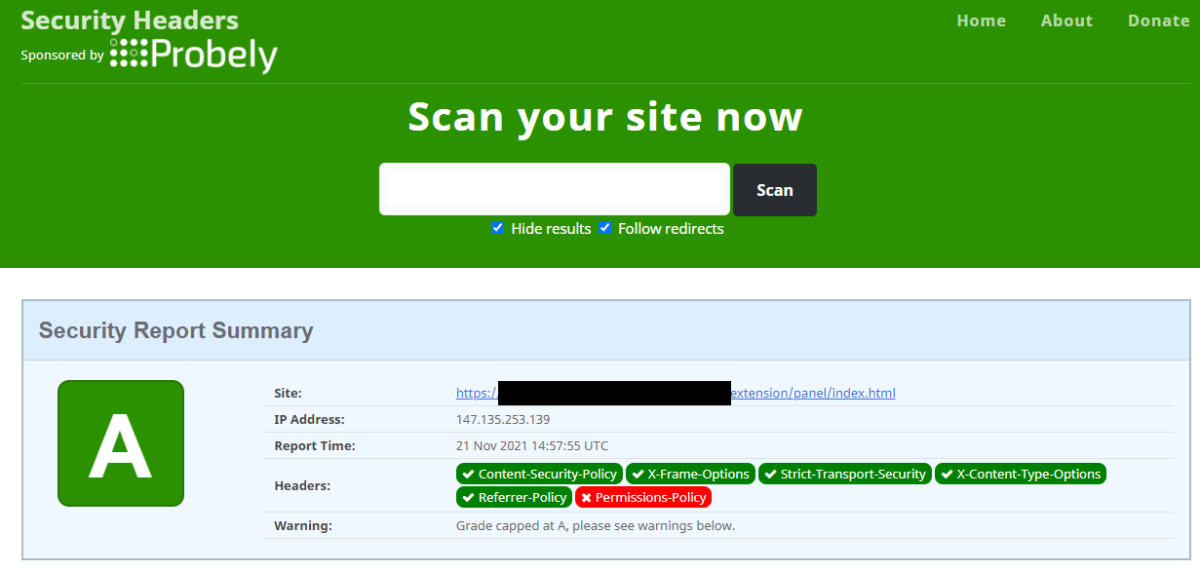
Once you have setup the server, you can the test your Rig via Security Headers which will test that your CSP is valid, however this only works if your Test Server is accessible from the internet! Which if you follow Part 5’s note will be for SSL testing purposes! And will only test that your CSP looks correct, not that it functions as intended!
Then you can move on to testing your Extension and check that your CSP works as intended, then you do not have to move to hosted test and back to test changes to your CSP!
If/when the API is updated to return the new fields, I’ll add a part 6.5 (probably) which will use the API to get the details instead. Sods law you’ll add a domain to your Test Rig/Server, and then forget to add the same domain to your Capabilities tab!
DEADLINE
Twitch will begin to Enforce the new CSP policy on January 25th.
Twitch closes for the holidays between Friday, 12/17/21 – Monday, 1/3/22. Twitch requests that Developers submit their extensions for review no later than Wednesday, 15th of December at 3PM PST.
Upcoming Winter Break
From the Twitch Developers Console
Attention, developers! Please note that the review team will be observing a winter holiday break from Friday, 12/17/21 – Monday, 1/3/22 and will not be performing Organization, Game, Chatbot Verification, or Extension reviews during this period of time. If you need a review completed prior to the holiday break, please submit your review request by no later than Wednesday, 12/15 at 3PM PST. Thank you for your understanding & happy holidays!
ONE MORE THING: Report URI
Well what about the report_uri, that you saw in the config.json example?
Well CSP provides a method to report CSP errors to a defined HTTPS POST endpoint. So whenever a CSP error occurs it can be reported to that HTTPS URL, very handy to help debug issues.
So if you configure your report_uri to be the same URL as your Extension Test rig, but with /csp/ on the end, so if your rig is at https://mytestrig.com/ then your CSP Report URI is https://mytestrig.com/csp/
You can capture and log these reports, for Express you will need to use the following code snippet, please note that a JSON payload is posted but using an alternative content-type, so you need to tell express.json to trigger on that content-type of application/csp-report
/*
This will capture any CSP Report and dump log it to console
*/
app.post('/csp/', express.json({
    type: 'application/csp-report'
}), (req,res) => {
    console.log(req.body);

    res.send('Ok');
});
The report-uri documentation over on MDN includes a PHP example, if that is your cup of tea!
An Update! Easier Development!
Added a small update to this post for easier testing with, first I took the entire CSP component and seperated it into a NPM module for easier usage and configuration.
The module, `twitchextensioncsp` can be found over on NPM and on GitHub and essentially just wraps Helmet for you and passes in the CSP Configuration with much less copy/paste between extensions if you are working on multiples.
And the Example simple server (remove the “build” system) is at Part 6.5 on the GitHub Repository
For “ease” of use heres an “quick” static Express Server implementing the module, it will do the following:
- Create an Express Server on port 8050
- Invoke
twitchextensioncsp - Enable the Extension CSP to support the Twitch Extensions Rig
- Add Img and Media and connect example domains
- Static mount the
builddirectory ontoextensionso your testing base URI ishttp://localhost:8050/extension/swap as needed depending on your SSL solution
const express = require('express');
const app = express();

app.listen(8050, function () {
    console.log('booted express on 8050');
});

const twitchextensioncsp = require('twitchextensioncsp');
app.use(twitchextensioncsp({
    clientID: 'abcdefg123456'
    enableRig: true,
    imgSrc: [
        'https://images.example.com'
    ],
    mediaSrc: [
        'https://videos.example.com'
    ],
    connectSrc: [
        'https://api.example.com'
    ]
}));

app.use('/extension/', express.static(__dirname + '/build/'));
If you refer to the README for twitchextensioncsp there are a handful of quick start examples for the CSP setup. As you do need to explicitly declare the Twitch CDN and Twitch API if you wish to use those in your Extension frontend!
