This week we are actually going to write some code! Amazing I know! We’ll be using nodeJS and some basic shell scripting, here just for some simplicity.
First off apologies for being 3 days late on this entry in the series!
In Part 4 we wrote about the Twitch Developer Rig and what it can/can’t do. One of the useful thing’s it can do for you is “host your files” for you when your extension is in Local test.

The Developer Rig, will either just “dumb serve” a folder of static files, or you can give it a full command to run, handy for WebPack/React/JS things that people need to pre-compile first.
But the big thing it won’t do is SSL Termination so whilst you can easily test your extension in the Rig, you won’t be able to easily test it on Twitch, which is the purpose of this little Dev Environment.
Personally at the moment I tend to write my Extensions in pure/vanilla JavaScript without libraries, since in most cases I’m just running a few fetch requests and drawing DOM elements, but the more interesting parts come with my compilation/bundling for hosting. The “rig” that I use is Developer Rig compatible since it is just a node command. But I’ve normally started it in a terminal as I’m testing on the actual Twitch website.
So what is the aim here?
To create a nodeJS Server that will
- “static” host the HTML, JS and CSS for an extension,
- do some clean up on JS/CSS, both for development and production,
- work behind (a real) SSL for testing on the Twitch website (or rig)
- be representative of Hosted test and above
What does that look like?
Well first we need to setup a bunch of folders, and we’ll set it up in a “nice” way for using Version control, some people may prefer to keep a separate repo for their EBS from their frontend for easier deploy. The choice is yours there! I use a mix, because being inconsistent is fun!
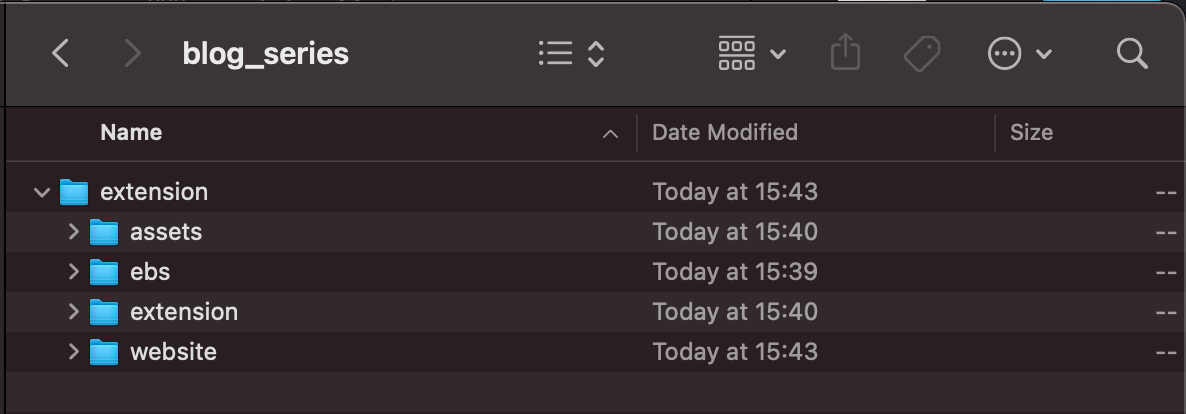
assets – for storing your screenshots, discovery images, icons and other bits and pieces that live on “Version Details”
ebs – the folder for building you EBS in
website – the folder for building a website in if your Extension has/needs one, usually would include your Privacy Policy.
extension – this is where our extension actually lives and is the folder we’ll be poking about in today.
The Extension Folder

assets – another assets folders? For storing any front end specific bits and pieces. You probably don’t need this.
build/release – build is where our “compiled” extension will sit
releases – I like to store my old/previous versions of the extension here for future reference
develop – the place we actually write our code
For Version Control, you would generally, touch build and release with a blank file (or .gitkeep if using Git) and then ignore those folders from version control.
We are going to be using the “static” part of NodeJS Express to serve the build folder, and use a super exciting bash script to populate the build folder from the develop folder.
Usually I’ll keep a dev folder in the develop folder, as I’ll keep the “pre-release” version of the extension in develop and the compiled/zip’ed version in releases.
The Bash Script though?
yeah, I use a bash script, it’s my preferred method, but anything it can do you can achieve in similar stuff such as WebPack, but you may want to run all sorts of things when you “deploy” you Extension Frontend during testing. And whilst I am considering other methods, I prefer the simple Bash script.
The Server
The server itself is relatively straight forward, you can refer to the Code on Github, but here is the key part we are interested in
const listen = 8050;

const express = require('express');
const app = express();

/*
Setup Express to Listen on a Port
*/
app.listen(listen, function () {
console.log('booted express on', listen);
})

/*
Setup a "Log" Event for file loading.
So you can see what is trying to be loaded
*/
app.use(function(req, res, next) {
console.log('received from', req.get('X-Forwarded-For'), ':', req.method, req.originalUrl);
next();
});
/*
Setup express Static to server those files
*/
app.use('/extension/', express.static(__dirname + '/build/'));
This will raise an express static server on port 8050, and then prepare to host the contents of build on the route extension.
So this will give us a URL of http://127.0.0.1/extension/ and if you remember in Part 3, we wrote about the structure of a URL of a Hosted test/Live extension being https://ClientID.ext-twitch.tv/ClientID/md5/yourHTML instantly our Development Environment is closer to the Production Environment.
To further this, I like to put my views into different folders. So the viewer will be in panel or video and if I offer both I’ll have both. The Config will be in config or something random for extra security on private Extensions. And Mobile in mobile if I need to serve different JS to the user.
Which then makes it even easier or a developer to remember to use relative links to their CSS/JS from the HTML, since my views are in sub folders, and the whole Dev Server is serving from a sub folder.
But what about the rest of the file? That is a basic Folder watcher, using Chokiar, that will watch for any change in the develop/dev directly and then run script.sh
This script will
- dump the current contents of build,
- copy the folder structure
- copy over any “common” assets in the assets folder (background images/icons for example)
- copy over each HTML file, in some cases run a minify process
- compile each JS file and CSS file together into one file and run it thru minifies (but not mangles*)
*Twitch disallows manglification, except in some super limited cases
The script will call the NPM globally installed instances of:
html-minifier(not in this example but I use it on occasion)uglify-eswhich providesuglifyjsuglicfycss
I like to build different parts of my extensions into different script/css files and then use my develop/build process to combine them into one file. Here is FlightSimTrack’s current layout for example. Left being the built/compiled and right being the Development version.

You can see how my many JS/CSS on the right are folded down into singular files. And make it easy to include CSS Resets/grid systems into each view when loading/merging those files from a common folder, which only exists on the right/develop side.
FlightSimTrack, for example, has a few parts, such as
- the maps,
- the player information
- Twitch Auth and PubSub handler
Which I’ve split into three files for ease of reading and modification, you can use one mega JS file or whatever compilation method you want, or not at all an include many script files! You just need to avoid magnification.
The only difference between my script.sh and my build.sh is build will generally HTML Minify where script doesn’t and build will compile the JS and drop and console.log commands, they don’t work on a released extension (and are disallowed by policy), so you may as well drop them from the files to keep the file size down! Great for Mobile users.
Summary
This will then give us a Development server, running on a Sub Folder, with files similar to what you would use in production. So this should be analogous to the Production result for your Extension.
Just one more thing
We forgot one thing, what about SSL? Oh that old chestnut! The final piece of the puzzle for if you want to test your Extension more realistically on the Twitch Website, rather than in the rig (where SSL is not required)!
There are two easy ways to provide SSL Termination, both have their nuances but I prefer the second.
Method 1
NGROK, is a Free (or paid for product), that will create a temporary public URL to a running service on your machine.
So in this example you’d just do ./ngrok http 8050 and then the UI will display a URL to copy/paste into the Twitch Developer Console for your “Testing Base URI” just remember to add /extension/ to the end, since that is the mount point for your build. And now you have SSL Termination!

NGROK may have some other funnies such as rate limits, but for current limits please refer to their website and pricing structures.
Method 2
This is my preferred method, instead of using NGROK (or paying for a constant URL with NGROK).
I use a reverse SSH Tunnel, and get NGINX on a server to handle SSL Termination with a “real” free from LetsEncrypt Certificate.
Setup is the same on the user side, instead of running ngrok I ssh -R 8050:127.0.0.1:8050 username@example.com
This means I never have to update the Developer Console with a new URL, and for testing purposes all my Extensions use the Same URL. I just change the server running at the end of the tunnel. And if I start work on a new extension, I can use the exact same hosting settings.
NGINX is configured to do the normal SSL Termination stuff, then I just proxypass. Here is a config example from my live server that handles my Extension hosting.
server {
    listen someip:443;
    listen [::]:443;

    server_name example.com;

    ssl on;
    ssl_certificate /etc/letsencrypt/live/example.com/fullchain.pem;
    ssl_certificate_key /etc/letsencrypt/live/example.com/privkey.pem;

    include /etc/letsencrypt/options-ssl-nginx.conf;

    resolver_timeout 10s;

    ssl_dhparam /etc/nginx/dhparam.pem;

    location / {
        proxy_pass http://overssh8050;

           proxy_set_header Upgrade $http_upgrade;
           proxy_set_header Connection 'upgrade';
           proxy_set_header Host $host;
           proxy_cache_bypass $http_upgrade;
           proxy_redirect off;
           proxy_http_version 1.1;
           proxy_set_header Host $host;
           proxy_set_header X-Real-IP $remote_addr;
           proxy_set_header X-Forwarded-For $proxy_add_x_forwarded_for;
           proxy_set_header X-Forwarded-Proto $scheme;
    }
}

upstream overssh8050 {
    server 127.0.0.1:8050;
    keepalive 8;
}
I’ll usually use a second port/SSH tunnel/SSL’ed domain to talk to my EBS running locally. And my script.sh/build.sh can be configured to use different EBS URL’s in the fetch commands you may do. One less thing to forget to swap when building for release/review queuing.
Summary, for real
That is it for this weeks post, you can have a poke about in the GitHub Repository at BarryCarlyon/twitch_extension_blog_series both for the Server.js and script files and the folder structure.
Now you should be able to setup a local test server, that is similar in URL structure to a released Twitch Extension, and provide SSL to that test server, so you can test the Extension on Twitch, OR in the Rig, two of the most common pitfalls Developers face when starting to build extensions.
BUT MOTHER I CRAVE VIOLENCE
Well, until I write the next part if you want to read more about the Developer Side of Extensions, you can pop a visit over the to the Documentation or take a look at Twitch’s Introductory Page and you can always join us on the “TwitchDev Discord Server”, visit the Developer Support Page for the current invite link!
Why you think you are good enough to even write blog posts on Extensions? I made a one or two of them Extensions of various types.