Twitch Extensions Part 6 – Dev Environment Updates – Content Security Policy!

In part 5 we wrote about a suitable testing platform for building your extensions on, essentially we create a static content server, that mimics the Twitch CDN for testing with.

Twitch Announced on the Forums that they are revising the CSP (Content Security Policy) that extensions use to protect and control what can be loaded. I wrote about this in the previous blog post.

I’m currently waiting on a response from Twitch (via the forums) about any other changes to the CSP, but for now, you can test the changes today!

What Even is CSP

First lets do a quick explanation of what CSP, CSP is Content Security Policy, a browser technology to help control what a given Website can load and what browser functions are allowed.

The HTTP Content-Security-Policy response header allows web site administrators to control resources the user agent is allowed to load for a given page. With a few exceptions, policies mostly involve specifying server origins and script endpoints. This helps guard against cross-site scripting attacks (Cross-site_scripting).

https://developer.mozilla.org/en-US/docs/Web/HTTP/Headers/Content-Security-Policy

You can read more about CSP and the various things it can do over on the MDN Web Docs. There is a lot more that can and can’t be done with CSP more than just controlling what content can be loaded from where, but for Twitch Extensions we only need to consider the parts of the Policy that affect Twitch Extensions.

Twitch Extension CSP Policy

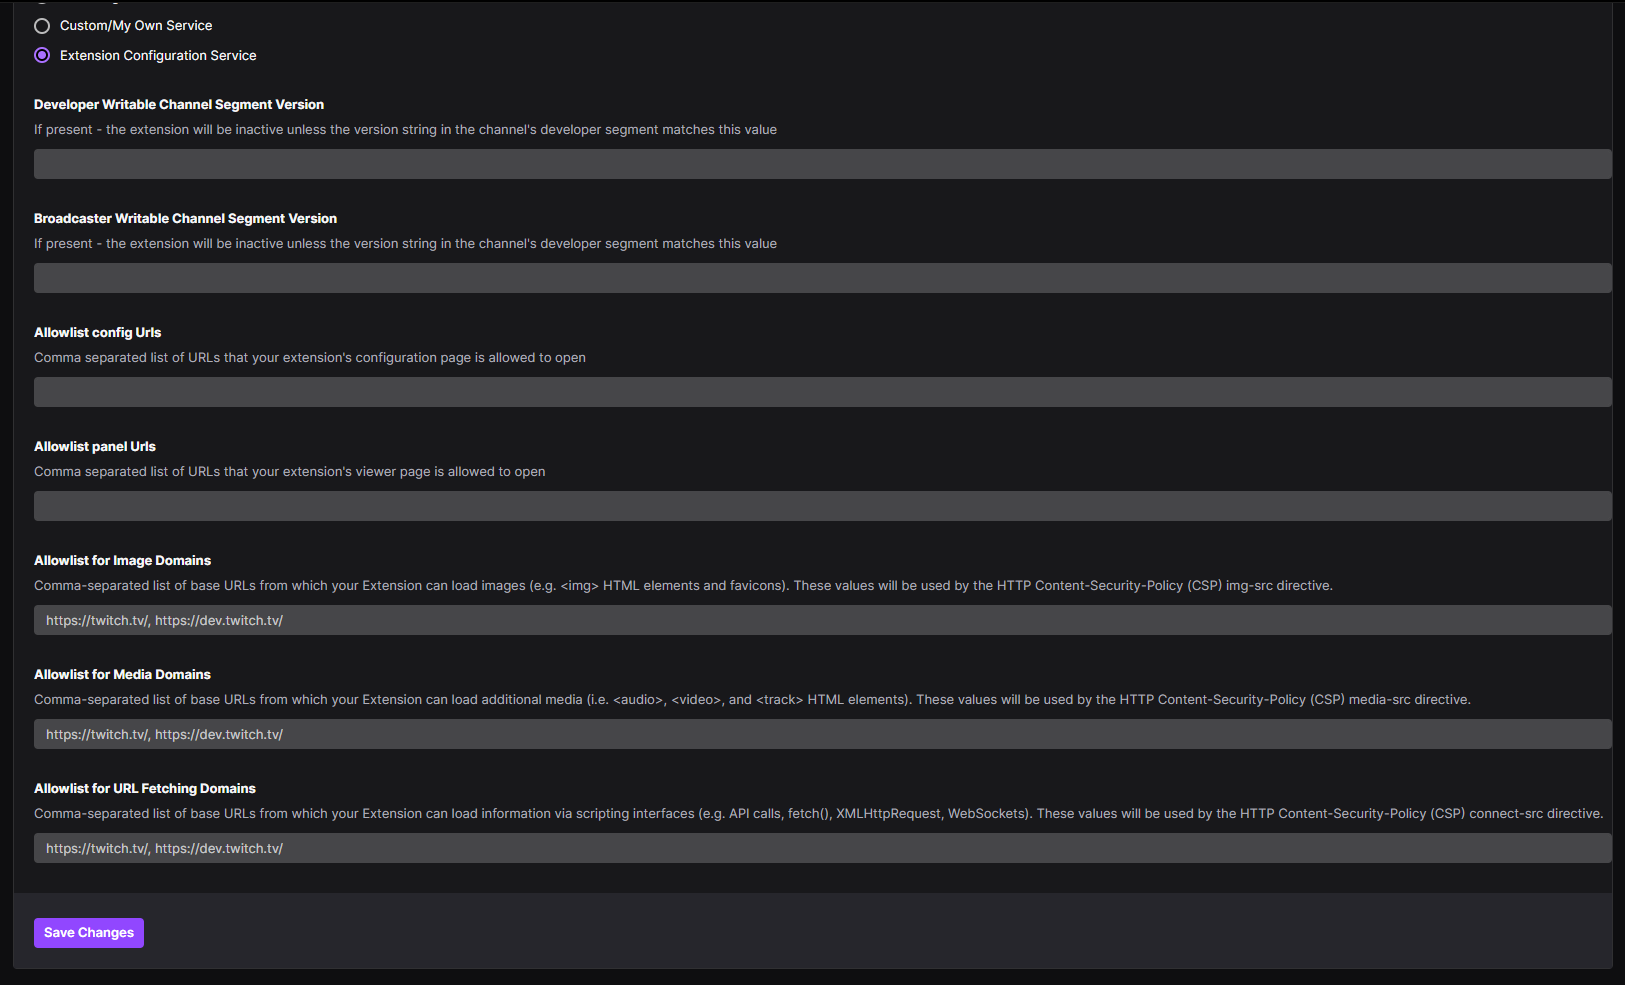
Twitch is requiring Extension developer to declare the Connect, Img, and Media domains, which in the policy are connect-src, img-src and media-src. You can declare this in the Developer Console for a version of your extension, under the Capabilities tab.

The New Extension Dashboard fields
The new Extension Dashboard fields

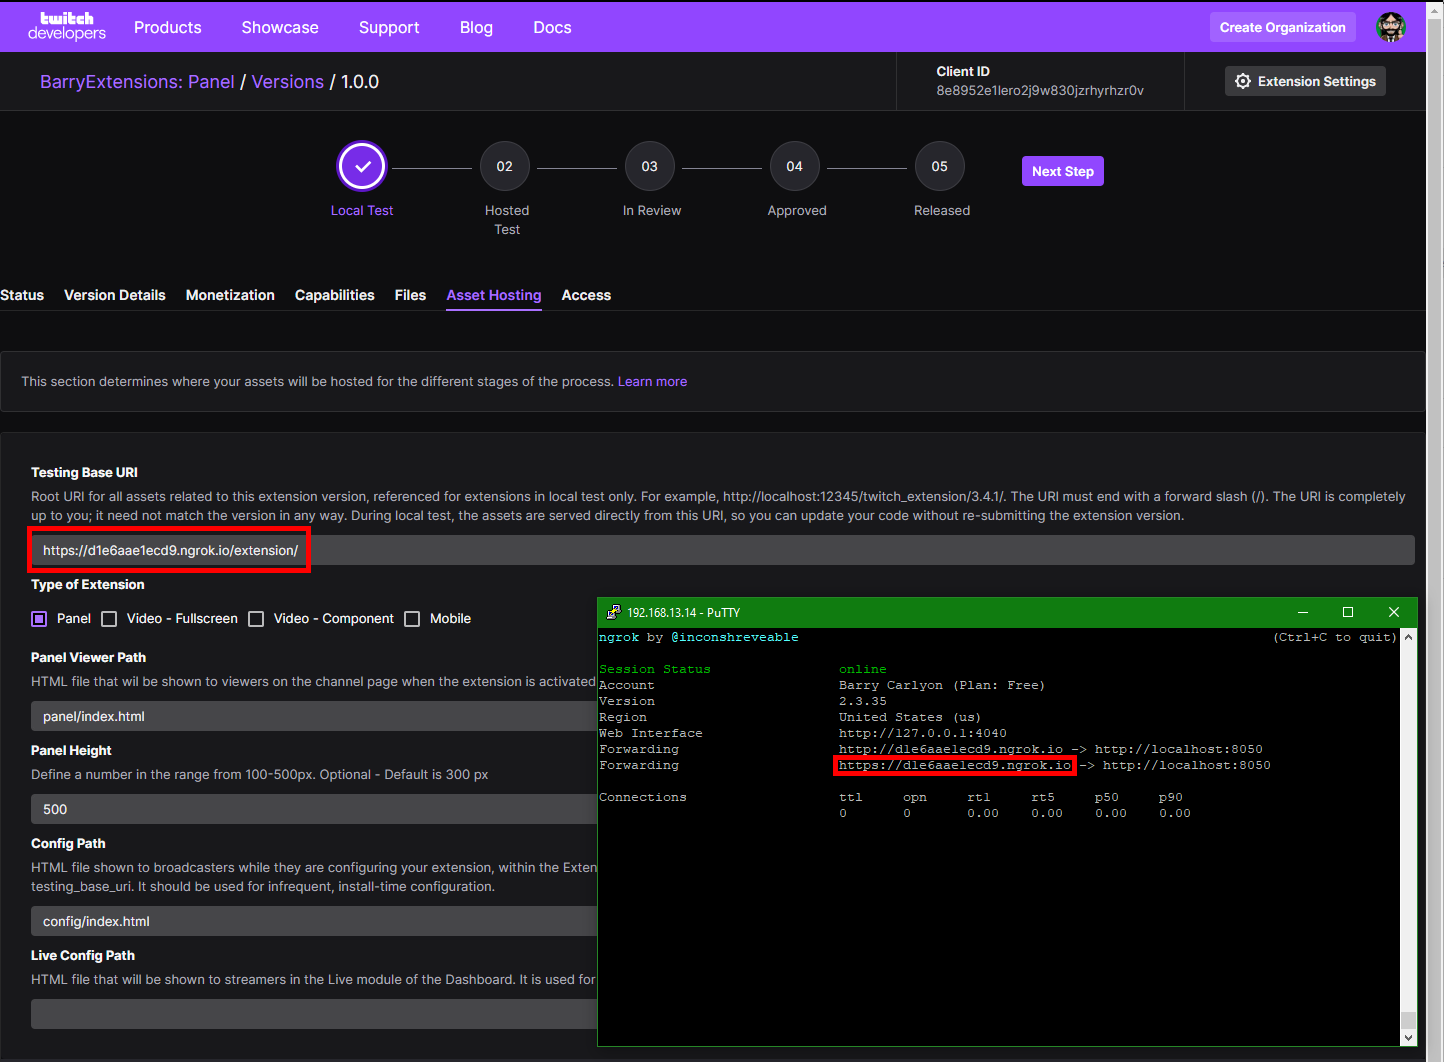
Now, the items you enter here only apply when you are using Hosted Test (or release), since Hosted Test will use Twitch’s CDN, and thus Twitch’s Server which can load and use the relevant fields, but in localtesting (aka not the CDN) we need to set this up ourselves.

Local Testing a CSP

If you have been following this series, then you already have a Node/Express server that will run a static output for you. We can easily add CSP headers to this server using a module called Helmet, generally speaking it’s wise to consider adding helmet (or CSP Headers in general) to any website you run to protect your users, but I digress!

So, how to set this up for Testing with.

Normally I’d say, on server start call the API to get the current extension settings from the console, however, the API at this time has not been updated to include the new fields, I raised a UserVoice requesting the new fields be added to the endpoints. And you can upvote that here.

So for now, we’ll need to populate the CSP for Helmet manually.

Configuring Helmet for CSP

The first thing I did was look at a released extension to see what the current CSP is, which I then split out into a object for configuring Helmet with. Then I looked at what the rig needs, and then looked at what you need to add to correctly simulate a CSP.

The base CSP for a Twitch Extension is, here twitch.client_id is loaded from an external config file, and represents the location that Hosted Test and Release use to host your files. Which I’ll touch on later.

/*
Current base CSP rules subject to change

See:
https://discuss.dev.twitch.tv/t/new-extensions-policy-for-content-security-policy-csp-directives-and-timeline-for-enforcement/33695/2

This example is based off a live extension
*/

let contentSecurityPolicy = {
    directives: {
        defaultSrc: [
            "'self'",
            `https://${twitch.client_id}.ext-twitch.tv`
        ],
        connectSrc: [
            "'self'",
            `https://${twitch.client_id}.ext-twitch.tv`,
            'https://extension-files.twitch.tv',
            'https://www.google-analytics.com',
            'https://stats.g.doubleclick.net'
        ],
        fontSrc:    [
            "'self'",
            `https://${twitch.client_id}.ext-twitch.tv`,
            'https://fonts.googleapis.com',
            'https://fonts.gstatic.com'
        ],
        imgSrc:     [
            "'self'",
            'data:',
            'blob:'
        ],
        mediaSrc:   [
            "'self'",
            'data:',
            'blob:'
        ],
        scriptSrc:  [
            "'self'",
            `https://${twitch.client_id}.ext-twitch.tv`,
            'https://extension-files.twitch.tv',
            'https://www.google-analytics.com',
            'https://stats.g.doubleclick.net'
        ],
        styleSrc:   [
            "'self'",
            "'unsafe-inline'",
            `https://${twitch.client_id}.ext-twitch.tv`,
            'https://fonts.googleapis.com'
        ],

        frameAncestors: [
            'https://supervisor.ext-twitch.tv',
            'https://extension-files.twitch.tv',
            'https://*.twitch.tv',
            'https://*.twitch.tech',
            'https://localhost.twitch.tv:*',
            'https://localhost.twitch.tech:*',
            'http://localhost.rig.twitch.tv:*'
        ]
    }
}

const helmet = require('helmet');
/*
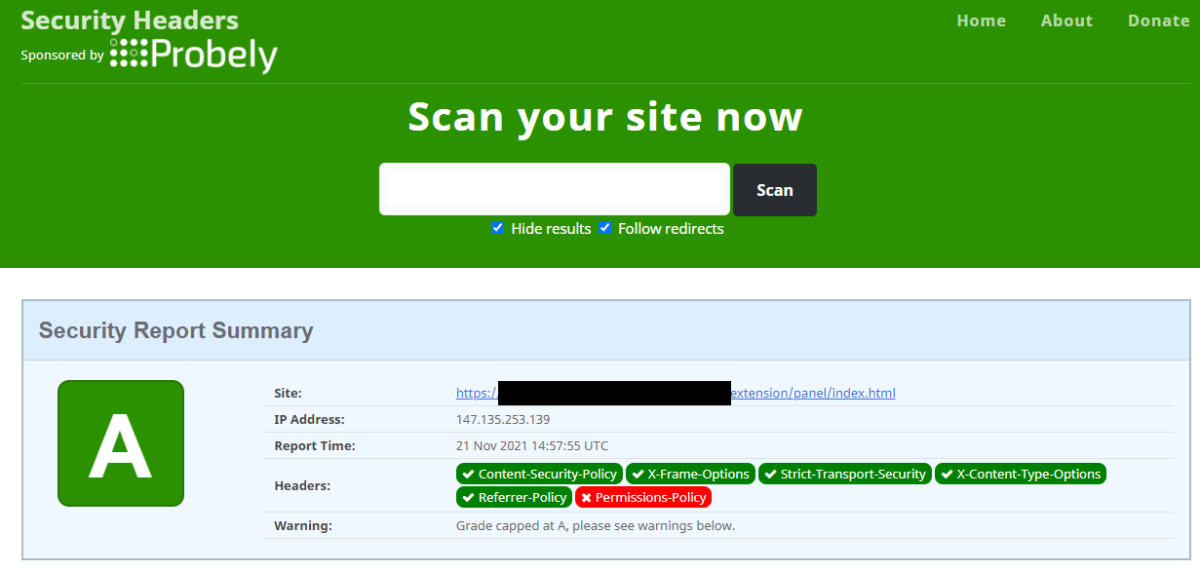
You can use Security Headers to test your server, if this server is web accessible
https://securityheaders.com/
It'll test that your CSP is valid.
Best testing done with an extension, on Twitch or in the rig!
*/

console.log('Going to use the following CSP', contentSecurityPolicy);

app.use(helmet({
    contentSecurityPolicy
}));

This I add after app.listen and before anything else! It does need to go before your app.use for express.static

This will configure your test server to use the base/default CSP. And will log it out the full CSP to the console when you start the server.

The Extension Developer Rig

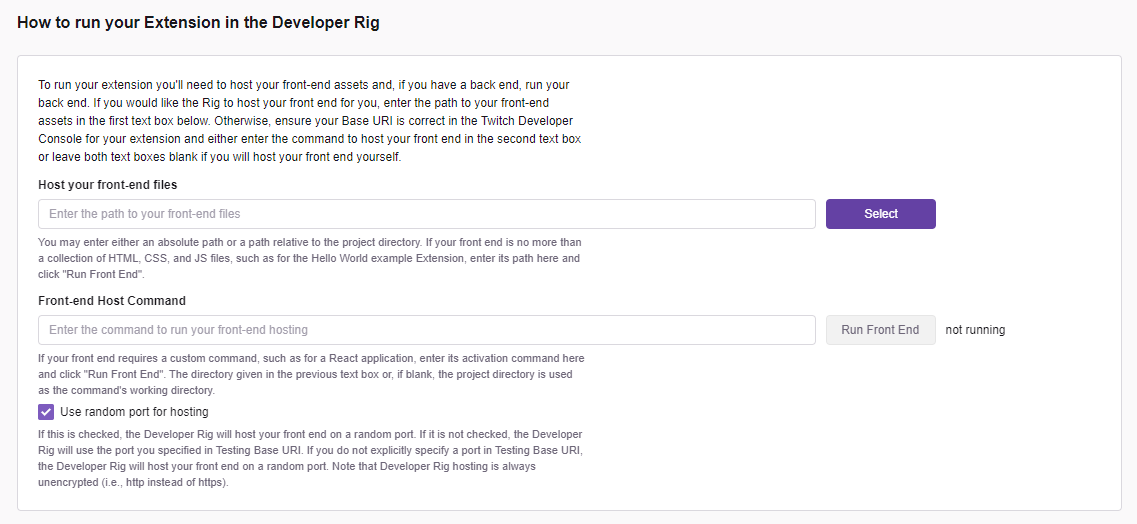
So the next step is how to enable your test server to work in the Twitch Extension Developer Rig. I don’t often use the rig, but it’s handy for spot testing views and mobile when I don’t have my phone handy (or the Extension has not been iOS allow listed yet!)

The Extension Rig is built in Electron, which means it will include calls to file and in testing it spot calls some other things.

For the rig I add the following rules, which I append to the default CSP using a Config Switch.

/*
should we enable the Rig?

The rig being an electron app, will call some other things
As well as having a file:// based parent
*/
if (csp_options.enable_rig) {
    let rig_sources = {
        connectSrc: [
            'wss://pubsub-edge.twitch.tv'
        ],
        frameAncestors: [
            'http://localhost:*',
            'file://*',
            'filesystem:'
        ]
    }

    // append these to the CSP
    for (let sourceType in rig_sources) {
        for (let x=0;x<rig_sources[sourceType].length;x++) {
            contentSecurityPolicy.directives[sourceType].push(rig_sources[sourceType][x]);
        }
    }
}

Nothing to silly there, but important if you are testing in the rig. Only enable this in your server when rig testing not testing on the Twitch website, as it’s overly permissive and might catch you out later.

My Sources

The final thing to do is to setup your sources, now this gets a little weird, as a valid CSP rule can omit the schema of the URL (see note).

For this example/setup we are adding the content domains to all three CSP directives. Using this example you can adjust and modify this as granularly as you want.

/*
Did we configure places that we can/may load media from
And yes we are just gonna glob them to all three groups
For example purposes
*/
csp_options.content_domains.forEach(domain => {
    contentSecurityPolicy.directives.imgSrc.push(domain);
    contentSecurityPolicy.directives.mediaSrc.push(domain);
    contentSecurityPolicy.directives.connectSrc.push(domain);
});

Note: In testing browsers will not enable/allow WSS if you declare a schema-less domain of www.example.com. So if you want WSS you need to declare it explicitly, for this I declare wss://www.example.com and https://www.example.com in the rule (not the lack of a trailing /).

I configure these schema+domains in an external configuration file for the server. Here is an example config.json:

{
    "listen": 8050,

    "csp_options": {
        "enable_rig": true,
        "report_uri": false,
        "ebs_domain": "myebs.com",
        "content_domains": [
            "https://mywebsite.com",
            "wss://mywebsite.com"
        ]
    },

    "twitch": {
        "client_id": "abcdefg"
    }
}

EBS?

If your extension utilizes an EBS you’ll need to declare that and add it to your connect-src, however if you also load images from your EBS you can skip this step.

I generally put my images and assets on a seperate server to my EBS, but for test purposes, this server example adds the EBS domain to all three declarations, for both schemas:

/*
Did we configure an EBS to call
*/
if (csp_options.ebs_domain) {
    console.log('Appending EBS Domain');
    let ebs_rules = {
        imgSrc: [
            'https://' + csp_options.ebs_domain,
            'wss://' + csp_options.ebs_domain
        ],
        mediaSrc: [
            'https://' + csp_options.ebs_domain,
            'wss://' + csp_options.ebs_domain
        ],
        connectSrc: [
            'https://' + csp_options.ebs_domain,
            'wss://' + csp_options.ebs_domain
        ]
    }

    for (let sourceType in ebs_rules) {
        for (let x=0;x<ebs_rules[sourceType].length;x++) {
            contentSecurityPolicy.directives[sourceType].push(ebs_rules[sourceType][x]);
        }
    }
}

Full Example!

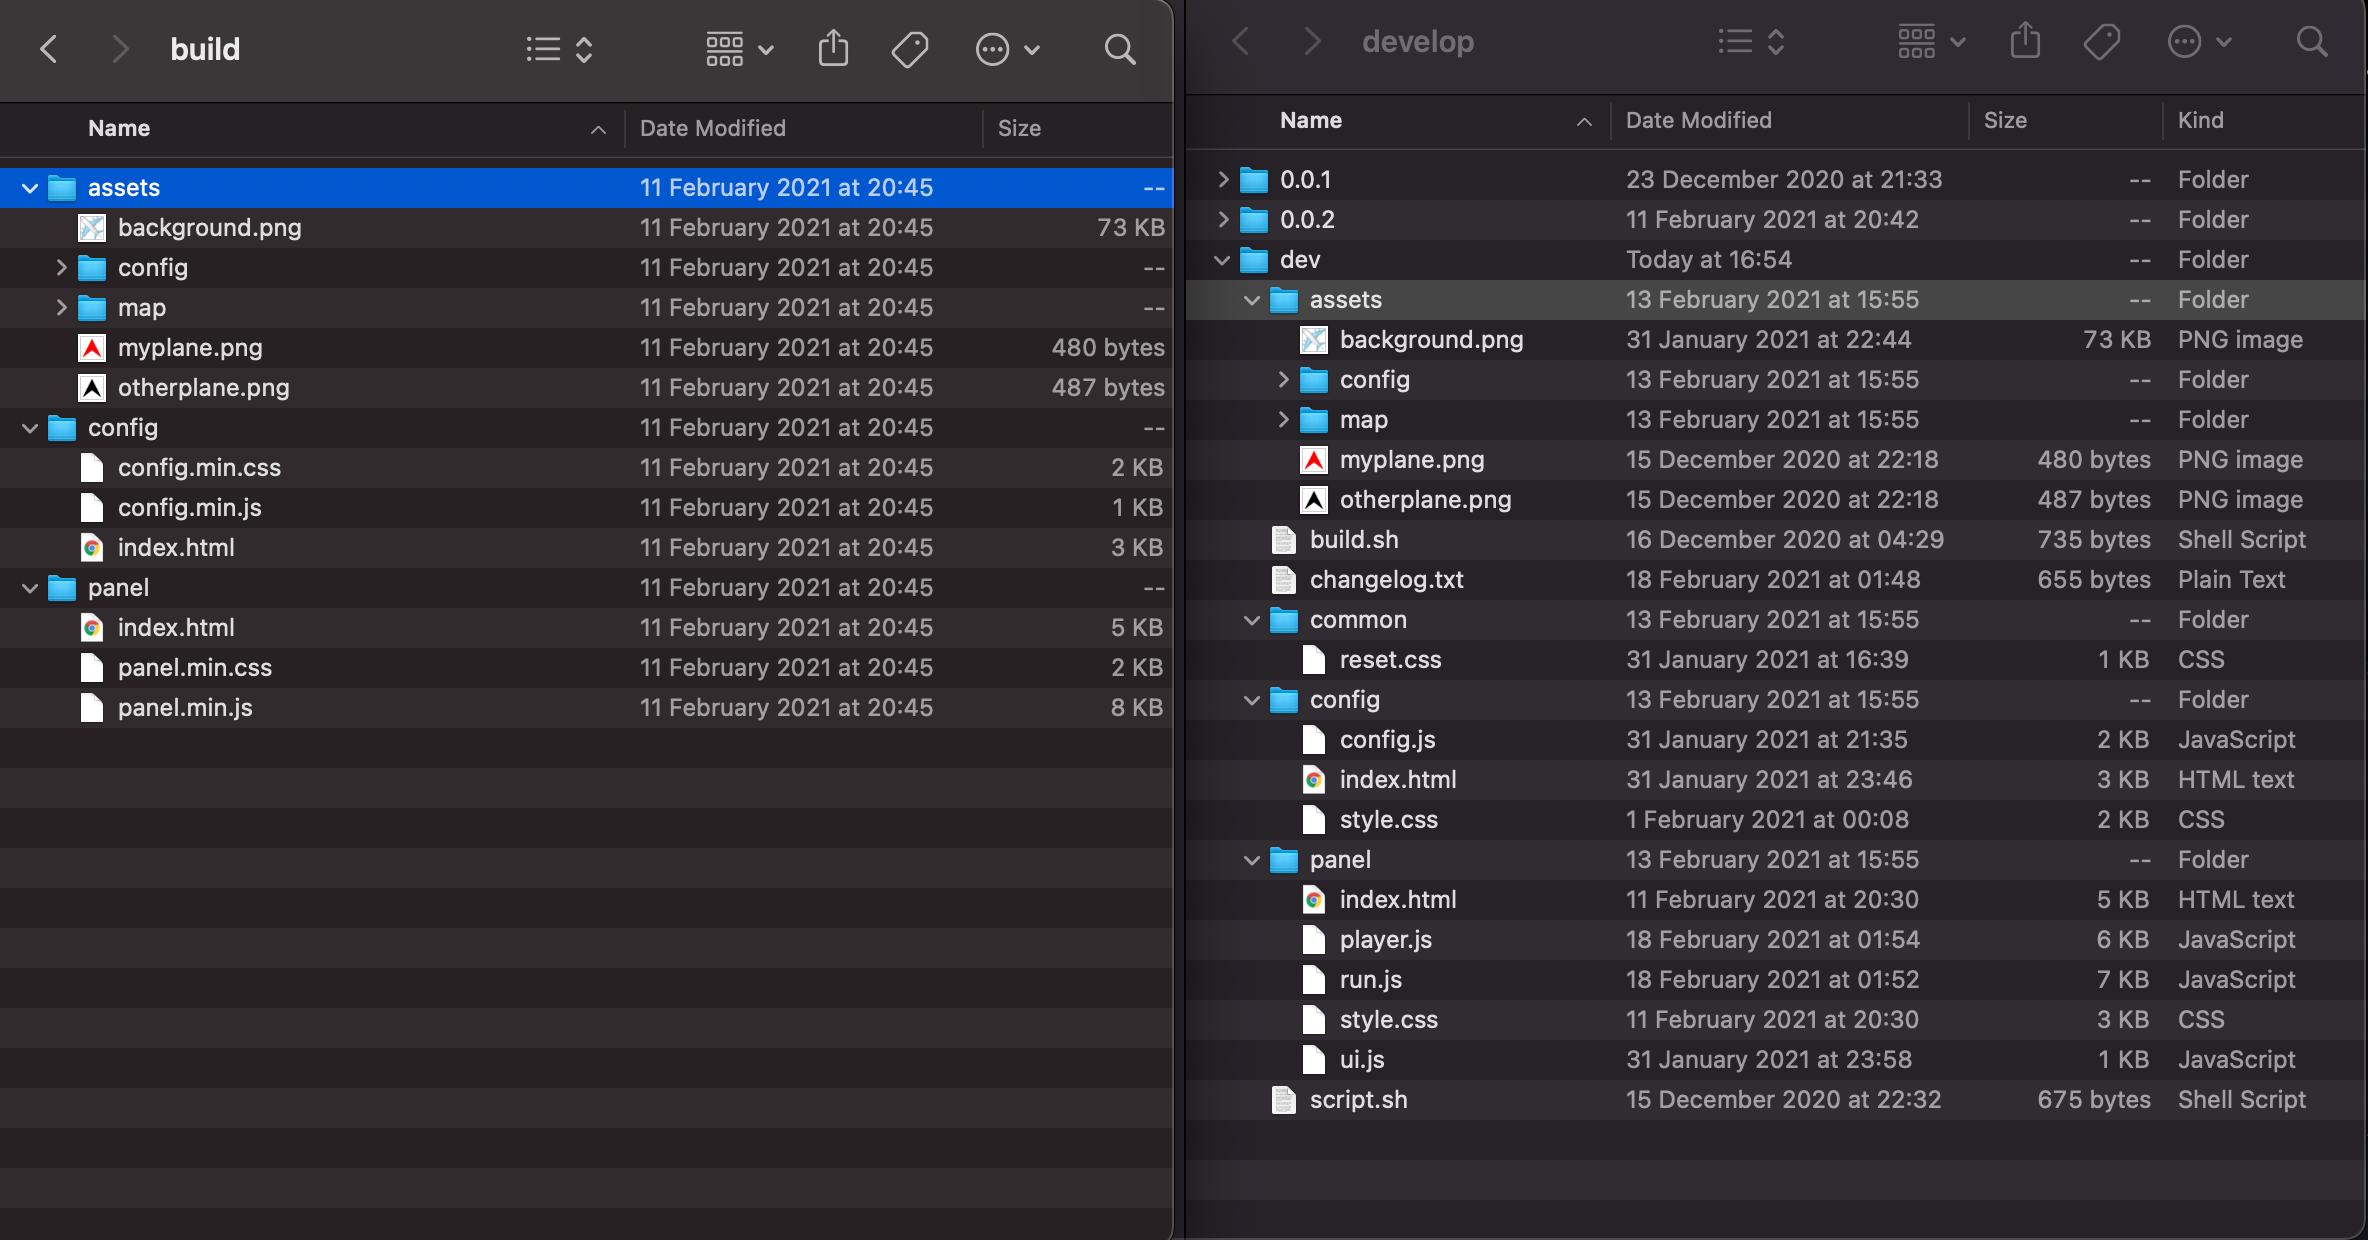
I put all of this together as a full example over on my GitHub. See Part 6 of the repository. This provides a “rig” as described in Part 5 but with the additional CSP Fields included.

To set this up do as follows

  • Download the Example from GitHub
  • Copy config_sample.json to config.json
  • Populate the twitch->client_id with your Extension Client ID
  • Revise the listen port if needed
  • Configure Your CSP options as needed, add the content domains as needed. And you EBS domain as needed.
  • If you load content from your EBS domain, set the ebs_domain to false, to avoid a duplicate declaration of a domain, or do not include your ebs_domain in your content_domains

Once you have setup the server, you can the test your Rig via Security Headers which will test that your CSP is valid, however this only works if your Test Server is accessible from the internet! Which if you follow Part 5’s note will be for SSL testing purposes! And will only test that your CSP looks correct, not that it functions as intended!

Then you can move on to testing your Extension and check that your CSP works as intended, then you do not have to move to hosted test and back to test changes to your CSP!

If/when the API is updated to return the new fields, I’ll add a part 6.5 (probably) which will use the API to get the details instead. Sods law you’ll add a domain to your Test Rig/Server, and then forget to add the same domain to your Capabilities tab!

DEADLINE

Twitch will begin to Enforce the new CSP policy on January 25th.

Twitch closes for the holidays between Friday, 12/17/21 – Monday, 1/3/22. Twitch requests that Developers submit their extensions for review no later than Wednesday, 15th of December at 3PM PST.

Upcoming Winter Break

Attention, developers! Please note that the review team will be observing a winter holiday break from Friday, 12/17/21 – Monday, 1/3/22 and will not be performing Organization, Game, Chatbot Verification, or Extension reviews during this period of time. If you need a review completed prior to the holiday break, please submit your review request by no later than Wednesday, 12/15 at 3PM PST. Thank you for your understanding & happy holidays!

From the Twitch Developers Console

ONE MORE THING: Report URI

Well what about the report_uri, that you saw in the config.json example?

Well CSP provides a method to report CSP errors to a defined HTTPS POST endpoint. So whenever a CSP error occurs it can be reported to that HTTPS URL, very handy to help debug issues.

So if you configure your report_uri to be the same URL as your Extension Test rig, but with /csp/ on the end, so if your rig is at https://mytestrig.com/ then your CSP Report URI is https://mytestrig.com/csp/

You can capture and log these reports, for Express you will need to use the following code snippet, please note that a JSON payload is posted but using an alternative content-type, so you need to tell express.json to trigger on that content-type of application/csp-report

/*
This will capture any CSP Report and dump log it to console
*/
app.post('/csp/', express.json({
    type: 'application/csp-report'
}), (req,res) => {
    console.log(req.body);

    res.send('Ok');
});

The report-uri documentation over on MDN includes a PHP example, if that is your cup of tea!

An Update! Easier Development!

Added a small update to this post for easier testing with, first I took the entire CSP component and seperated it into a NPM module for easier usage and configuration.

The module, `twitchextensioncsp` can be found over on NPM and on GitHub and essentially just wraps Helmet for you and passes in the CSP Configuration with much less copy/paste between extensions if you are working on multiples.

And the Example simple server (remove the “build” system) is at Part 6.5 on the GitHub Repository

For “ease” of use heres an “quick” static Express Server implementing the module, it will do the following:

  • Create an Express Server on port 8050
  • Invoke twitchextensioncsp
  • Enable the Extension CSP to support the Twitch Extensions Rig
  • Add Img and Media and connect example domains
  • Static mount the build directory onto extension so your testing base URI is http://localhost:8050/extension/ swap as needed depending on your SSL solution
const express = require('express');
const app = express();

app.listen(8050, function () {
    console.log('booted express on 8050');
});

const twitchextensioncsp = require('twitchextensioncsp');
app.use(twitchextensioncsp({
    clientID: 'abcdefg123456'
    enableRig: true,
    imgSrc: [
        'https://images.example.com'
    ],
    mediaSrc: [
        'https://videos.example.com'
    ],
    connectSrc: [
        'https://api.example.com'
    ]
}));

app.use('/extension/', express.static(__dirname + '/build/'));

If you refer to the README for twitchextensioncsp there are a handful of quick start examples for the CSP setup. As you do need to explicitly declare the Twitch CDN and Twitch API if you wish to use those in your Extension frontend!

Twitch Extensions Part 5 – Dev Environment

This week we are actually going to write some code! Amazing I know! We’ll be using nodeJS and some basic shell scripting, here just for some simplicity. 

First off apologies for being 3 days late on this entry in the series!

In Part 4 we wrote about the Twitch Developer Rig and what it can/can’t do. One of the useful thing’s it can do for you is “host your files” for you when your extension is in Local test.

The Hosting options in the Developer rig.

The Developer Rig, will either just “dumb serve” a folder of static files, or you can give it a full command to run, handy for WebPack/React/JS things that people need to pre-compile first.

But the big thing it won’t do is SSL Termination so whilst you can easily test your extension in the Rig, you won’t be able to easily test it on Twitch, which is the purpose of this little Dev Environment.

Personally at the moment I tend to write my Extensions in pure/vanilla JavaScript without libraries, since in most cases I’m just running a few fetch requests and drawing DOM elements, but the more interesting parts come with my compilation/bundling for hosting. The “rig” that I use is Developer Rig compatible since it is just a node command. But I’ve normally started it in a terminal as I’m testing on the actual Twitch website.

So what is the aim here?

To create a nodeJS Server that will

  • “static” host the HTML, JS and CSS for an extension,
  • do some clean up on JS/CSS, both for development and production,
  • work behind (a real) SSL for testing on the Twitch website (or rig)
  • be representative of Hosted test and above

What does that look like?

Well first we need to setup a bunch of folders, and we’ll set it up in a “nice” way for using Version control, some people may prefer to keep a separate repo for their EBS from their frontend for easier deploy. The choice is yours there! I use a mix, because being inconsistent is fun!

Proposed folder structure for your extension repository

assets – for storing your screenshots, discovery images, icons and other bits and pieces that live on “Version Details”

ebs – the folder for building you EBS in

website – the folder for building a website in if your Extension has/needs one, usually would include your Privacy Policy.

extension – this is where our extension actually lives and is the folder we’ll be poking about in today.

The Extension Folder

The Folders in the Extension Folder

assets – another assets folders? For storing any front end specific bits and pieces. You probably don’t need this.

build/release – build is where our “compiled” extension will sit

releases – I like to store my old/previous versions of the extension here for future reference

develop – the place we actually write our code

For Version Control, you would generally, touch build and release with a blank file (or .gitkeep if using Git) and then ignore those folders from version control.

We are going to be using the “static” part of NodeJS Express to serve the build folder, and use a super exciting bash script to populate the build folder from the develop folder.

Usually I’ll keep a dev folder in the develop folder, as I’ll keep the “pre-release” version of the extension in develop and the compiled/zip’ed version in releases.

The Bash Script though?

yeah, I use a bash script, it’s my preferred method, but anything it can do you can achieve in similar stuff such as WebPack, but you may want to run all sorts of things when you “deploy” you Extension Frontend during testing. And whilst I am considering other methods, I prefer the simple Bash script.

The Server

The server itself is relatively straight forward, you can refer to the Code on Github, but here is the key part we are interested in

const listen = 8050;
 
const express = require('express');
const app = express();
 
/*
Setup Express to Listen on a Port
*/
app.listen(listen, function () {
console.log('booted express on', listen);
})
 
/*
Setup a "Log" Event for file loading.
So you can see what is trying to be loaded
*/
app.use(function(req, res, next) {
console.log('received from', req.get('X-Forwarded-For'), ':', req.method, req.originalUrl);
next();
});
/*
Setup express Static to server those files
*/
app.use('/extension/', express.static(__dirname + '/build/'));

This will raise an express static server on port 8050, and then prepare to host the contents of build on the route extension.

So this will give us a URL of http://127.0.0.1/extension/ and if you remember in Part 3, we wrote about the structure of a URL of a Hosted test/Live extension being https://ClientID.ext-twitch.tv/ClientID/md5/yourHTML instantly our Development Environment is closer to the Production Environment.

To further this, I like to put my views into different folders. So the viewer will be in panel or video and if I offer both I’ll have both. The Config will be in config or something random for extra security on private Extensions. And Mobile in mobile if I need to serve different JS to the user.

Which then makes it even easier or a developer to remember to use relative links to their CSS/JS from the HTML, since my views are in sub folders, and the whole Dev Server is serving from a sub folder.

But what about the rest of the file? That is a basic Folder watcher, using Chokiar, that will watch for any change in the develop/dev directly and then run script.sh

This script will

  • dump the current contents of build,
  • copy the folder structure
  • copy over any “common” assets in the assets folder (background images/icons for example)
  • copy over each HTML file, in some cases run a minify process
  • compile each JS file and CSS file together into one file and run it thru minifies (but not mangles*)

*Twitch disallows manglification, except in some super limited cases

The script will call the NPM globally installed instances of:

  • html-minifier (not in this example but I use it on occasion)
  • uglify-es which provides uglifyjs
  • uglicfycss

I like to build different parts of my extensions into different script/css files and then use my develop/build process to combine them into one file. Here is FlightSimTrack’s current layout for example. Left being the built/compiled and right being the Development version.

FlightSimTracks structure

You can see how my many JS/CSS on the right are folded down into singular files. And make it easy to include CSS Resets/grid systems into each view when loading/merging those files from a common folder, which only exists on the right/develop side.

FlightSimTrack, for example, has a few parts, such as

  • the maps,
  • the player information
  • Twitch Auth and PubSub handler

Which I’ve split into three files for ease of reading and modification, you can use one mega JS file or whatever compilation method you want, or not at all an include many script files! You just need to avoid magnification.

The only difference between my script.sh and my build.sh is build will generally HTML Minify where script doesn’t and build will compile the JS and drop and console.log commands, they don’t work on a released extension (and are disallowed by policy), so you may as well drop them from the files to keep the file size down! Great for Mobile users.

Summary

This will then give us a Development server, running on a Sub Folder, with files similar to what you would use in production. So this should be analogous to the Production result for your Extension.

Just one more thing

We forgot one thing, what about SSL? Oh that old chestnut! The final piece of the puzzle for if you want to test your Extension more realistically on the Twitch Website, rather than in the rig (where SSL is not required)!

There are two easy ways to provide SSL Termination, both have their nuances but I prefer the second.

Method 1

NGROK, is a Free (or paid for product), that will create a temporary public URL to a running service on your machine.

So in this example you’d just do ./ngrok http 8050 and then the UI will display a URL to copy/paste into the Twitch Developer Console for your “Testing Base URI” just remember to add /extension/ to the end, since that is the mount point for your build. And now you have SSL Termination!

The Dev Console configured with a NGROK URL

NGROK may have some other funnies such as rate limits, but for current limits please refer to their website and pricing structures.

Method 2

This is my preferred method, instead of using NGROK (or paying for a constant URL with NGROK).

I use a reverse SSH Tunnel, and get NGINX on a server to handle SSL Termination with a “real” free from LetsEncrypt Certificate.

Setup is the same on the user side, instead of running ngrok I ssh -R 8050:127.0.0.1:8050 username@example.com

This means I never have to update the Developer Console with a new URL, and for testing purposes all my Extensions use the Same URL. I just change the server running at the end of the tunnel. And if I start work on a new extension, I can use the exact same hosting settings.

NGINX is configured to do the normal SSL Termination stuff, then I just proxypass. Here is a config example from my live server that handles my Extension hosting.

server {
    listen someip:443;
    listen [::]:443;

    server_name example.com;

    ssl on;
    ssl_certificate /etc/letsencrypt/live/example.com/fullchain.pem;
    ssl_certificate_key /etc/letsencrypt/live/example.com/privkey.pem;

    include /etc/letsencrypt/options-ssl-nginx.conf;

    resolver_timeout 10s;

    ssl_dhparam /etc/nginx/dhparam.pem;

    location / {
        proxy_pass http://overssh8050;

           proxy_set_header Upgrade $http_upgrade;
           proxy_set_header Connection 'upgrade';
           proxy_set_header Host $host;
           proxy_cache_bypass $http_upgrade;
           proxy_redirect off;
           proxy_http_version 1.1;
           proxy_set_header Host $host;
           proxy_set_header X-Real-IP $remote_addr;
           proxy_set_header X-Forwarded-For $proxy_add_x_forwarded_for;
           proxy_set_header X-Forwarded-Proto $scheme;
    }
}

upstream overssh8050 {
    server 127.0.0.1:8050;
    keepalive 8;
}

I’ll usually use a second port/SSH tunnel/SSL’ed domain to talk to my EBS running locally. And my script.sh/build.sh can be configured to use different EBS URL’s in the fetch commands you may do. One less thing to forget to swap when building for release/review queuing.

Summary, for real

That is it for this weeks post, you can have a poke about in the GitHub Repository at BarryCarlyon/twitch_extension_blog_series both for the Server.js and script files and the folder structure.

Now you should be able to setup a local test server, that is similar in URL structure to a released Twitch Extension, and provide SSL to that test server, so you can test the Extension on Twitch, OR in the Rig, two of the most common pitfalls Developers face when starting to build extensions.

BUT MOTHER I CRAVE VIOLENCE

Well, until I write the next part if you want to read more about the Developer Side of Extensions, you can pop a visit over the to the Documentation or take a look at Twitch’s Introductory Page and you can always join us on the “TwitchDev Discord Server”, visit the Developer Support Page for the current invite link!

Why you think you are good enough to even write blog posts on Extensions? I made a one or two of them Extensions of various types.

Twitch API Examples

I spend a lot of time on the Twitch Developer forums and Discord helping out other third party developers. That among other things led to me being asked to become a Twitch Ambassador, which is probably a story for another post.

As part of spending a lot of time helping of Forums/Discord, it become useful to write up some examples in various languages for people to refer to, since some people prefer code examples over documentation, and it’s easier to demonstrate how to tie multiple calls/endpoints together for the desired result.

To that end my GitHub Repo at barrycarlyon/twitch_misc now exists and holds examples from Authentication flows (from Implicit to server access and regular user in-between), extension config/pubsub, and examples for Webhooks and the new Eventsub (which is worth a look!). So if you are looking for some examples do checkout the Repository. Some of the examples can even be tested on GitHub itself via GitHub pages, the examples available are listed in the readme and at the Github Pages site.

Twitch also recently made the requirement that all calls to helix (aka the New API) need to be Authenticated using a Bearer, which made it difficult for Extensions to get the viewers details. So to that end I created a basic example of how to do that in an Extension with a “User Profile Extension” example. Which is at BarryCarlyon/twitch_profile_extension. So this covers a good way to handle that flow.

Right now most of the examples are nodeJS, or PHP, but there are some in Python kicking about!

I’ll be looking at adding more examples and other examples in other languages as we go!

I’m usually really bad at commenting my code as I prefer reading the code, but I made a conscious effort to add useful code comments on these repos!

Google oAuth and offline access

Been doing a lot of various stuff and things for CohhCarnage and some of that stuff has involved building an achievements tracking system for the website.

One of those achievements, is for YouTube Subscription. Where the achievement is awarded to the logged in user, if the user has subscribed to a given YouTube channel, in this case Cohh’s YouTube.

In order to make sure that people can’t “cheat” the system, we ask them to link their Google/YouTube account with the website and use the relevant API to look up their Subscription status.

Initially this worked fine, but I ran into some issues where the oAuth token stored has expired and thus I can’t do a status check, for cases where the user links their YouTube to their Cohhilition Account then doesn’t subscribe on YouTube until after 24 hours later (or some caching issue with Google).

So, the simple fix using Googles PHP Library for oAuth’ing is to just do a

<?php

$client->setAccessType('offline')

Now, this works fine for the most part, you happily get a refresh token, and can thus renew your token.

Then comes a hiccup, if for whatever reason you have offline access type on, and the user has previously authorised the application and it’s offline permission, you DON’T get a refresh token in some cases. Some user cases include:

  • you’ve lost their token,
  • or got a bad one
  • or the user managed to find the authentication loop (again) when they shouldn’t, and thus a new code/token combo is generated

Normally you are using something like:

<?php

$client = new Google_Client();
$client->setClientId($client_id);
$client->setClientSecret($client_secret);
$client->setRedirectUri($redirect_uri);
$client->addScope("email");
$client->addScope("profile"); 
$client->setAccessType('offline');// last forever/give me a refresh

But in order to make sure that you get a refresh_token EVERY time someone goes through the authentication loop, you have to adjust as follows:

<?php

$client = new Google_Client();
$client->setClientId($client_id);
$client->setClientSecret($client_secret);
$client->setRedirectUri($redirect_uri);
$client->addScope("email");
$client->addScope("profile"); 
$client->setAccessType('offline');// last forever/give me a refresh
$client->setApprovalPrompt('force');// force a refresh token return everytime

Apparently, using

'offline'

is supposed to imply

'force'

according to some Stack Overflows posts, but this doesn’t seem the case.

In the end my full Google_Client setup looks like:

<?php

        $client = new Google_Client();
        $client->setAuthConfig($consumer);
        $client->addScope('profile');
        $client->addScope('email');
        $client->addScope('https://www.googleapis.com/auth/youtube.readonly');
        $client->setAccessType('offline');// asks for a refresh token
        $client->setApprovalPrompt('force');// forces the refresh token being returned
        $client->setIncludeGrantedScopes(true);
        $client->setRedirectUri($callback);

Just an odd thing I came across recently that I thought I would write up. Most of the notes here are from Stack Overflow post on the subject

Magento – Products showing in the wrong category

I came across something odd a while back, and until recently not had time to investigate the issue.

Products were showing up in categories that they were not explicitly in.

In summary, when you reindex catalog_category_product Magento goes and looks at all the products and the categories that they are in. For the categories that the product are in, it gets the category tree of that category.

So consider this category hierarchy:

  1. Category A
    1. Sub Category A 1
      1. Bottom Category 1
      2. Bottom Category 2
    2. Sub Category A 2
      1. Bottom Category 3
      2. Bottom Category 4
    3. Sub Category A 3
      1. Bottom Category 5
      2. Bottom Category 6
  2. Category B
    1. Sub Category B 1
      1. Bottom Category 7
      2. Bottom Category 8
    2. Sub Category B 2
      1. Bottom Category 9
      2. Bottom Category 10
    3. Sub Category B 3
      1. Bottom Category 11
      2. Bottom Category 12

Now you create a product and put it in Bottom Category 9 and Bottom Category 11. When you reindex it’s put into the list to show up in the category and the parents on that tree, so Category B and Category B 2, and so on for Bottom Category 11.

Now over time we add more products and more categories, and several months later we decide to rearrange our category tree, as we’ve gotten too wide and our needs have changed, or some other reason. Say to something like this, a strikethru indicates a disabled category (as in is_active is 0 (it’s a boolean integer))

  1. Category A
    1. Sub Category A 1
      1. Bottom Category 1
      2. Bottom Category 2
      3. Bottom Category 3
      4. Bottom Category 4
    2. Sub Category A 2
    3. Sub Category A 3
      1. Bottom Category 5
      2. Bottom Category 6
  2. Category B
    1. Sub Category B 1
      1. Bottom Category 7
      2. Bottom Category 8
    2. Sub Category B 2
      1. Bottom Category 9
      2. Bottom Category 10
    3. Sub Category B 3
      1. Bottom Category 11
      2. Bottom Category 12

Now of course we reindex, and the problems start.

The Problem

We have a problem, the Product correctly shows in Bottom Category 11 and it’s parents, but it is still showing up in Sub Category A 1 and it’s parents in error.

It seems that the reindexer takes categories that are disabled (as in is_active is false), and their tree, into account when building the list of category pages that a product can be displayed on.

So in order to fix this I went deep into Magento core to go and see which query was at fault. Turns out that it’s not exactly broken, it’s just Magento doesn’t check for it a give category is active or not when it builds the list.

The query at fault is:

INSERT INTO `catalog_category_anc_products_index_idx` (`category_id`, `product_id`, `position`) SELECT STRAIGHT_JOIN DISTINCT `ca`.`category_id`, `cp`.`product_id`, MIN(IF(ca.category_id = ce.entity_id, `cp`.`position`, (`ce`.`position` + 1) * (`ce`.`level` + 1 * 10000) + `cp`.`position`)) AS `position` FROM `catalog_category_anc_categs_index_idx` AS `ca`
 INNER JOIN `catalog_category_entity` AS `ce` ON `ce`.`path` LIKE `ca`.`path` OR ce.entity_id = ca.category_id
 INNER JOIN `catalog_category_product` AS `cp` ON cp.category_id = ce.entity_id
 INNER JOIN `catalog_category_product_index_enbl_idx` AS `pv` ON pv.product_id = cp.product_id GROUP BY `ca`.`category_id`,
	`cp`.`product_id`

As you can see it just collects from catalog_category_entity, which has a table structure of:

mysql> describe catalog_category_entity;
+------------------+----------------------+------+-----+---------+----------------+
| Field            | Type                 | Null | Key | Default | Extra          |
+------------------+----------------------+------+-----+---------+----------------+
| entity_id        | int(10) unsigned     | NO   | PRI | NULL    | auto_increment |
| entity_type_id   | smallint(5) unsigned | NO   |     | 0       |                |
| attribute_set_id | smallint(5) unsigned | NO   |     | 0       |                |
| parent_id        | int(10) unsigned     | NO   |     | 0       |                |
| created_at       | timestamp            | YES  |     | NULL    |                |
| updated_at       | timestamp            | YES  |     | NULL    |                |
| path             | varchar(255)         | NO   | MUL | NULL    |                |
| position         | int(11)              | NO   |     | 0       |                |
| level            | int(11)              | NO   | MUL | 0       |                |
| children_count   | int(11)              | NO   |     | 0       |                |
+------------------+----------------------+------+-----+---------+----------------+
10 rows in set (0.00 sec)

As you can see that table structure is somewhat limited. Since this is the bare bones basics of a category. And thus the query to collect categories of a product is in, considers inactive categories as if doesn’t have this information.

The Solution

The fix here is simple. Find where the query is defined and take into account the is_active category attribute, and we’ll do it the Magento way. Rather than hardcoding entity_id’s.

A quick note about how I found the query. I opened up public_html/lib/Varien/Db/Adapter/Pdo/Mysql.php and changed the variable $_debug from false to true, it’s around about line 103. This will output all the SQL queries to public_html/var/debug/pdo_mysql.log.

After that I just grep’ed the source catalog_category_anc_products_index_idx which told me where the table was defined in a xml config, and then grep’ed again for the internal reference name, (there was much much grep’ing for bit’s and pieces).

The query runs under the reindexAll function of Mage_Catalog_Model_Resource_Category_Indexer_Product. So basically take the ENTIRE contents of this function and setup a Model Resource override, and fix the query.

Module Basics

Creating our Module in the directory local/Company/Catalog

Normally I wouldn’t cover this, but we are overriding a resource which is a little different from just overriding a model.

etc/config.xml
<?xml version="1.0"?>
<config>
    <modules>
        <Company_Catalog>
            <version>0.0.1</version>
        </Company_Catalog>
    </modules>

    <global>
        <models>
            <companycatalog>
                <class>Company_Catalog_Model</class>
            </companycatalog>

            <catalog_resource_eav_mysql4>
                <rewrite>
                    <category_indexer_product>Company_Catalog_Model_Resource_Category_Indexer_Product</category_indexer_product>
                </rewrite>
            </catalog_resource_eav_mysql4>
        </models>
    </global>
</config>
Model/Resource/Category/Indexer/Product.php

Literally just a copy of the contents of reindexAll with some modifications. Starting at // Query Correction and ending at // end Query Correction.

<?php

class Company_Catalog_Model_Resource_Category_Indexer_Product extends Mage_Catalog_Model_Resource_Category_Indexer_Product
{
    /**
     * Rebuild all index data
     *
     * @return Mage_Catalog_Model_Resource_Category_Indexer_Product
     */
    public function reindexAll()
    {
        $this->useIdxTable(true);
        $this->beginTransaction();
        try {
            $this->clearTemporaryIndexTable();
            $idxTable = $this->getIdxTable();
            $idxAdapter = $this->_getIndexAdapter();
            $stores = $this->_getStoresInfo();
            /**
             * Build index for each store
             */
            foreach ($stores as $storeData) {
                $storeId    = $storeData['store_id'];
                $websiteId  = $storeData['website_id'];
                $rootPath   = $storeData['root_path'];
                $rootId     = $storeData['root_id'];
                /**
                 * Prepare visibility for all enabled store products
                 */
                $enabledTable = $this->_prepareEnabledProductsVisibility($websiteId, $storeId);
                /**
                 * Select information about anchor categories
                 */
                $anchorTable = $this->_prepareAnchorCategories($storeId, $rootPath);
                /**
                 * Add relations between not anchor categories and products
                 */
                $select = $idxAdapter->select();
                /** @var $select Varien_Db_Select */
                $select->from(
                    array('cp' => $this->_categoryProductTable),
                    array('category_id', 'product_id', 'position', 'is_parent' => new Zend_Db_Expr('1'),
                        'store_id' => new Zend_Db_Expr($storeId))
                )
                ->joinInner(array('pv' => $enabledTable), 'pv.product_id=cp.product_id', array('visibility'))
                ->joinLeft(array('ac' => $anchorTable), 'ac.category_id=cp.category_id', array())
                ->where('ac.category_id IS NULL');

                $query = $select->insertFromSelect(
                    $idxTable,
                    array('category_id', 'product_id', 'position', 'is_parent', 'store_id', 'visibility'),
                    false
                );
                $idxAdapter->query($query);

                /**
                 * Assign products not associated to any category to root category in index
                 */

                $select = $idxAdapter->select();
                $select->from(
                    array('pv' => $enabledTable),
                    array(new Zend_Db_Expr($rootId), 'product_id', new Zend_Db_Expr('0'), new Zend_Db_Expr('1'),
                        new Zend_Db_Expr($storeId), 'visibility')
                )
                ->joinLeft(array('cp' => $this->_categoryProductTable), 'pv.product_id=cp.product_id', array())
                ->where('cp.product_id IS NULL');

                $query = $select->insertFromSelect(
                    $idxTable,
                    array('category_id', 'product_id', 'position', 'is_parent', 'store_id', 'visibility'),
                    false
                );
                $idxAdapter->query($query);

                /**
                 * Prepare anchor categories products
                 */
                $anchorProductsTable = $this->_getAnchorCategoriesProductsTemporaryTable();
                $idxAdapter->delete($anchorProductsTable);

                $position = 'MIN('.
                    $idxAdapter->getCheckSql(
                        'ca.category_id = ce.entity_id',
                        $idxAdapter->quoteIdentifier('cp.position'),
                        '('.$idxAdapter->quoteIdentifier('ce.position').' + 1) * '
                        .'('.$idxAdapter->quoteIdentifier('ce.level').' + 1 * 10000)'
                        .' + '.$idxAdapter->quoteIdentifier('cp.position')
                    )
                .')';

                // Query Correction

                // load the is_active category attribute
                $attributeModel = Mage::getModel('eav/entity_attribute')->loadByCode(Mage_Catalog_Model_Category::ENTITY, 'is_active');
                $attributeTable = 'catalog_category_entity_' . $attributeModel->getBackendType();

                $select = $idxAdapter->select()
                ->useStraightJoin(true)
                ->distinct(true)
                ->from(array('ca' => $anchorTable), array('category_id'))
                ->joinInner(
                    array('ce' => $this->_categoryTable),
                    $idxAdapter->quoteIdentifier('ce.path') . ' LIKE ' .
                    $idxAdapter->quoteIdentifier('ca.path') . ' OR ce.entity_id = ca.category_id',
                    array()
                )

                ->joinInner(
                    array('cp' => $this->_categoryProductTable),
                    'cp.category_id = ce.entity_id',
                    array('product_id')
                )

                // left join the attribute
                ->joinInner(
                    array('ccei' => $attributeTable),
                    'ccei.entity_id = cp.category_id',
                    array()//select nothing
                )

                ->joinInner(
                    array('pv' => $enabledTable),
                    'pv.product_id = cp.product_id',
                    array('position' => $position)
                )

                ->where('ccei.attribute_id=' . $attributeModel->getAttributeId())//is_active
                ->where('ccei.value=1')

                ->group(array('ca.category_id', 'cp.product_id'));
                $query = $select->insertFromSelect($anchorProductsTable,
                    array('category_id', 'product_id', 'position'), false);
                $idxAdapter->query($query);

                // end Query Correction

                /**
                 * Add anchor categories products to index
                 */
                $select = $idxAdapter->select()
                ->from(
                    array('ap' => $anchorProductsTable),
                    array('category_id', 'product_id',
                        'position', // => new Zend_Db_Expr('MIN('. $idxAdapter->quoteIdentifier('ap.position').')'),
                        'is_parent' => $idxAdapter->getCheckSql('cp.product_id > 0', 1, 0),
                        'store_id' => new Zend_Db_Expr($storeId))
                )
                ->joinLeft(
                    array('cp' => $this->_categoryProductTable),
                    'cp.category_id=ap.category_id AND cp.product_id=ap.product_id',
                    array()
                )
                ->joinInner(array('pv' => $enabledTable), 'pv.product_id = ap.product_id', array('visibility'));

                $query = $select->insertFromSelect(
                    $idxTable,
                    array('category_id', 'product_id', 'position', 'is_parent', 'store_id', 'visibility'),
                    false
                );
                $idxAdapter->query($query);

                $select = $idxAdapter->select()
                    ->from(array('e' => $this->getTable('catalog/product')), null)
                    ->join(
                        array('ei' => $enabledTable),
                        'ei.product_id = e.entity_id',
                        array())
                    ->joinLeft(
                        array('i' => $idxTable),
                        'i.product_id = e.entity_id AND i.category_id = :category_id AND i.store_id = :store_id',
                        array())
                    ->where('i.product_id IS NULL')
                    ->columns(array(
                        'category_id'   => new Zend_Db_Expr($rootId),
                        'product_id'    => 'e.entity_id',
                        'position'      => new Zend_Db_Expr('0'),
                        'is_parent'     => new Zend_Db_Expr('1'),
                        'store_id'      => new Zend_Db_Expr($storeId),
                        'visibility'    => 'ei.visibility'
                    ));

                $query = $select->insertFromSelect(
                    $idxTable,
                    array('category_id', 'product_id', 'position', 'is_parent', 'store_id', 'visibility'),
                    false
                );

                $idxAdapter->query($query, array('store_id' => $storeId, 'category_id' => $rootId));
            }

            $this->syncData();

            /**
             * Clean up temporary tables
             */
            $this->clearTemporaryIndexTable();
            $idxAdapter->delete($enabledTable);
            $idxAdapter->delete($anchorTable);
            $idxAdapter->delete($anchorProductsTable);
            $this->commit();
        } catch (Exception $e) {
            $this->rollBack();
            throw $e;
        }
        return $this;
    }
}

The fix in depth

The first thing done here is to Magento Safe load the Category Attribute details for is_active.

                // load the is_active category attribute
                $attributeModel = Mage::getModel('eav/entity_attribute')->loadByCode(Mage_Catalog_Model_Category::ENTITY, 'is_active');
                $attributeTable = 'catalog_category_entity_' . $attributeModel->getBackendType();

After this join,

                ->joinInner(
                    array('cp' => $this->_categoryProductTable),
                    'cp.category_id = ce.entity_id',
                    array('product_id')
                )

we need to add another join, in this case we are joining to the table that contains the is_active information, it’s usually catalog_category_entity_int but we Magento Safe loaded it above.

                // left join the attribute
                ->joinInner(
                    array('ccei' => $attributeTable),
                    'ccei.entity_id = cp.category_id',
                    array()//select nothing
                )

Finally we need to adjust to add a where to clean up the join and select active categories only, after the last join and before the group function call:

                ->where('ccei.attribute_id=' . $attributeModel->getAttributeId())//is_active
                ->where('ccei.value=1')

This changes the query to:

INSERT INTO `catalog_category_anc_products_index_idx` (`category_id`, `product_id`, `position`) SELECT STRAIGHT_JOIN DISTINCT `ca`.`category_id`, `cp`.`product_id`, MIN(IF(ca.category_id = ce.entity_id, `cp`.`position`, (`ce`.`position` + 1) * (`ce`.`level` + 1 * 10000) + `cp`.`position`)) AS `position` FROM `catalog_category_anc_categs_index_idx` AS `ca`
 INNER JOIN `catalog_category_entity` AS `ce` ON `ce`.`path` LIKE `ca`.`path` OR ce.entity_id = ca.category_id
 INNER JOIN `catalog_category_product` AS `cp` ON cp.category_id = ce.entity_id
 INNER JOIN `catalog_category_entity_int` AS `ccei` ON ccei.entity_id = cp.category_id
 INNER JOIN `catalog_category_product_index_enbl_idx` AS `pv` ON pv.product_id = cp.product_id WHERE (ccei.attribute_id=119) AND (ccei.value=1) GROUP BY `ca`.`category_id`,
	`cp`.`product_id`

And Finally

Now with this module in place (remember to activate it in etc/modules) clear your cache and reindex. And hey presto, the product is no longer showing up in a category that is a parent of a category that the product is in that is now disabled. (Bit of a mouthful that)

In Summary

Much nicer, and not too much of a performance hit really.

Overall it means your products only show in the right active categories.

Generally it is only a issue when you disable a category and don’t delete it and then rearrange things leaving remnants of the old category tree floating about, so basically anything a common user would do.

I don’t tend to delete stuff myself, in case things get reactivated, and I’ll reuse the records.

Hopefully this is of help, rather than deleting records!