Send Chat Announcement includes the same control/ability that Send Chat Message has, the ability to control if that Announcement goes to all Channels if the channel is in shared chat mode, with the default being true/send only to home channel.
So broadly this means you can run a Twitch chat bot off JUST the App Access token, as most functions a chat bot will do day to day in the primary function thread can use the Token.
Which has the added benefit of not having to juggle tokens, user refresh tokens, saving those, as to get a new App Access Token, it’s just load ClientID and Secret from env and go get a new token! And of course App Access Tokens has a longer life time of around 60 days or so, which means less refresh operations overall!
To also note there are no additional permission/scope changes here! You should be all good to go if already using conduits and were user token-ing to send announcements.
channel.chat.notification now emits Watch Streak events! No longer will a bot need to listen to IRC for this single event (oooooh wait first-msg maybe that soon…), also payloads for announcements updated in line with the Send Chat Announcement change, notably as it’s not a breaking change it’s added to V1,
In the beginning App Access Tokens could just load public data, that didn’t need any oAuth scopes, from Twitch API. And so any given developers project had to maintain a user access token(s) for users of their application.
Then extensions were introduced, bundled in Extensions are Subscriber support, allowing extensions and their EBS to read a given viewers subscription status to a channel, outside of the Extension JS Helper function to check the status in client side code. That then leaves how does an Extension EBS (aka Backend Service) perform the same call (since you should never trust the client) to perform the same check.
And so Extension generated App Access Tokens, could call Get Broadcaster Subscriptions. The first endpoint that is scoped that an app access token could load on behalf of a user.
Since then various aspects of Twitch Developer Tools have come and gone, we lost WebSub, and we lost PubSub, and we lost both (over time) in favour of EventSub. There is a bunch of other stuff that happened but the important part here is that with the loss of PubSub, Eventsub achieved “featured parity” with PubSub and a number of other things introduced Chat over Eventsub.
EventSub
An Extensions ability to grant the ability for an app access token to call subscriber information is baked into the “install an extension” work flow.
But EventSub introduced the dual (or even triple) legged auth approach.
First a user will need to perform a user oAuth loop, either Implicit, Authorization Code, or DCF (Device Code Flow). This then creates a link between the user and the ClientID along with the scopes requested.
Combine that with the recently added Get Authorization By User endpoint to check what scopes your ClientID has to a given user, you can check permissions before trying to create EventSub Subscriptions for Webhooks or Conduits.
For the user’s in the condition get that user to user authenticate with the needed scopes
Generate an active app access token (if you don’t have one already)
Create the Subscription
As an aside you can use “user.authorization.grant” to easily monitor for new user authentications and create subscriptions as a follow up, if say your user token gen is air gapped from your Eventsub handler. This is a pattern I use on the IGDB Extension to monitor for authentications and create subscriptions to stream.online/offline and channel.update (which yes are public topics but become cost 0 _if_ the user is authenticate to the Client ID, and I use the user.authorization.revoke to unsubscribe since I only want to keep cost 0 subscriptions), becuase the IGDB Extension config page launches an implicit flow since I don’t need the user token ever I just need to auth so creating one with a refresh token is overkill, but I digress….
So that briefly is how EventSub dual legged auth operates.
Chat Over EventSub
Then along came Chat over Eventsub and a bunch of separate topics essentially providing IRC chat as a already JSON-ifed consumable feed.
This also came with Conduits and the ability for chat bots to scale to as many channels as needed, because the broadcaster auth’s the chatbot to be present on their channel. It is similar to how adding Discord Bot to a Discord Server works from a broadcaster point of view.
But chat over eventsub specified two user ID’s in the condition. (which yes can be the same ID but we’ll skip that for simplicity).
So first a developer would
Create a Client ID (generally owned by their own Twitch profile but the other of a Client ID is irrelevant, it’s always whom auths to the client that is important)
Create a Twitch account with the username of the bot they want to use
User Authenticate the bot to the Client ID with the relevant scopes
Then authentication any number of broadcasters to the Client ID
Now you can rejoin all channels with one API request (update shard), great for restarts or outages, as restart the websocket, call update shard, and then the bot is back in all rooms, no more slow roll rejoins or rate limit joins/etc.
So that is briefly the triple legged auth of chat over eventsub.
So What about App Access Tokens on the API?
Send Chat Message was introduced at the same time as chat over eventsub and is the first “proper” endpoint that worked with App Access Tokens following prior auth from the user(s) involved, (the broadcaster_id and sender_id)
This meant that for “general” operations a chat bot still needed to load and maintain either the broadcasters user token for Start Commercial for example, or the bots own token for Banning a User from chat.
So a bot would be juggling and maintaining up to three tokens,
A broadcasters token for broadcaster based operations
A bot token for doing moderation actions (for example), or sending chat
An app access token for subscription management (or sending chat)
But, now, as of yesterday! For the most part that is no more!
Well Spill the Beans then!
TWENTY ONE API endpoints now support this pattern of using an App Access Token after performing prior user(s) authentication(s). Look for the Beta tag under the Authorization section of each endpoint.
Anything marked in bold with a * has additional scope requirements compared to the user token version, please check the docs, but I suspect your bot will likely already have obtained the scopes.
So now a chat bot broadly doesn’t need to maintain or even keep on file a user access token for itself or the broadcaster, as most general operations a bot is gonna do will work using the App Access Token. This also comes with the bonus that a user access code flow token is only good for 4 hours but an app access token is good for much longer. (Remember to utilise the Validate Token Endpoint to check time remaining on a token)
I’ll note that “Get Clips Download” supports this pattern, but that API was introduced with the pattern.
But a Sadness
However, the obvious missing endpoint that doesn’t support this pattern is Send Chat Announcement which I hope is supported soon, I think that’s the only one I need to token juggle for at the moment.
Cronjobs that need to do something on multiple users/broadcasters, the script starts, loads the token, does the job and just switches the user ID no token switchin’!
Well OBS 32.0.0 is out, and it’s gonna be pain, but in a good way, wait is pain ever a good thing.
It’s similar pain to the OBS 28 to anything after 28 move but PAIN all the same.
Along with all the new shiny features, like FiniteSingularity’s Plugin Manager, theres a bunch of changes under the hood! And the “Streamer Important” of these changes are what this blog post is gonna blog post about!
You can go read the full change log, over on the Releases Page, new shiny features at the top!
Look at this AWESOME Plugin manager. (OBS on line 2? Well thats Logitech’s Plugin apparently… go figure)
So What Broke
So since I have a finger in a LOT of pies, not just on Twitch but other realms, all within Streaming space, I’ll pull OBS Beta’s as they come and start testing. (Curse past me for setting my Mac OBS to always grab the betas… but whatever)
So, I pulled down OBS 32.0.0 beta 1 and it crashed on Launch. Here is the GitHub report yeah in the OP I was blaming EVERYONE and their dog (not Finite’s Dog). Took some better knowing peeps to trace it down and at the time I was busy and couldn’t do my own tracing. (Was too busy OMGWUT-ing to “upstairs” with “please don’t let customers go to 32.0.0 just yet)
Beta 2 fixed the crash on launch issue. But the problem here was the Streamdeck Plugin calling something that was removed from OBS in 32.0.0, since under the hood changes are dropping support for some legacy/older plugin hooks (or so I believe), and the SD plugin was invoking that and the fault wasn’t “safe caught” leading to OBS to crash instead of skip plugin loading.
Elgato was informed and so they chimed in with a “we are on it“, praise be to Videophile.
OBS 32.0.0 is General Release
So OBS 32.0.0 is now “released to the masses”
Heres what you need to do step by step, these steps are valid for OBS 31.x.x but shouldn’t be different for Older OBS, if on OBS Portable HAVE FUN! But you should know what you are doing here if you are running portable anyway…
“File” -> “Show Settings Folder”
Take a copy of the folder “basic” your scenes and profiles are in here and you should routinely back this up. (sure this doesn’t backup media assets (images/videos) that your scenes use thats up to you to sort but will preserve file paths and the like)
Close OBS
Next to update Streamdeck, first check that Streamdeck itself is “recent” should be running at least Software Version 7.0.0. Hit the “Cog” -> “General” -> “Check for Updates”. (At time of writing V7.0.1 is available) this step may also do the next step for you.
If Streamdeck has updated it’ll restart, next Hit the “Cog” -> “Plugins” -> Scroll to OBS Studio, “Check for Update”, anything newer than 2.2.8 and you should be good. (Current version is 2.2.9.9), side note: most plugins have auto update, but some plugins you installed before that was a thing won’t so check those manually if you want.
Now Open OBS and let OBS update to 32.0.0 (do “Help” -> “Check for Updates” if not auto prompted)
Away you go!
Other Plugins
After Restarting OBS into 32.0.0 you’ll want to check for and update any other plugins you use/consider important before you go live for the first time.
Notably ratwithacompiler has put out an update for the Closed Captions Plugin, that a lot of people use (and the one I recommend to people for adding CC’s to your streams), during the OBS 32.0.0 beta phases, to fix a similar fix to what Elgato has needed to do.
But everyone installs different plugins, and currently Plugin Management is manual and not all plugins with hint you need to update. (Why “currently” you say? Well the new Plugin Manager is going to be looking at hinting for updates I understand! YAY)
Aitum Multistream will for example, but I don’t think they have any updates at time of writing. Since it works fine under OBS 32.0.0, I just know it has a visible thang for “update available”.
Post Amble
Just doing my OBS updates, nice alert 😀 I know which ones I need to go and do now, but if you have other plugins make sure to check manually in case they didn’t get reported as not loading!
This week we are actually going to write some code! Amazing I know! We’ll be using nodeJS and some basic shell scripting, here just for some simplicity.
First off apologies for being 3 days late on this entry in the series!
In Part 4 we wrote about the Twitch Developer Rig and what it can/can’t do. One of the useful thing’s it can do for you is “host your files” for you when your extension is in Local test.
The Hosting options in the Developer rig.
The Developer Rig, will either just “dumb serve” a folder of static files, or you can give it a full command to run, handy for WebPack/React/JS things that people need to pre-compile first.
But the big thing it won’t do is SSL Termination so whilst you can easily test your extension in the Rig, you won’t be able to easily test it on Twitch, which is the purpose of this little Dev Environment.
Personally at the moment I tend to write my Extensions in pure/vanilla JavaScript without libraries, since in most cases I’m just running a few fetch requests and drawing DOM elements, but the more interesting parts come with my compilation/bundling for hosting. The “rig” that I use is Developer Rig compatible since it is just a node command. But I’ve normally started it in a terminal as I’m testing on the actual Twitch website.
So what is the aim here?
To create a nodeJS Server that will
“static” host the HTML, JS and CSS for an extension,
do some clean up on JS/CSS, both for development and production,
work behind (a real) SSL for testing on the Twitch website (or rig)
be representative of Hosted test and above
What does that look like?
Well first we need to setup a bunch of folders, and we’ll set it up in a “nice” way for using Version control, some people may prefer to keep a separate repo for their EBS from their frontend for easier deploy. The choice is yours there! I use a mix, because being inconsistent is fun!
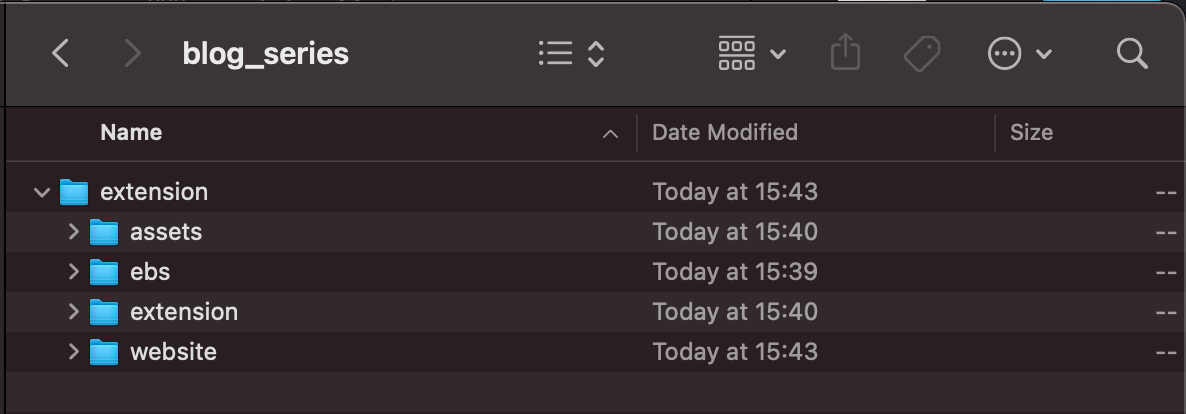
Proposed folder structure for your extension repository
assets – for storing your screenshots, discovery images, icons and other bits and pieces that live on “Version Details”
ebs – the folder for building you EBS in
website – the folder for building a website in if your Extension has/needs one, usually would include your Privacy Policy.
extension – this is where our extension actually lives and is the folder we’ll be poking about in today.
The Extension Folder
The Folders in the Extension Folder
assets – another assets folders? For storing any front end specific bits and pieces. You probably don’t need this.
build/release – build is where our “compiled” extension will sit
releases – I like to store my old/previous versions of the extension here for future reference
develop – the place we actually write our code
For Version Control, you would generally, touch build and release with a blank file (or .gitkeep if using Git) and then ignore those folders from version control.
We are going to be using the “static” part of NodeJS Express to serve the build folder, and use a super exciting bash script to populate the build folder from the develop folder.
Usually I’ll keep a dev folder in the develop folder, as I’ll keep the “pre-release” version of the extension in develop and the compiled/zip’ed version in releases.
The Bash Script though?
yeah, I use a bash script, it’s my preferred method, but anything it can do you can achieve in similar stuff such as WebPack, but you may want to run all sorts of things when you “deploy” you Extension Frontend during testing. And whilst I am considering other methods, I prefer the simple Bash script.
The Server
The server itself is relatively straight forward, you can refer to the Code on Github, but here is the key part we are interested in
const listen = 8050;

const express = require('express');
const app = express();

/*
Setup Express to Listen on a Port
*/
app.listen(listen, function () {
console.log('booted express on', listen);
})

/*
Setup a "Log" Event for file loading.
So you can see what is trying to be loaded
*/
app.use(function(req, res, next) {
console.log('received from', req.get('X-Forwarded-For'), ':', req.method, req.originalUrl);
next();
});
/*
Setup express Static to server those files
*/
app.use('/extension/', express.static(__dirname + '/build/'));
This will raise an express static server on port 8050, and then prepare to host the contents of build on the route extension.
So this will give us a URL of http://127.0.0.1/extension/ and if you remember in Part 3, we wrote about the structure of a URL of a Hosted test/Live extension being https://ClientID.ext-twitch.tv/ClientID/md5/yourHTML instantly our Development Environment is closer to the Production Environment.
To further this, I like to put my views into different folders. So the viewer will be in panel or video and if I offer both I’ll have both. The Config will be in config or something random for extra security on private Extensions. And Mobile in mobile if I need to serve different JS to the user.
Which then makes it even easier or a developer to remember to use relative links to their CSS/JS from the HTML, since my views are in sub folders, and the whole Dev Server is serving from a sub folder.
But what about the rest of the file? That is a basic Folder watcher, using Chokiar, that will watch for any change in the develop/dev directly and then run script.sh
This script will
dump the current contents of build,
copy the folder structure
copy over any “common” assets in the assets folder (background images/icons for example)
copy over each HTML file, in some cases run a minify process
compile each JS file and CSS file together into one file and run it thru minifies (but not mangles*)
*Twitch disallows manglification, except in some super limited cases
The script will call the NPM globally installed instances of:
html-minifier (not in this example but I use it on occasion)
uglify-es which provides uglifyjs
uglicfycss
I like to build different parts of my extensions into different script/css files and then use my develop/build process to combine them into one file. Here is FlightSimTrack’s current layout for example. Left being the built/compiled and right being the Development version.
FlightSimTracks structure
You can see how my many JS/CSS on the right are folded down into singular files. And make it easy to include CSS Resets/grid systems into each view when loading/merging those files from a common folder, which only exists on the right/develop side.
FlightSimTrack, for example, has a few parts, such as
the maps,
the player information
Twitch Auth and PubSub handler
Which I’ve split into three files for ease of reading and modification, you can use one mega JS file or whatever compilation method you want, or not at all an include many script files! You just need to avoid magnification.
The only difference between my script.sh and my build.sh is build will generally HTML Minify where script doesn’t and build will compile the JS and drop and console.log commands, they don’t work on a released extension (and are disallowed by policy), so you may as well drop them from the files to keep the file size down! Great for Mobile users.
Summary
This will then give us a Development server, running on a Sub Folder, with files similar to what you would use in production. So this should be analogous to the Production result for your Extension.
Just one more thing
We forgot one thing, what about SSL? Oh that old chestnut! The final piece of the puzzle for if you want to test your Extension more realistically on the Twitch Website, rather than in the rig (where SSL is not required)!
There are two easy ways to provide SSL Termination, both have their nuances but I prefer the second.
Method 1
NGROK, is a Free (or paid for product), that will create a temporary public URL to a running service on your machine.
So in this example you’d just do ./ngrok http 8050 and then the UI will display a URL to copy/paste into the Twitch Developer Console for your “Testing Base URI” just remember to add /extension/ to the end, since that is the mount point for your build. And now you have SSL Termination!
The Dev Console configured with a NGROK URL
NGROK may have some other funnies such as rate limits, but for current limits please refer to their website and pricing structures.
Method 2
This is my preferred method, instead of using NGROK (or paying for a constant URL with NGROK).
I use a reverse SSH Tunnel, and get NGINX on a server to handle SSL Termination with a “real” free from LetsEncrypt Certificate.
Setup is the same on the user side, instead of running ngrok I ssh -R 8050:127.0.0.1:8050 username@example.com
This means I never have to update the Developer Console with a new URL, and for testing purposes all my Extensions use the Same URL. I just change the server running at the end of the tunnel. And if I start work on a new extension, I can use the exact same hosting settings.
NGINX is configured to do the normal SSL Termination stuff, then I just proxypass. Here is a config example from my live server that handles my Extension hosting.
I’ll usually use a second port/SSH tunnel/SSL’ed domain to talk to my EBS running locally. And my script.sh/build.sh can be configured to use different EBS URL’s in the fetch commands you may do. One less thing to forget to swap when building for release/review queuing.
Summary, for real
That is it for this weeks post, you can have a poke about in the GitHub Repository at BarryCarlyon/twitch_extension_blog_series both for the Server.js and script files and the folder structure.
Now you should be able to setup a local test server, that is similar in URL structure to a released Twitch Extension, and provide SSL to that test server, so you can test the Extension on Twitch, OR in the Rig, two of the most common pitfalls Developers face when starting to build extensions.
BUT MOTHER I CRAVE VIOLENCE
Well, until I write the next part if you want to read more about the Developer Side of Extensions, you can pop a visit over the to the Documentation or take a look at Twitch’s Introductory Page and you can always join us on the “TwitchDev Discord Server”, visit the Developer Support Page for the current invite link!
This is the first part of a I don’t know how many parts series on Twitch Extensions. We’ll cover how to develop them, how to EBS them, some notes on Designing and what to avoid, some practices for after release care, and touch on some marketing ideas/things for your Extension Website.
So since this is the first part, we’ll cover the basics first. What, Where, Who, How, and Why of an Extension
Why is Gamora
What is a Twitch Extension
A Twitch Extension is basically an iFrame that allows a developer to create anything they want, as long as it fits within the Guidelines set out by Twitch, and of course it’s Terms of Service and Developer Agreements
This can range from MiniGames, to QnA/Polling extensions, to Community information extensions, to game information extensions, or play with the Streamer extensions
Some examples include
Sound Alerts – Lets users pick a sound to play on Stream, can be free or utilize bits/channel points
Crowd Control – Provides plugins for a variety of games, to allow people to interact with the game, make it easier/harder for the Broadcaster
Cardboard.live – Lets viewers see what cards are in your current deck, and check the state of the game board, without having to spam/ask in chat
Borderlands 3 ECHOcast – Lets viewers check out your Borderlands 3 character, and let viewers win extra loot for their own character when the Broadcaster opens Red Chests in game
Detroit: Community Play – Ask the community to pick/vote on the option when a multiple choice question appears during the game play of Detroit: Become Human.
The Cohhilition – A community interaction extension, that provides access to various Community things (in this case for a single channel), without having the viewer leave the comfort of the Twitch page
Some of these descriptions are super simple to cover the salient points and many will do more things than my summary covers
Twitch being a live streaming site, provides to the Broadcaster, a page, and that page will consist of a number of elements.
Depending on if the streamer is live or not the elements on the page will vary slightly. If the Broadcaster is live, you’ll land on the video/chat page, if the Broadcaster is not live, you’ll land on a “Home”/index style page
Now the part that we care about is the “Chat”/live view page, and on that page you will find a number of sections
An example of a Twitch Channel Page
The Video Player
The live Chat
The Stream information section – The Title and Category
A small about the Broadcaster section
The Panels section
A Twitch Extension can be added to a couple of these sections, and has 3 main (and two auxiliary) integration points.
The Main Integration points
Video Overlay – The Extension can cover/utilize the whole of the video player
Panel – The Extension appears in the panels section below the stream, and has width of 318px and a maximum height of 500px
Video Component – Basically a panel that appears over the video player but is locked to the right hand side of the player, it can utilize a varied amount of the player space
The “main” integration points are mutually exclusive, an Extension can only occupy any one of those slots at once
The Auxiliary Integration points
An example of a mobile extension on iOS
Mobile Panel – The Extension is available on mobile for mobile users to interact, it will replace the chat, and dimensions wise basically similar to a panel on PC (in terms of ratio), but you would have to consider landscape views on tablets as well.
Panel popout – Panel Extensions can be opened in a new window and can be resized by the user at will
An extension can be in one of the “main” integration points, and the mobile point.
Who is a Twitch Extension
As part of being on Twitch, extensions are able to use a number of Extension Features, as well as doing more “regular” Twitch stuff. You could run a regular chat bot that runs with your extension, the Twitch Extension Timeout with bits does this in order to run the actual timeout commands on users
So aside from the “regular” stuff like chat bots, Twitch Extensions have access to some additional features
Bits Support – Allow Viewers, to exchange bits (a digital good) for various “digital goods” inside Extensions, this could range from an extra vote in polling extensions, or picking a victim in “Timeout With Bits”, or a cool cloak for your character in a game. Revenue generate here is split 80/20 between the Broadcaster/Developer.
Subscription Support – Allows the Extension to check the subscription status of a viewer on the channel the extension is installed to, avoiding the need for the Extension Developer to get and maintain oAuth access tokens from the Broadcaster “separately” to the install process of the Extension
Identitiy Link – Allows viewers to “login’ to your extension, we’ll cover this more in a later post in the series
Chat Capabilities – Allow the Extension to send chat messages (via a HTTP POST request), usually used as a notification system to prompt viewers to perform an action in the extension, like a new poll has started, go vote, for example
The Configuration Service – We’ll cover this in a later post as well, but it’s a way to store data on Twitch’s server that you can use in the extension, this might be something like, the name of the Broadcasters Character in a game that you would use in an API request to get information about the character
Streamer Allowlist – allows the Extension Developer to restrict whom can install the Extension to their channel
We’ll cover each Capability/feature in future blog posts in the series
How is a Twitch Extension
We’ll cover this more, in depth in later posts, a Twitch Extension is a bundle of files uploaded to the Extension CDN (Content Delivery Network). This needs to include your HTML, JS, CSS, and any static images you want to store on the CDN (pretty handy for background images for panel extensions). Twitch has some restrictions on what an extension can load from external sources, but essentially images are fine, CSS/JS is not, CSS/JS must be local/included.
Those files are uploaded to a sub domain of Twitch, into a particular sub folder tree on that sub domain, which we will cover more in depth in a later post, when we talk about building extensions and a suitable way to test them and some related gotchas.
All Twitch Extensions have their bundles uploaded to the Twitch and before they are released (or updated) to the masses, the Twitch Extension Review team will review the Extension, to ensure it works as intended, there is no major bugs effecting activation, the Extension compiles with the Guidelines and Terms of Services, and most importantly contains nothing malicious to interfere with the Twitch website or the viewer using the extension Computer/device
A Twitch Extension is allowed to communicate offsite, the resource just has to be secured over SSL, this is commonly referred to as an EBS or Extension Backend Service, we’ll cover this more later as well!
Why is a Twitch Extensions?
But Why is a Twitch Extension (any use) I hear you cry?
A Twitch Extension provides ways for the Streamers Community to perform rich interactions, without leaving the Twitch Broadcasters page, which means you keep the Viewer watching the Stream or interacting with Chat, with relatively easy access to Twitch API’s, without long additional steps for Viewer Authentication
Summary
That is it for Part 1 in this series on Twitch Extensions, I’ve cover the basic What, Where, Who, How of Twitch Extensions
Parts will either be weekly or bi-weekly, we will see how we go!
BUT MOTHER I CRAVE VIOLENCE
Well, until I write the next part if you want to read more about the Developer Side of Extensions, you can pop a visit over the to the Documentation or take a look at Twitch’s Introductory Page and you can always join us on the “TwitchDev Discord Server”, visit the Developer Support Page for the current invite link!
Were the sub headings supposed to make sense? No not really.