Twitch Extensions: Part 3 – The Architecture of an Extension

In Part 2 we spoke a fair bit about “the path and file name of the HTML file you wish to load, it is a relative path to the Testing Base URI/final upload URL”, and this week we will cover why I mentioned that every time!

So, this week The Architecture of a Twitch Extension!

An example of Architecture from Wikipedia, The Pyramids at Gizah - © CC BY-SA 2.0
An example of Architecture from Wikipedia, The Pyramids at Gizah – © CC BY-SA 2.0

Basic Architecture

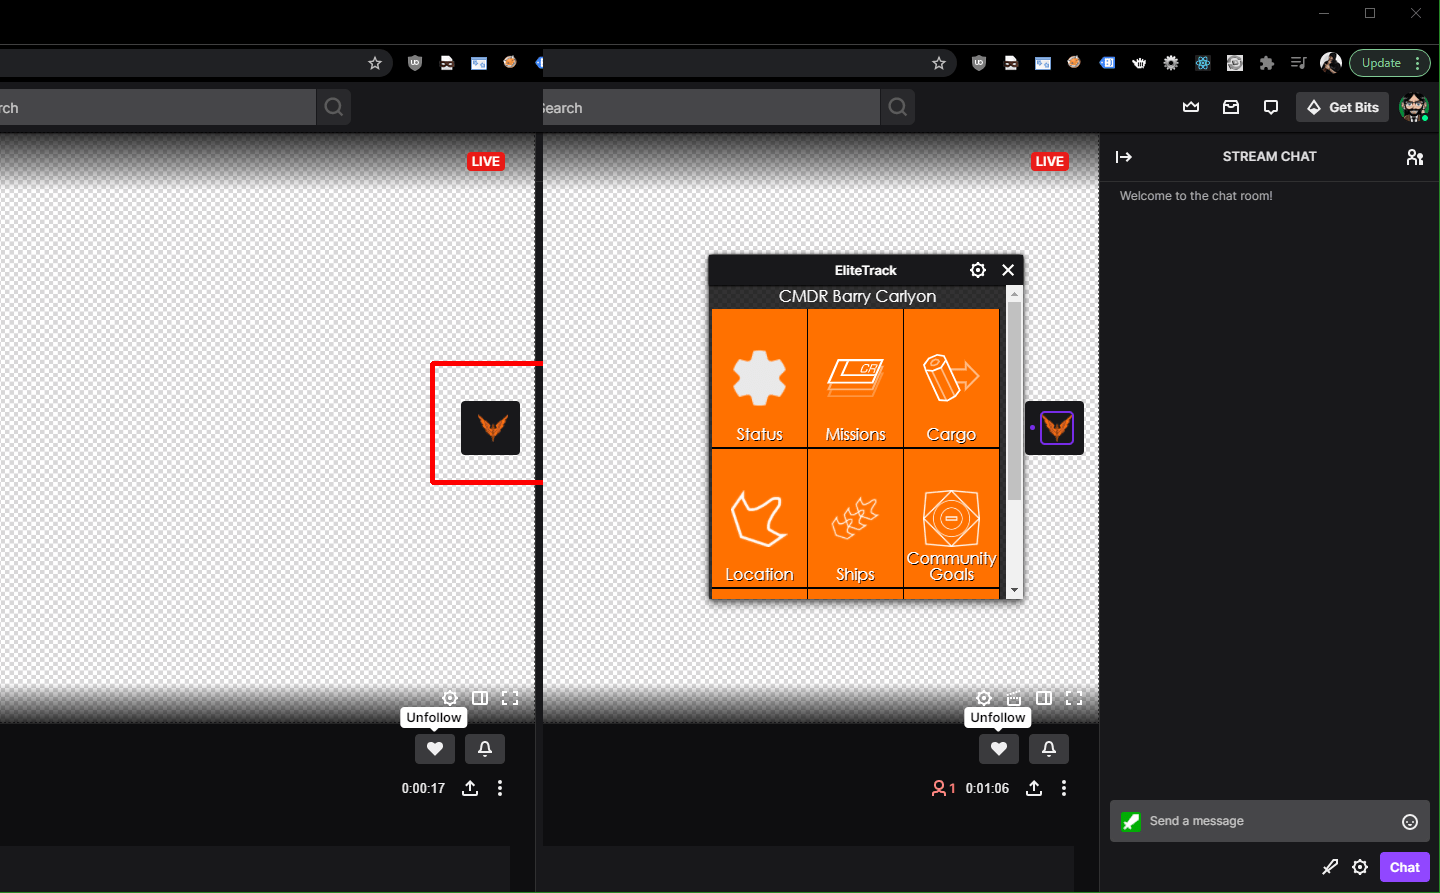
We have covered before that essentially a Twitch Extension is a “Website” that is iFrame’ed onto the Twitch Page, into an integration slot, but what does that actually look like?

The Twitch Architecture Overview
The Twitch Architecture Overview – According to Twitch

This is the “stack” that represents how an Extension is loaded, to illustrate this, we’ll use FlightSimTrack installed to the FlightSimTrack Twitch channel

  • First we have the Twitch Channel page – the “Browser” above
  • Then the Twitch Extension “supervisor”, this basically handles any handshaking between the outer Twitch and the inner Extension, we can’t cover more about it as it’s not documented anywhere, and that is my theory on what it does! It is mentioned in passing in the documentation
  • Then the Extension itself – the “iFrame” above

Relative path? WHY?

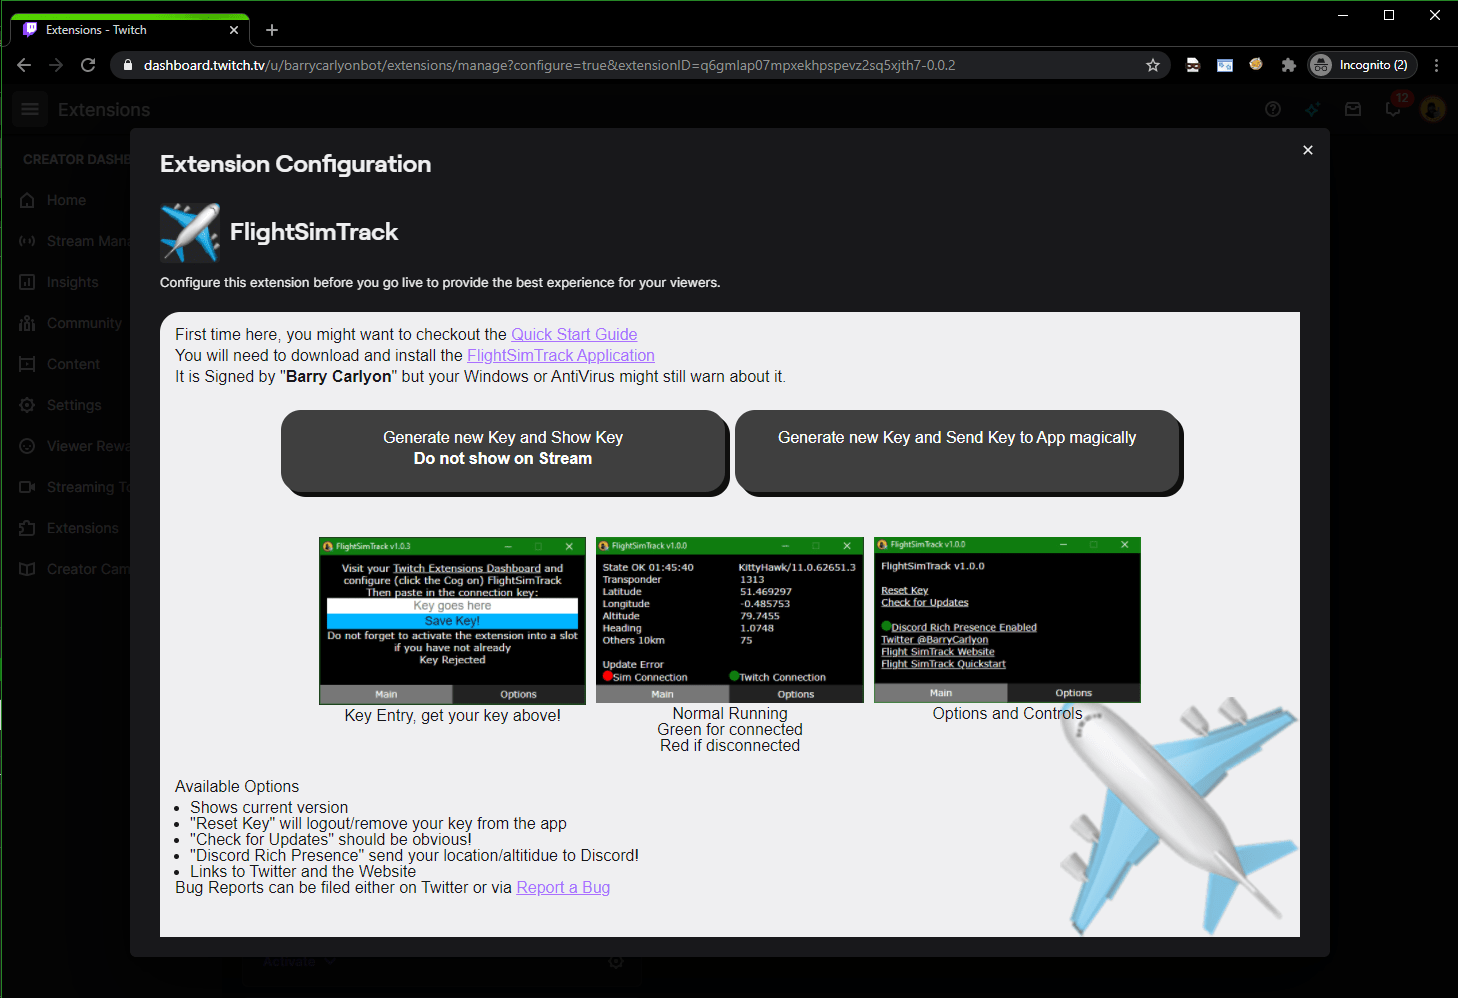
So why “relative path”? Well here is what the URL to the Panel looks like for FlightSimTrack

https://q6gmlap07mpxekhpspevz2sq5xjth7.ext-twitch.tv/q6gmlap07mpxekhpspevz2sq5xjth7/ 0.0.2/78753d6eeea69840398d8e46ff018e3b/panel/index.html?anchor=panel&language=en&locale=en-US&mode=viewer&state=released&platform=web

The first thing we’ll notice is that the index.html is in a sub folder of the domain. And NOW you know why we said “the path and file name of the HTML file you wish to load, it is a relative path to the Testing Base URI/final upload URL” every, single, time. And it’s a common hiccup that Extension Developers run into, a number of people come into the Developer Discord needing extension help, and they either made a mistake packaging the Zip for upload (we’ll cover Upload procedure in a future post), or the developer has used an “absolute” link to a JS/CSS file (starting /style.css or https://example.com/style.css for example, instead of just style.css).

But lets break down this URL, into it’s parts

URL breakdown

https://extClientID.ext-twitch.tv/extClientID/Version/md5OfZip/path_to_file_for_integration_point.html?querystring

We’ll cover the Query string parameters more in a future post, but you can read about them in the Extension Documentation Reference

The most important one to be aware of right now is anchor which tells you which integration slot this is. In this example it’s a panel, and FlightSimTrack’s panel is configured to load panel/index.html for this integration slot.

  • extClientID is obvious, it’s the ClientID of your Extension
  • Extensions live on the domain extClientID.ext-twitch.tv, why a different domain for each extension and separate to Twitch? This prevents any issues with Cookies from the “main” Twitch Website, so there won’t be any session hijacking or other crazy things, you can read a little more on that in the documentation
  • Version – the version of the extension that these files are for
  • md5 of the zip file that was uploaded, during testing you might go to Hosted test/local test (two Stages of the Extension Lifecycle that we’ll cover next week) a few times, so the md5 will change, this is a easy “cache defeat” when you are Hosted testing
  • Final part is the path and html file you specified in the console to load for this integration slot
Asset Hosting for FlightSimTrack

The URL structure is the same for every integration point, and all files are considered “public”, which is something to consider when building in things for Channel Moderators to use.

That about covers everything for the frontend

Well, what about the Backend?

Oh you want the backend to do you?

The Twitch Architecture Overview
The Twitch Architecture Overview – According to Twitch again!

First of all it’s important to note than a Backend, also referred to as EBS or Extension Backend Service, is entirely optional, depending on your Extension, what/how it functions or what it does, it might not even need an EBS, either from calling Public API’s or from it being completely self contained.

The SSL Requirement

But for those Extensions that need an EBS, there is essentially one rule, it must serves it’s contents over SSL, this isn’t just good for Security, but is required as the Twitch Website is over SSL and browsers will reject Mixed Content (loading non SSL content from SSL).

So

  • Loading from the EBS? Needs to be https://urltoyourebs/
  • Loading from a Public API? Needs to be https://someapi/
  • Loading from a Websocket? Needs to be wss://somesocket/
  • Loading an image from a CDN? Needs to be https://somecdn/image.png

To illustrate some examples:

  • FlightSimTrack viewer, nothing at all (images are on the Twitch Extensions CDN and map tiles come from map tile vendors over SSL)
  • FlightSimTrack config, EBS lives at https://twitch.extensions.barrycarlyon.co.uk/
  • CohhCarnage Panel Extension, uses an API at https://extensions.cohhilition.com/ and a socket at wss://extensions.cohhilition.com/
  • Dropped Frames video Extension, no API or socket at all, but images from a CDN, usually Twitter/Twitch avatars directly from Twitter/Twitch over HTTPs, it receives from Twitch PubSub only.

You can see that they all all work over endpoints/routes protected by SSL.

We’ll cover how to build a “custom” EBS, and verifying identity in a future post, this week it’s just “Architecture”, the long and short of it, is you are basically just building a Custom API to interact between your front end and backend. A common way I describe Extensions, is as follows

Extensions are a website, where the front end is on a different server to the backend, and you can’t do server side rendering

– Barry Carlyon on “Well what is an Extension anyway!”

Languages

Whilst a Twitch extension is “limited” to HTML and JavaScript, your EBS/Backend API can be in any language you want. But when it comes to examples, samples and boilerplates you’ll generally find them in JavaScript (via NodeJS) or Go, (since Twitch is a “Go House”). We’ll be using NodeJS in this series, merely because it’s potentially the easiest for people to understand and convert knowledge between different languages.

If you want to jump ahead, you can check out the Developer Rig, which will provide you access to a number of Extension Examples, which are also available on the TwitchDev GitHub, or my own Twitch Profile Extension (which demonstrates how to call the Twitch API via an “EBS” proxy), these examples are designed to highlight a specific function of Twitch Extensions, rather than a “practical” example.

Real Certificates only

Naturally this needs to use “real” SSL Certificates, as apposed to self signed, which is “bearable” for testing with. Generally you’ll find Extension Developers will whip out LetsEncrypt as it’s free and easy to setup, and straightforward to setup a testing system.

Summary

So that covers the Architecture of an Extension

Not really sure what else to add, here is a photo of my cat, Sprite.

Sprite has invaded this Blog Post

What about next week?

Next week we will be looking at the Developer Rig and how/when to use it and setting up a Dev environment suitable for developing a Twitch Extension!

BUT MOTHER I CRAVE VIOLENCE

Well, until I write the next part if you want to read more about the Developer Side of Extensions, you can pop a visit over the to the Documentation or take a look at Twitch’s Introductory Page and you can always join us on the “TwitchDev Discord Server”, visit the Developer Support Page for the current invite link!

Why you think you are good enough to even write blog posts on Extensions? I made a one or two of them Extensions of various types.

Twitch Extensions: Part 2 – Integration Points

Welcome to part two of the Twitch Extension Series of Posts.

This week, we’ll be talking a little on Integration Points!

What integration points does a Twitch Extension have?

We touched on this in Part 1

Twitch provides developers with three main, two auxiliary, and two Broadcaster only integration points, and of these integration points Twitch lets us pick the HTML (and thus Javascript or CSS) file(s) we wish to load for all of these. (Well except Panel Popout, screw that guy, it owes me a tenner).

Hang on just a minute

What? OH! You want to know how to create an Extension first or where to set the HTML to be loaded for each view? Yes, that would make a little more sense, wouldn’t it!

Extensions can be created, configured, and release via the Twitch Developer Console.

The Developer console can be found at https://dev.twitch.tv/console

After logging in you’ll generally land on the Summary page that will list you current Extensions, Applications and any Games/Categories you may “own” on Twitch from being part of an organization

An example of the Twitch Developer Dashboard Overview

We’ll ignore everything else since we are only interested in Extensions.

Twitch Developer Console for Extensions

If you click Extensions then “Create Extension” it’ll take you through a short “Setup Wizard” before presenting you with your ClientID for the Extension. We’ll do that now so we have an Extension to play with during this series!

PRO TIP: After starting the Wizard, please finish the wizard, even if you intend to change everything later.

  • Asks for your Extension Name, then Click Continue
  • Asks you to pick the views/integration points you want, which you can change later
  • Provide a Version number, 0.0.1 will suffice for now
  • Add additional details such as the Extension description and contact details for you
  • Now hit “Create Extension Version”

Twitch will send you an email to verify the provided contact details, so click the link in those email(s).

We’ll cover most of the other fields in a future post, but today we are interested in integration points.

Twitch will now have dropped us on the status page for our Extension

It’s important to note that you cannot use “Twitch” in the name of you Extension, and the name needs to be unique across Extensions and Applications across all of Twitch

So Integration Points?

On the Extension Status page, hit “Asset Hosting”, this will take us to the page to configure our “Extension Views” and what html to load. Twitch will prefill with something sensible, but you can use anything you want

"Asset Hosting" section of a Twitch Extension Console
“Asset Hosting” section of a Twitch Extension Console

At the top is the Testing Base URI, we are going to ignore this for now, but we’ll be covering it next week, when we might actually start building.

Below that comes the section that lets you pick via Checkbox, which views (for the viewer) you wish to enable. And the settings for each view.

Panel

A Panel is rendered below the stream, in the panels section, Broadcasters have “some” control over where a panel extension will appear in relation to the other panels, Twitch liks to jumble things round sometimes, but generally Panel Extensions are pretty sticky and reflect the broadcasters choice.

A panel has the following settings available

  • Panel Viewer Path – the path and file name of the HTML file you wish to load, it is a relative path to the Testing Base URI/final upload URL
  • Panel Height – a panel extension is fixed Width (318px), but the developer can choose what height to use, ranging from 100px to 500px

A Panel extension, can be popped out (one of the Auxiliary Integration points we mentioned), which will start at 318px wide and the specified height, but the Viewer can then resize this window. It’s something to be aware of when building your extension, and offers the ability to use Responsive design

Video – Fullscreen

A Video Fullscreen extension will cover the whole stream, so the developer and designer can utilize the whole stream. Usually it’s safe to assume that the size is 1920px x 1080px, and you can scale as needed, we’ll cover some ways to handle this in a future post

A video Fullscreen only has one setting, the HTML file you wish to load, it is a relative path to the Testing Base URI/final upload URL

Mobile

YES, THE CHECKBOXES GO: Panel, Video – Full, Video – Comp, Mobile but the page goes in a different order

The Mobile view is presented to Viewers using a Mobile device in the Twitch App for that device, such as an Apple iPhone, Apple Table, Android phone and so on.

Like Video Fullscreen there is only one option here, the HTML file to load, it is a relative path to the Testing Base URI/final upload URL

Mobile you’ll need to practice Responsive design as dimensions will vary by device and orientation of the device

Video – Component Viewer Path

A video Component roughly works similar to a Panel, but it defaults to being “closed” and can be manually opened by the Viewer by clicking the relevant icon in the “taskbar”, the Taskbar is presented to the viewer on the right of a Live Stream.

The Extensions Taskbar, left is shown a Video Component Extension in the closed state and right is the open state

The following options are available

  • Video Component Viewer Path – the path and file name of the HTML file you wish to load, it is a relative path to the Testing Base URI/final upload URL
  • Video Component Sizing Parameters – there are a number of options here we’ll cover this more in depth at a future post as it can get fun!

Non Viewer integration Points

That covers all the Viewer intergration points and their options in summary

Next we have the “Broadcaster” Integration points, there are two of them, both have the same available settings, the path and file name of the HTML file you wish to load, it is a relative path to the Testing Base URI/final upload URL

Configuration view

This is the main/one off configuration view, when a broadcaster first installs your Extension they will be prompted to ask if they want to visit the Configuration page or not. This page is used for one off or infrequent configuration

The Extension Config prompt during install

In some cases, developers can also block an extension being activated if the configuration has not been done, usually this would be used for things such as providing an API key to access another API, or asking the broadcaster what their Destiny 2/other game Character name is (for example)

The Twitch Extension configuration page for FlightSimTrack
The Twitch Extension configuration page for FlightSimTrack, this example provides additional setup instructions and the API Access Key for the Companion Desktop App

It can be reached from the install flow for an extension and from the “Cog” Icon on an Extension in the Extension Manager section of the Dashboard

In terms of Dimensions it’s usually Landscape but a broadcaster can resize it pretty narrow, so you’ll need to be responsive or provide a minimum width

Live Configuration View

The Live configration view is to be used by the broadcaster for common tasks or things that need to be done during a Stream, examples of this would be to start a Poll for a poll extension, or a “I’m starting a round” in a mini games extension.

The Live configuration view is reached by the Broadcaster from the “Quick Actions” Section of their “Stream Manager”

A Twitch Dashboard Quick Action Button
An example of a Quick Action Extension Button

When clicked, a new window will open, which will contain the Quick Action/Live Configuration View, it’s resizable by the broadcaster so you’ll need to practice responsive design again here

An Opened Quick Action
EliteTrack’s Quick Action view provides easy access to a summary of the data sent, and prompts the user about Bug Reporting

Summary

And that covers the various integration points in a bit more depth compared to last weeks post!

Next week, we’ll be covering “Getting Started Building” I think and why every time I mention a HTML file did I follow it with: “the path and file name of the HTML file you wish to load, it is a relative path to the Testing Base URI/final upload URL”

BUT MOTHER I CRAVE VIOLENCE

Well, until I write the next part if you want to read more about the Developer Side of Extensions, you can pop a visit over the to the Documentation or take a look at Twitch’s Introductory Page and you can always join us on the “TwitchDev Discord Server”, visit the Developer Support Page for the current invite link!

Why you think you are good enough to even write blog posts on Extensions? I made a one or two of them Extensions of various types.

Twitch Extensions: Part 1 – An Introduction

This is the first part of a I don’t know how many parts series on Twitch Extensions. We’ll cover how to develop them, how to EBS them, some notes on Designing and what to avoid, some practices for after release care, and touch on some marketing ideas/things for your Extension Website.

So since this is the first part, we’ll cover the basics first. What, Where, Who, How, and Why of an Extension

When is Gamora
Why is Gamora

What is a Twitch Extension

A Twitch Extension is basically an iFrame that allows a developer to create anything they want, as long as it fits within the Guidelines set out by Twitch, and of course it’s Terms of Service and Developer Agreements

This can range from MiniGames, to QnA/Polling extensions, to Community information extensions, to game information extensions, or play with the Streamer extensions

Some examples include

  • Sound Alerts – Lets users pick a sound to play on Stream, can be free or utilize bits/channel points
  • Crowd Control – Provides plugins for a variety of games, to allow people to interact with the game, make it easier/harder for the Broadcaster
  • Cardboard.live – Lets viewers see what cards are in your current deck, and check the state of the game board, without having to spam/ask in chat
  • Borderlands 3 ECHOcast – Lets viewers check out your Borderlands 3 character, and let viewers win extra loot for their own character when the Broadcaster opens Red Chests in game
  • Detroit: Community Play – Ask the community to pick/vote on the option when a multiple choice question appears during the game play of Detroit: Become Human.
  • The Cohhilition – A community interaction extension, that provides access to various Community things (in this case for a single channel), without having the viewer leave the comfort of the Twitch page

Some of these descriptions are super simple to cover the salient points and many will do more things than my summary covers

Check out more extensions at Twitch’s own Extension Discovery

Where is a Twitch Extension

Twitch being a live streaming site, provides to the Broadcaster, a page, and that page will consist of a number of elements.

Depending on if the streamer is live or not the elements on the page will vary slightly. If the Broadcaster is live, you’ll land on the video/chat page, if the Broadcaster is not live, you’ll land on a “Home”/index style page

Now the part that we care about is the “Chat”/live view page, and on that page you will find a number of sections

An example of a Twitch Channel Page
  • The Video Player
  • The live Chat
  • The Stream information section – The Title and Category
  • A small about the Broadcaster section
  • The Panels section

A Twitch Extension can be added to a couple of these sections, and has 3 main (and two auxiliary) integration points.

The Main Integration points

  • Video Overlay – The Extension can cover/utilize the whole of the video player
  • Panel – The Extension appears in the panels section below the stream, and has width of 318px and a maximum height of 500px
  • Video Component – Basically a panel that appears over the video player but is locked to the right hand side of the player, it can utilize a varied amount of the player space

The “main” integration points are mutually exclusive, an Extension can only occupy any one of those slots at once

The Auxiliary Integration points

An example of a mobile extension on iOS
  • Mobile Panel – The Extension is available on mobile for mobile users to interact, it will replace the chat, and dimensions wise basically similar to a panel on PC (in terms of ratio), but you would have to consider landscape views on tablets as well.
  • Panel popout – Panel Extensions can be opened in a new window and can be resized by the user at will

An extension can be in one of the “main” integration points, and the mobile point.

Who is a Twitch Extension

As part of being on Twitch, extensions are able to use a number of Extension Features, as well as doing more “regular” Twitch stuff. You could run a regular chat bot that runs with your extension, the Twitch Extension Timeout with bits does this in order to run the actual timeout commands on users

So aside from the “regular” stuff like chat bots, Twitch Extensions have access to some additional features

  • Bits Support – Allow Viewers, to exchange bits (a digital good) for various “digital goods” inside Extensions, this could range from an extra vote in polling extensions, or picking a victim in “Timeout With Bits”, or a cool cloak for your character in a game. Revenue generate here is split 80/20 between the Broadcaster/Developer.
  • Subscription Support – Allows the Extension to check the subscription status of a viewer on the channel the extension is installed to, avoiding the need for the Extension Developer to get and maintain oAuth access tokens from the Broadcaster “separately” to the install process of the Extension
  • Identitiy Link – Allows viewers to “login’ to your extension, we’ll cover this more in a later post in the series
  • Chat Capabilities – Allow the Extension to send chat messages (via a HTTP POST request), usually used as a notification system to prompt viewers to perform an action in the extension, like a new poll has started, go vote, for example
  • The Configuration Service – We’ll cover this in a later post as well, but it’s a way to store data on Twitch’s server that you can use in the extension, this might be something like, the name of the Broadcasters Character in a game that you would use in an API request to get information about the character
  • Streamer Allowlist – allows the Extension Developer to restrict whom can install the Extension to their channel

We’ll cover each Capability/feature in future blog posts in the series

How is a Twitch Extension

We’ll cover this more, in depth in later posts, a Twitch Extension is a bundle of files uploaded to the Extension CDN (Content Delivery Network). This needs to include your HTML, JS, CSS, and any static images you want to store on the CDN (pretty handy for background images for panel extensions). Twitch has some restrictions on what an extension can load from external sources, but essentially images are fine, CSS/JS is not, CSS/JS must be local/included.

Those files are uploaded to a sub domain of Twitch, into a particular sub folder tree on that sub domain, which we will cover more in depth in a later post, when we talk about building extensions and a suitable way to test them and some related gotchas.

All Twitch Extensions have their bundles uploaded to the Twitch and before they are released (or updated) to the masses, the Twitch Extension Review team will review the Extension, to ensure it works as intended, there is no major bugs effecting activation, the Extension compiles with the Guidelines and Terms of Services, and most importantly contains nothing malicious to interfere with the Twitch website or the viewer using the extension Computer/device

A Twitch Extension is allowed to communicate offsite, the resource just has to be secured over SSL, this is commonly referred to as an EBS or Extension Backend Service, we’ll cover this more later as well!

Why is a Twitch Extensions?

But Why is a Twitch Extension (any use) I hear you cry?

A Twitch Extension provides ways for the Streamers Community to perform rich interactions, without leaving the Twitch Broadcasters page, which means you keep the Viewer watching the Stream or interacting with Chat, with relatively easy access to Twitch API’s, without long additional steps for Viewer Authentication

Summary

That is it for Part 1 in this series on Twitch Extensions, I’ve cover the basic What, Where, Who, How of Twitch Extensions

Parts will either be weekly or bi-weekly, we will see how we go!

BUT MOTHER I CRAVE VIOLENCE

Well, until I write the next part if you want to read more about the Developer Side of Extensions, you can pop a visit over the to the Documentation or take a look at Twitch’s Introductory Page and you can always join us on the “TwitchDev Discord Server”, visit the Developer Support Page for the current invite link!

Were the sub headings supposed to make sense? No not really.

Why you think you are good enough to even write blog posts on Extensions? I made a one or two of them Extensions of various types.

How does Twitch’s new EventSub work?

Preamble

In the beginning, Twitch created Webhooks. And the world rejoiced, finally we no longer have to long poll for things such as followers! Hurrah! But it came with a gotcha, since Twitch Webhooks is based on the Websub specification, each and every Webhook you wanted to listen to had to be renewed, now this is limited to 10 days (max) or the time remainging on the Token you authenticate with (when asking to listen to priviledge topics such as subscribers), which generally meant you had to remake certain subscriptions every 4 hours, after of course renewing the token with the refresh token. Since the maximum length of a Twitch user token is 4 hours. (Implicit tokens use 60 days, but you can’t refresh those).

This wasn’t a good solution for developers, since it creates siginificant load, and “wasting” of your rate limits with Helix. Even more so when working with multiiple streamers.

Twitch has acknowledged this as a problem, which leads us to the new product of EventSub.

Aside from ignoring the need to remake your subscriptions periodically, EventSub also doesn’t need a correspoding Helix endpoint to exist for the topic you wish to listen on (this also means a different format for the data payloads), and means EventSub can make new topic types without waiting for Helix to create the endpoint first.

So, now onwards to the meat of this post!

EventSub, hows does it work?

The long and short of it, is that everything is sent via HTTP Post requests, to your SSL protected endpoint.

Unlike Webhooks, Eventsub only authenticates using App Access Tokens (for server to server requests), but how does this work when you are attempting subscribe to a channels new Subscribers topic, or the Ban/timeout events topics?

Authentication

Well, when you make a subscription request to EventSub, Twitch looks at your App Access token, then checks in the background if the requested broadcaster has connected to your Application at any point, with the relevant scopes, and not revoked that connection.

So, it’s a “two legged” approach to authentication. But means that you, the developer, don’t need to store the broadcasters access or refresh tokens, after they have authorised. though you generally would in order to perform “catch up” if your application goes offline/restarts for any reason.

Infrastructure

So to utilise EventSub, you need to create a portal that allows broadcasters to grant access to your Application to their account with the relevant scopes, using “regular” User Authentication.

Then on authentication you check/create eventsub subscriptions as needed, using your App Access Token. You should also store and use the returned User Acces token for use on catchups

And you need a server that can recieve HTTP Posts from Twitch for verification of the connection and accepting data payloads. (Generlly here you’ll HTTP 2xx OK as quickly as possible and send the data into background processes.

TLDR: for example if you can call Get Broadcaster Subscriptions (at the moment you obtained the Access Token) then your ClientID can subscribe to the channel.subscribe EventSub.

Summary

Hopefully this should help out anyone that is new to EventSub or getting involved with the Twitch Channel Points Hackathon.

Since many people may look at EventSub to recieve new Channel point redemptions but might trip up over the initial authentication setup.

There are a number of examples on my GitHub that might help, but if you need any further help, please join us on the TwitchDev Discord Server!

Just thought I would write up this post with a ramble of notes on how EventSub Authentication works, since theres gonna be a spike in people asking and probably getting stuck if they are new to working with Twitch.