Finally Twitch EventSub is at feature parity with third party supported/documented PubSub, that the end of PubSub has been announced.
In a forum post over on Twitch Developers it has been announced the schedule for the shutdown of Twitch PubSub for access by third party developers.
The final death date is April 14th 2025.
Which I guess means it’s time for me to complete my own migration from PubSub to EventSub. Which at least is JUST ABOUT planned….
At least for 90% of what I need it’s ALL USERNOTICE as an EventSub topic, which is this case is channel.chat.notification and then whatever I choose to go with for consuming cheering.
So then for anything else I’ll need that doesn’t exist, either from it not existing in the first place OR a undocumented topic I might be using, off to uservoice I’ll go!
Off hand I think there is only one thing but we’ll see when I work on and complete my migration! The only other barrier is gonna be authentication but I have authentication or can get it for everything I need.
It is worth noting that Extension PubSub is unaffected, as that for the most part is a completely different system that just shares the same name.
Topic Migration notes
Edit: I guess I should add some notes about migration
DO NOT FORGET this also effects the Extension API endpoints (such as Send PubSub message and Send Extension Chat message), this doesn’t affect the Extension JS Helper!
Most people will likely be using Ajax calls in website front ends and are now confused how to migrate, there are two routes for this problem. You either ask the user to login with Twitch to provide a token to use (this is how my GitHub examples work) but not very user friendly, you don’t want to prompt the user to login to your website JUST to show them if your stream is live or not. The second route is your frontend needs to call your server and the server uses a Client Credentials token to call the API with.
Alternatively if you are doing something “simple” such as “check my stream is live” then you should consider moving from API calls to EventSub instead. Then when a channel changes Title or stream status, Twitch will tell you in (near) real time. Collect and store that data in a database, and now your website doesn’t need to call the Twitch API each time someone loads your website.
If a feature is missing or theres something you need thats not in Helix, don’t forget to file a UserVoice. I know a lot of people need/want Clip Offsets so make your voice heard with UserVoices and votes on existing issues. See also my mega UserVoice sheet. And checkout the GitHub for known issues.
In part 5 we wrote about a suitable testing platform for building your extensions on, essentially we create a static content server, that mimics the Twitch CDN for testing with.
Twitch Announced on the Forums that they are revising the CSP (Content Security Policy) that extensions use to protect and control what can be loaded. I wrote about this in the previous blog post.
I’m currently waiting on a response from Twitch (via the forums) about any other changes to the CSP, but for now, you can test the changes today!
What Even is CSP
First lets do a quick explanation of what CSP, CSP is Content Security Policy, a browser technology to help control what a given Website can load and what browser functions are allowed.
The HTTP Content-Security-Policy response header allows web site administrators to control resources the user agent is allowed to load for a given page. With a few exceptions, policies mostly involve specifying server origins and script endpoints. This helps guard against cross-site scripting attacks (Cross-site_scripting).
You can read more about CSP and the various things it can do over on the MDN Web Docs. There is a lot more that can and can’t be done with CSP more than just controlling what content can be loaded from where, but for Twitch Extensions we only need to consider the parts of the Policy that affect Twitch Extensions.
Twitch Extension CSP Policy
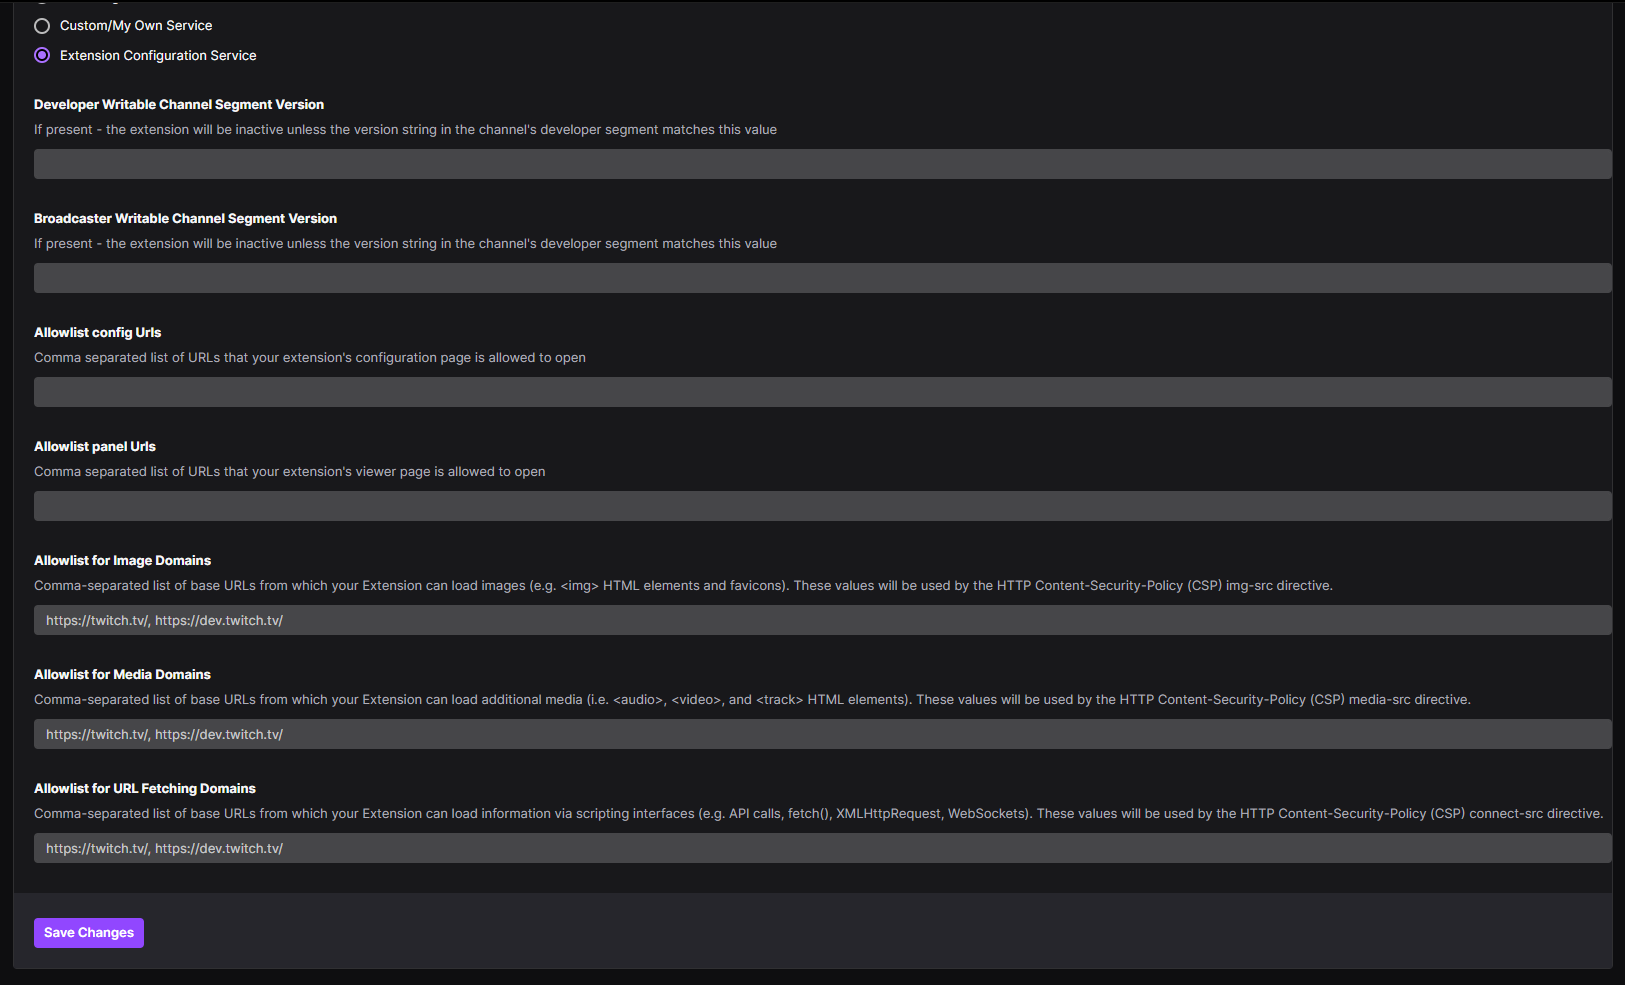
Twitch is requiring Extension developer to declare the Connect, Img, and Media domains, which in the policy are connect-src, img-src and media-src. You can declare this in the Developer Console for a version of your extension, under the Capabilities tab.
The new Extension Dashboard fields
Now, the items you enter here only apply when you are using Hosted Test (or release), since Hosted Test will use Twitch’s CDN, and thus Twitch’s Server which can load and use the relevant fields, but in localtesting (aka not the CDN) we need to set this up ourselves.
Local Testing a CSP
If you have been following this series, then you already have a Node/Express server that will run a static output for you. We can easily add CSP headers to this server using a module called Helmet, generally speaking it’s wise to consider adding helmet (or CSP Headers in general) to any website you run to protect your users, but I digress!
So, how to set this up for Testing with.
Normally I’d say, on server start call the API to get the current extension settings from the console, however, the API at this time has not been updated to include the new fields, I raised a UserVoice requesting the new fields be added to the endpoints. And you can upvote that here.
So for now, we’ll need to populate the CSP for Helmet manually.
Configuring Helmet for CSP
The first thing I did was look at a released extension to see what the current CSP is, which I then split out into a object for configuring Helmet with. Then I looked at what the rig needs, and then looked at what you need to add to correctly simulate a CSP.
The base CSP for a Twitch Extension is, here twitch.client_id is loaded from an external config file, and represents the location that Hosted Test and Release use to host your files. Which I’ll touch on later.
/*
Current base CSP rules subject to change
See:
https://discuss.dev.twitch.tv/t/new-extensions-policy-for-content-security-policy-csp-directives-and-timeline-for-enforcement/33695/2
This example is based off a live extension
*/
let contentSecurityPolicy = {
directives: {
defaultSrc: [
"'self'",
`https://${twitch.client_id}.ext-twitch.tv`
],
connectSrc: [
"'self'",
`https://${twitch.client_id}.ext-twitch.tv`,
'https://extension-files.twitch.tv',
'https://www.google-analytics.com',
'https://stats.g.doubleclick.net'
],
fontSrc: [
"'self'",
`https://${twitch.client_id}.ext-twitch.tv`,
'https://fonts.googleapis.com',
'https://fonts.gstatic.com'
],
imgSrc: [
"'self'",
'data:',
'blob:'
],
mediaSrc: [
"'self'",
'data:',
'blob:'
],
scriptSrc: [
"'self'",
`https://${twitch.client_id}.ext-twitch.tv`,
'https://extension-files.twitch.tv',
'https://www.google-analytics.com',
'https://stats.g.doubleclick.net'
],
styleSrc: [
"'self'",
"'unsafe-inline'",
`https://${twitch.client_id}.ext-twitch.tv`,
'https://fonts.googleapis.com'
],
frameAncestors: [
'https://supervisor.ext-twitch.tv',
'https://extension-files.twitch.tv',
'https://*.twitch.tv',
'https://*.twitch.tech',
'https://localhost.twitch.tv:*',
'https://localhost.twitch.tech:*',
'http://localhost.rig.twitch.tv:*'
]
}
}
const helmet = require('helmet');
/*
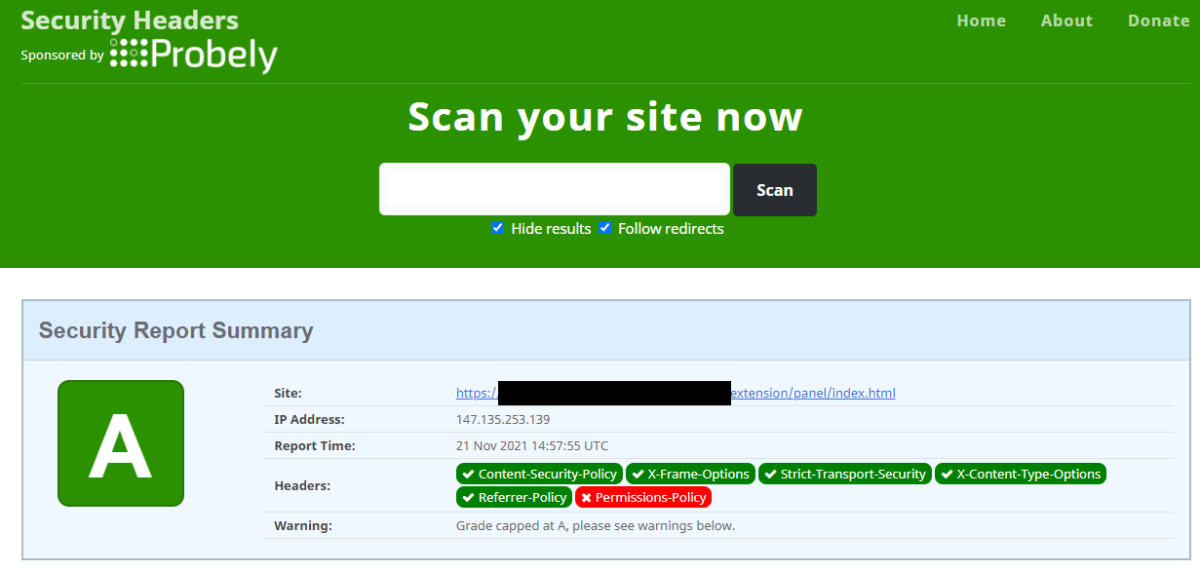
You can use Security Headers to test your server, if this server is web accessible
https://securityheaders.com/
It'll test that your CSP is valid.
Best testing done with an extension, on Twitch or in the rig!
*/
console.log('Going to use the following CSP', contentSecurityPolicy);
app.use(helmet({
contentSecurityPolicy
}));
This I add after app.listen and before anything else! It does need to go before your app.use for express.static
This will configure your test server to use the base/default CSP. And will log it out the full CSP to the console when you start the server.
The Extension Developer Rig
So the next step is how to enable your test server to work in the Twitch Extension Developer Rig. I don’t often use the rig, but it’s handy for spot testing views and mobile when I don’t have my phone handy (or the Extension has not been iOS allow listed yet!)
The Extension Rig is built in Electron, which means it will include calls to file and in testing it spot calls some other things.
For the rig I add the following rules, which I append to the default CSP using a Config Switch.
/*
should we enable the Rig?

The rig being an electron app, will call some other things
As well as having a file:// based parent
*/
if (csp_options.enable_rig) {
    let rig_sources = {
        connectSrc: [
            'wss://pubsub-edge.twitch.tv'
        ],
        frameAncestors: [
            'http://localhost:*',
            'file://*',
            'filesystem:'
        ]
    }

    // append these to the CSP
    for (let sourceType in rig_sources) {
        for (let x=0;x<rig_sources[sourceType].length;x++) {
            contentSecurityPolicy.directives[sourceType].push(rig_sources[sourceType][x]);
        }
    }
}
Nothing to silly there, but important if you are testing in the rig. Only enable this in your server when rig testing not testing on the Twitch website, as it’s overly permissive and might catch you out later.
My Sources
The final thing to do is to setup your sources, now this gets a little weird, as a valid CSP rule can omit the schema of the URL (see note).
For this example/setup we are adding the content domains to all three CSP directives. Using this example you can adjust and modify this as granularly as you want.
/*
Did we configure places that we can/may load media from
And yes we are just gonna glob them to all three groups
For example purposes
*/
csp_options.content_domains.forEach(domain => {
    contentSecurityPolicy.directives.imgSrc.push(domain);
    contentSecurityPolicy.directives.mediaSrc.push(domain);
    contentSecurityPolicy.directives.connectSrc.push(domain);
});
Note: In testing browsers will not enable/allow WSS if you declare a schema-less domain of www.example.com. So if you want WSS you need to declare it explicitly, for this I declare wss://www.example.com and https://www.example.com in the rule (not the lack of a trailing /).
I configure these schema+domains in an external configuration file for the server. Here is an example config.json:
If your extension utilizes an EBS you’ll need to declare that and add it to your connect-src, however if you also load images from your EBS you can skip this step.
I generally put my images and assets on a seperate server to my EBS, but for test purposes, this server example adds the EBS domain to all three declarations, for both schemas:
/*
Did we configure an EBS to call
*/
if (csp_options.ebs_domain) {
    console.log('Appending EBS Domain');
    let ebs_rules = {
        imgSrc: [
            'https://' + csp_options.ebs_domain,
            'wss://' + csp_options.ebs_domain
        ],
        mediaSrc: [
            'https://' + csp_options.ebs_domain,
            'wss://' + csp_options.ebs_domain
        ],
        connectSrc: [
            'https://' + csp_options.ebs_domain,
            'wss://' + csp_options.ebs_domain
        ]
    }

    for (let sourceType in ebs_rules) {
        for (let x=0;x<ebs_rules[sourceType].length;x++) {
            contentSecurityPolicy.directives[sourceType].push(ebs_rules[sourceType][x]);
        }
    }
}
Full Example!
I put all of this together as a full example over on my GitHub. See Part 6 of the repository. This provides a “rig” as described in Part 5 but with the additional CSP Fields included.
To set this up do as follows
Download the Example from GitHub
Copy config_sample.json to config.json
Populate the twitch->client_id with your Extension Client ID
Revise the listen port if needed
Configure Your CSP options as needed, add the content domains as needed. And you EBS domain as needed.
If you load content from your EBS domain, set the ebs_domain to false, to avoid a duplicate declaration of a domain, or do not include your ebs_domain in your content_domains
Once you have setup the server, you can the test your Rig via Security Headers which will test that your CSP is valid, however this only works if your Test Server is accessible from the internet! Which if you follow Part 5’s note will be for SSL testing purposes! And will only test that your CSP looks correct, not that it functions as intended!
Then you can move on to testing your Extension and check that your CSP works as intended, then you do not have to move to hosted test and back to test changes to your CSP!
If/when the API is updated to return the new fields, I’ll add a part 6.5 (probably) which will use the API to get the details instead. Sods law you’ll add a domain to your Test Rig/Server, and then forget to add the same domain to your Capabilities tab!
DEADLINE
Twitch will begin to Enforce the new CSP policy on January 25th.
Twitch closes for the holidays between Friday, 12/17/21 – Monday, 1/3/22. Twitch requests that Developers submit their extensions for review no later than Wednesday, 15th of December at 3PM PST.
Upcoming Winter Break
Attention, developers! Please note that the review team will be observing a winter holiday break from Friday, 12/17/21 – Monday, 1/3/22 and will not be performing Organization, Game, Chatbot Verification, or Extension reviews during this period of time. If you need a review completed prior to the holiday break, please submit your review request by no later than Wednesday, 12/15 at 3PM PST. Thank you for your understanding & happy holidays!
Well what about the report_uri, that you saw in the config.json example?
Well CSP provides a method to report CSP errors to a defined HTTPS POST endpoint. So whenever a CSP error occurs it can be reported to that HTTPS URL, very handy to help debug issues.
So if you configure your report_uri to be the same URL as your Extension Test rig, but with /csp/ on the end, so if your rig is at https://mytestrig.com/ then your CSP Report URI is https://mytestrig.com/csp/
You can capture and log these reports, for Express you will need to use the following code snippet, please note that a JSON payload is posted but using an alternative content-type, so you need to tell express.json to trigger on that content-type of application/csp-report
/*
This will capture any CSP Report and dump log it to console
*/
app.post('/csp/', express.json({
    type: 'application/csp-report'
}), (req,res) => {
    console.log(req.body);

    res.send('Ok');
});
Added a small update to this post for easier testing with, first I took the entire CSP component and seperated it into a NPM module for easier usage and configuration.
The module, `twitchextensioncsp` can be found over on NPM and on GitHub and essentially just wraps Helmet for you and passes in the CSP Configuration with much less copy/paste between extensions if you are working on multiples.
For “ease” of use heres an “quick” static Express Server implementing the module, it will do the following:
Create an Express Server on port 8050
Invoke twitchextensioncsp
Enable the Extension CSP to support the Twitch Extensions Rig
Add Img and Media and connect example domains
Static mount the build directory onto extension so your testing base URI is http://localhost:8050/extension/ swap as needed depending on your SSL solution
If you refer to the README for twitchextensioncsp there are a handful of quick start examples for the CSP setup. As you do need to explicitly declare the Twitch CDN and Twitch API if you wish to use those in your Extension frontend!
Twitch provides developers with three main, two auxiliary, and two Broadcaster only integration points, and of these integration points Twitch lets us pick the HTML (and thus Javascript or CSS) file(s) we wish to load for all of these. (Well except Panel Popout, screw that guy, it owes me a tenner).
Hang on just a minute
What? OH! You want to know how to create an Extension first or where to set the HTML to be loaded for each view? Yes, that would make a little more sense, wouldn’t it!
Extensions can be created, configured, and release via the Twitch Developer Console.
After logging in you’ll generally land on the Summary page that will list you current Extensions, Applications and any Games/Categories you may “own” on Twitch from being part of an organization
An example of the Twitch Developer Dashboard Overview
We’ll ignore everything else since we are only interested in Extensions.
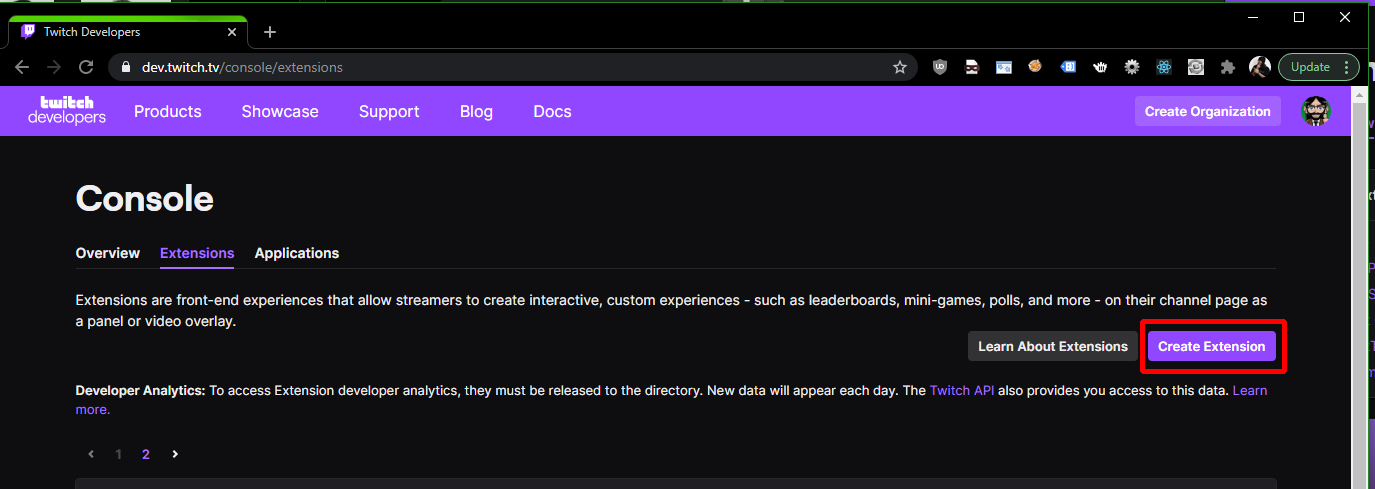
Twitch Developer Console for Extensions
If you click Extensions then “Create Extension” it’ll take you through a short “Setup Wizard” before presenting you with your ClientID for the Extension. We’ll do that now so we have an Extension to play with during this series!
PRO TIP: After starting the Wizard, please finish the wizard, even if you intend to change everything later.
Asks for your Extension Name, then Click Continue
Asks you to pick the views/integration points you want, which you can change later
Provide a Version number, 0.0.1 will suffice for now
Add additional details such as the Extension description and contact details for you
Now hit “Create Extension Version”
Twitch will send you an email to verify the provided contact details, so click the link in those email(s).
We’ll cover most of the other fields in a future post, but today we are interested in integration points.
Twitch will now have dropped us on the status page for our Extension
It’s important to note that you cannot use “Twitch” in the name of you Extension, and the name needs to be unique across Extensions and Applications across all of Twitch
So Integration Points?
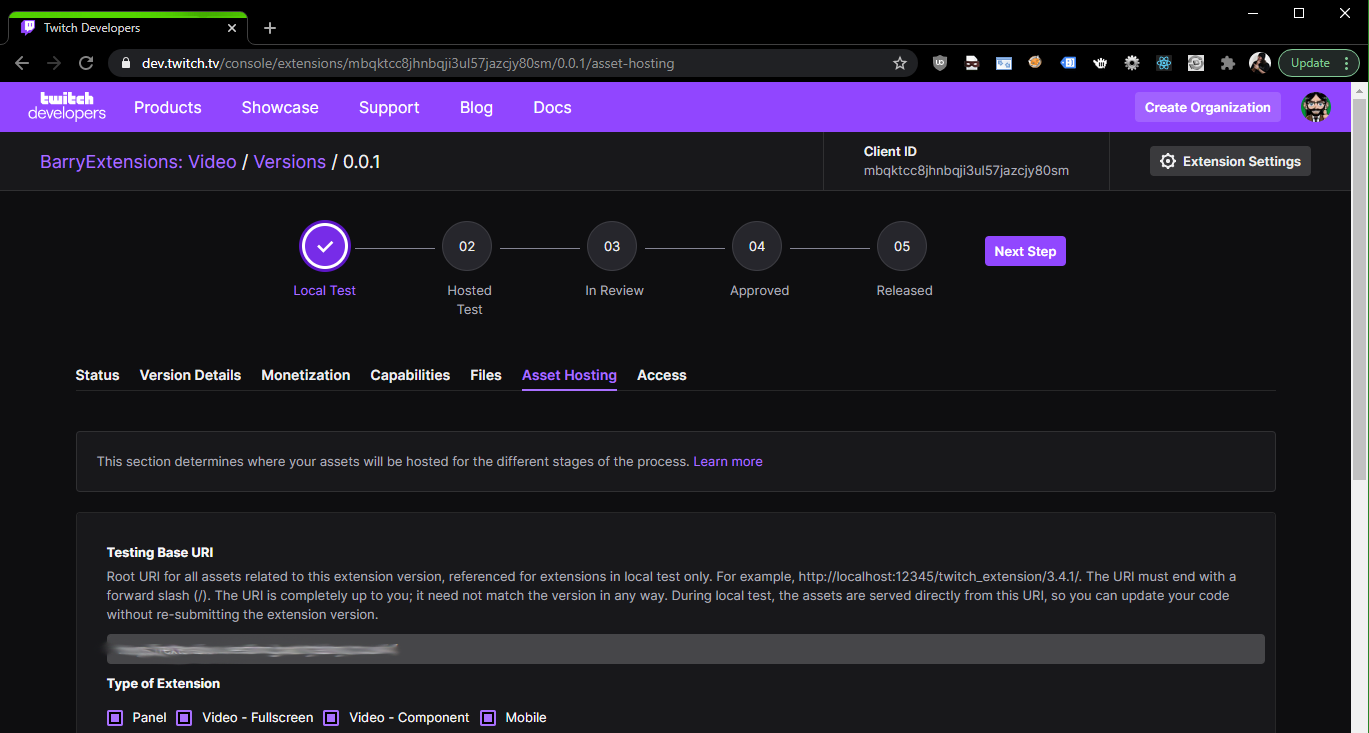
On the Extension Status page, hit “Asset Hosting”, this will take us to the page to configure our “Extension Views” and what html to load. Twitch will prefill with something sensible, but you can use anything you want
“Asset Hosting” section of a Twitch Extension Console
At the top is the Testing Base URI, we are going to ignore this for now, but we’ll be covering it next week, when we might actually start building.
Below that comes the section that lets you pick via Checkbox, which views (for the viewer) you wish to enable. And the settings for each view.
Panel
A Panel is rendered below the stream, in the panels section, Broadcasters have “some” control over where a panel extension will appear in relation to the other panels, Twitch liks to jumble things round sometimes, but generally Panel Extensions are pretty sticky and reflect the broadcasters choice.
A panel has the following settings available
Panel Viewer Path – the path and file name of the HTML file you wish to load, it is a relative path to the Testing Base URI/final upload URL
Panel Height – a panel extension is fixed Width (318px), but the developer can choose what height to use, ranging from 100px to 500px
A Panel extension, can be popped out (one of the Auxiliary Integration points we mentioned), which will start at 318px wide and the specified height, but the Viewer can then resize this window. It’s something to be aware of when building your extension, and offers the ability to use Responsive design
Video – Fullscreen
A Video Fullscreen extension will cover the whole stream, so the developer and designer can utilize the whole stream. Usually it’s safe to assume that the size is 1920px x 1080px, and you can scale as needed, we’ll cover some ways to handle this in a future post
A video Fullscreen only has one setting, the HTML file you wish to load, it is a relative path to the Testing Base URI/final upload URL
Mobile
YES, THE CHECKBOXES GO: Panel, Video – Full, Video – Comp, Mobile but the page goes in a different order
The Mobile view is presented to Viewers using a Mobile device in the Twitch App for that device, such as an Apple iPhone, Apple Table, Android phone and so on.
Like Video Fullscreen there is only one option here, the HTML file to load, it is a relative path to the Testing Base URI/final upload URL
Mobile you’ll need to practice Responsive design as dimensions will vary by device and orientation of the device
Video – Component Viewer Path
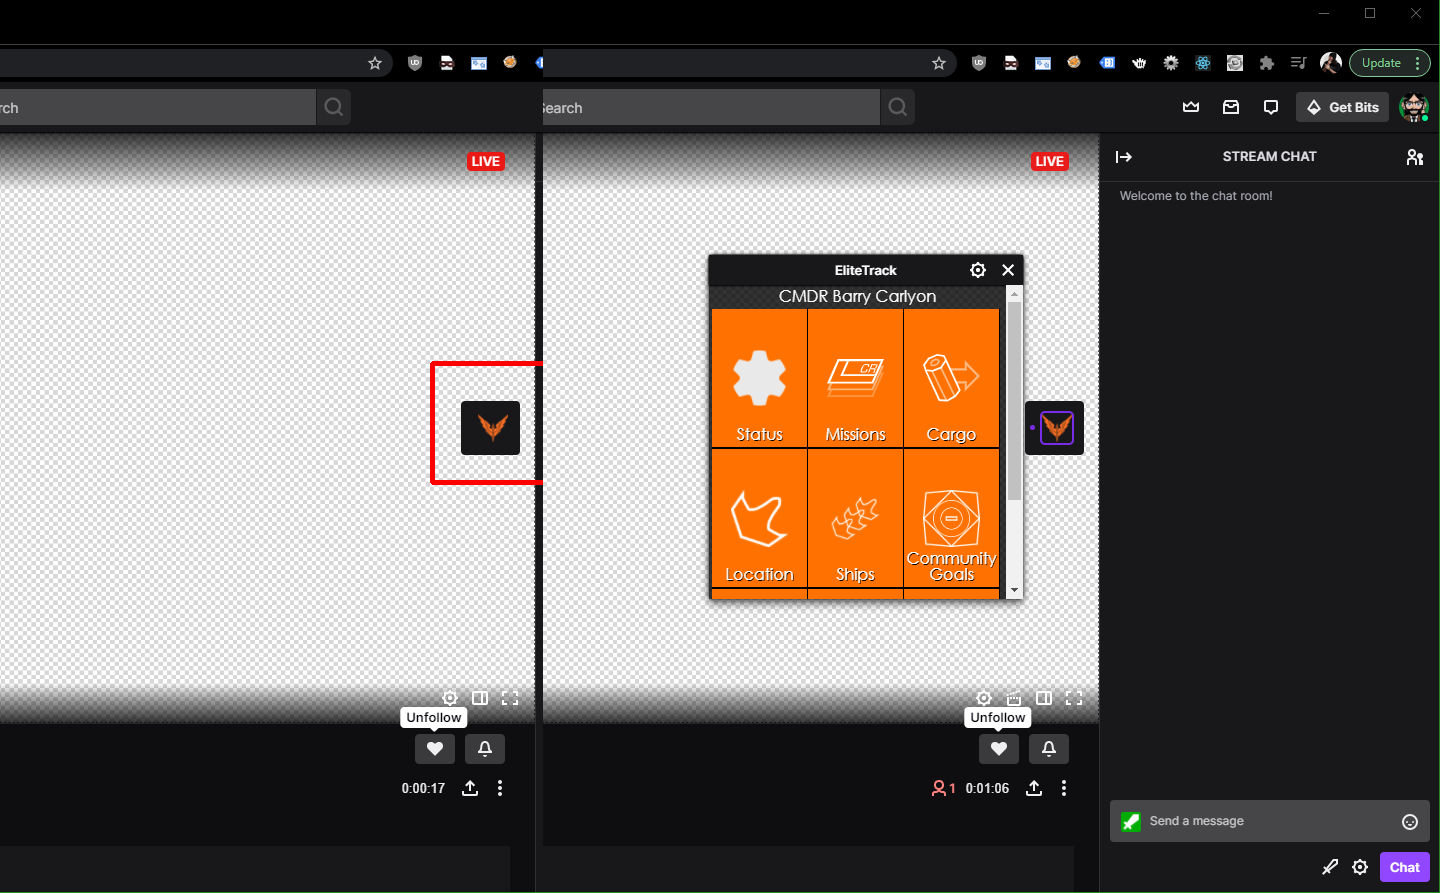
A video Component roughly works similar to a Panel, but it defaults to being “closed” and can be manually opened by the Viewer by clicking the relevant icon in the “taskbar”, the Taskbar is presented to the viewer on the right of a Live Stream.
The Extensions Taskbar, left is shown a Video Component Extension in the closed state and right is the open state
The following options are available
Video Component Viewer Path – the path and file name of the HTML file you wish to load, it is a relative path to the Testing Base URI/final upload URL
Video Component Sizing Parameters – there are a number of options here we’ll cover this more in depth at a future post as it can get fun!
Non Viewer integration Points
That covers all the Viewer intergration points and their options in summary
Next we have the “Broadcaster” Integration points, there are two of them, both have the same available settings, the path and file name of the HTML file you wish to load, it is a relative path to the Testing Base URI/final upload URL
Configuration view
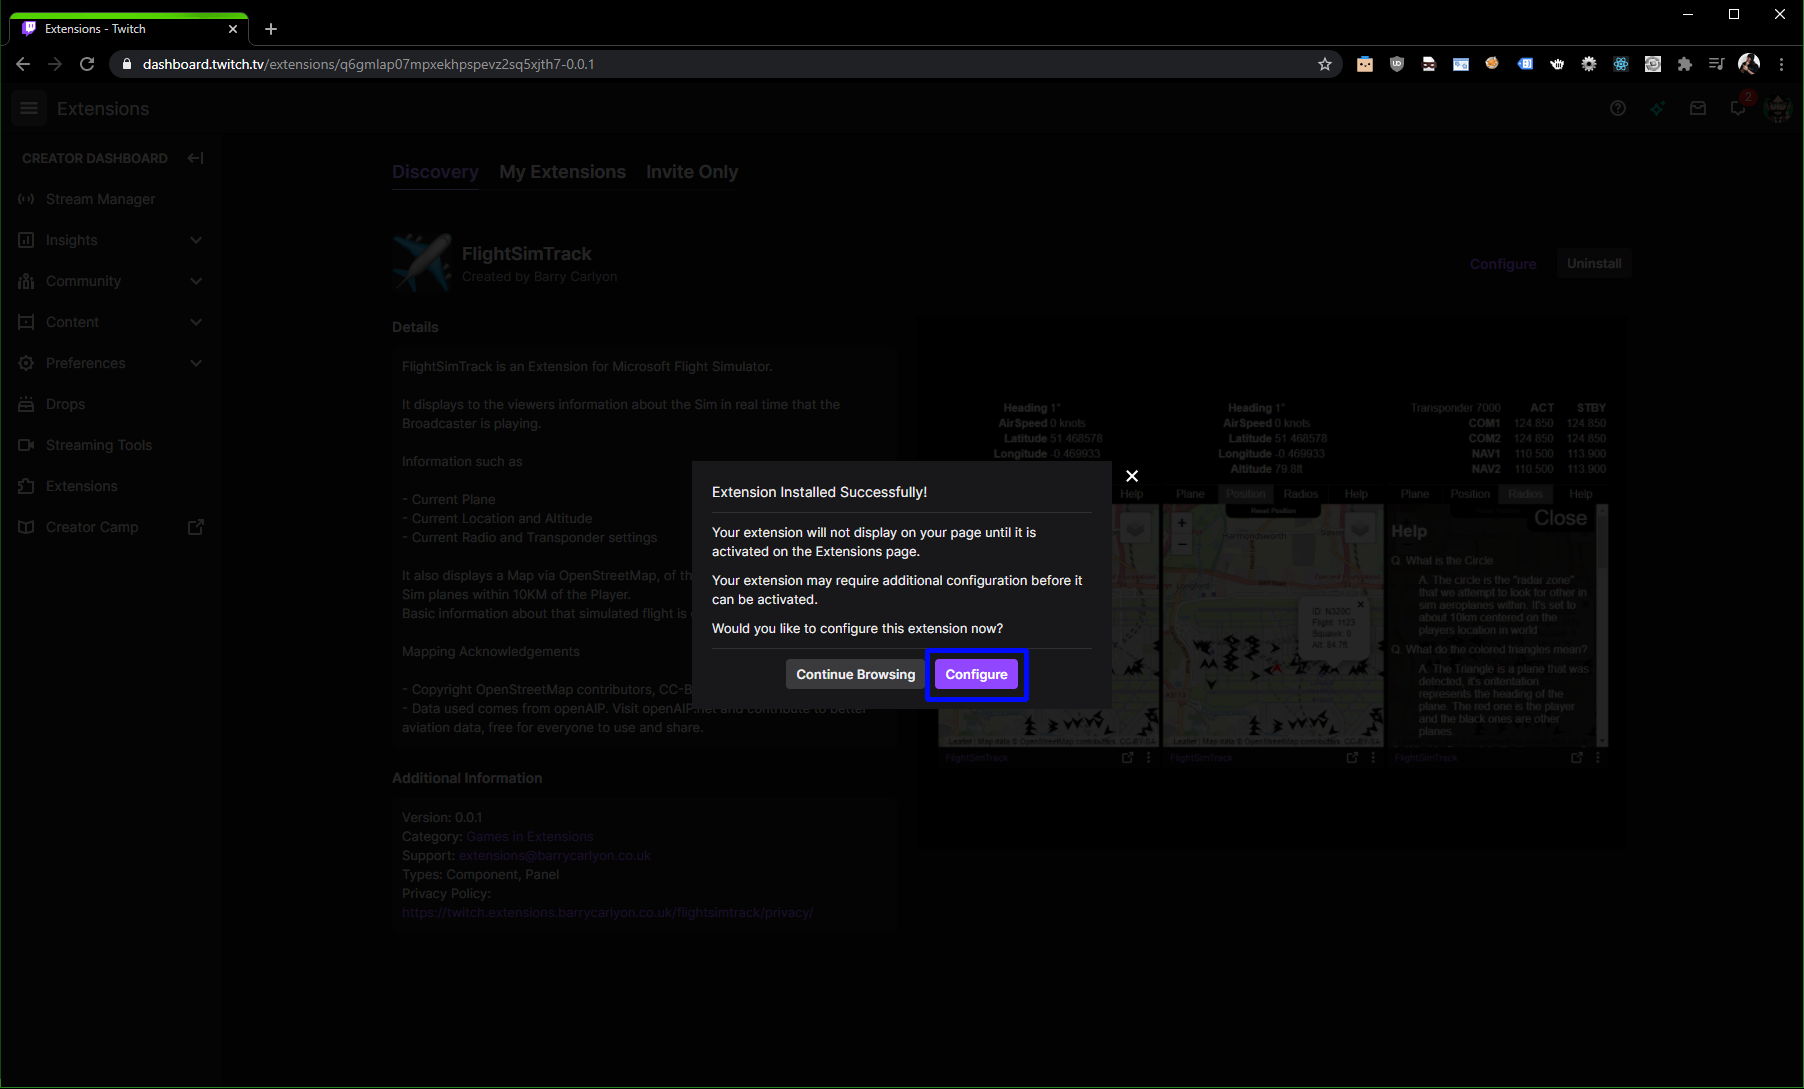
This is the main/one off configuration view, when a broadcaster first installs your Extension they will be prompted to ask if they want to visit the Configuration page or not. This page is used for one off or infrequent configuration
The Extension Config prompt during install
In some cases, developers can also block an extension being activated if the configuration has not been done, usually this would be used for things such as providing an API key to access another API, or asking the broadcaster what their Destiny 2/other game Character name is (for example)
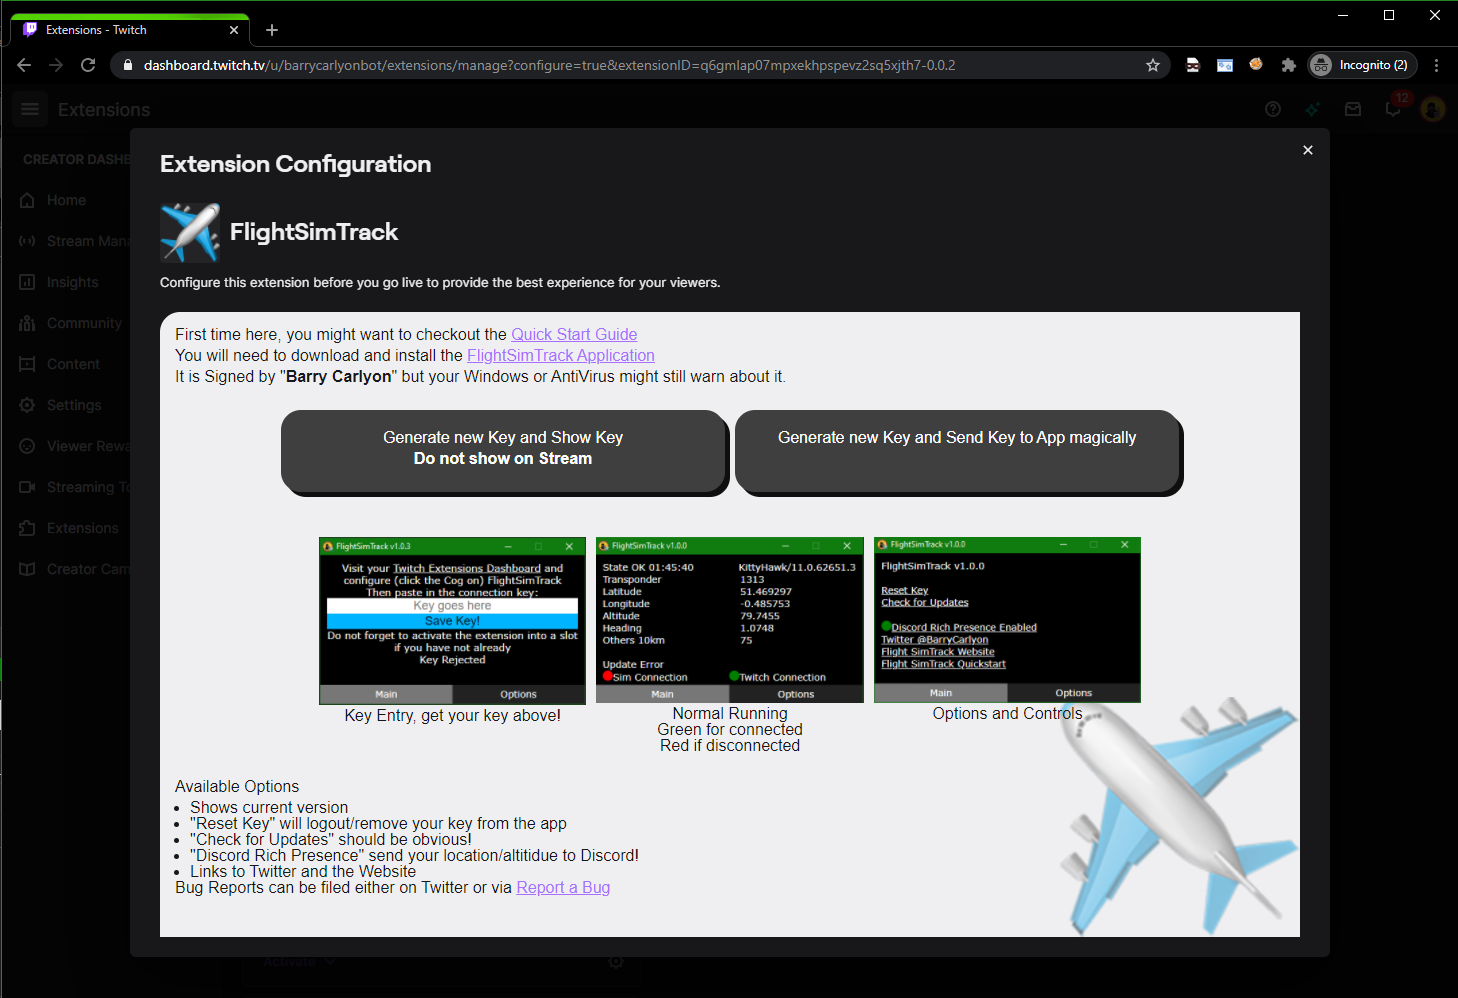
The Twitch Extension configuration page for FlightSimTrack, this example provides additional setup instructions and the API Access Key for the Companion Desktop App
It can be reached from the install flow for an extension and from the “Cog” Icon on an Extension in the Extension Manager section of the Dashboard
In terms of Dimensions it’s usually Landscape but a broadcaster can resize it pretty narrow, so you’ll need to be responsive or provide a minimum width
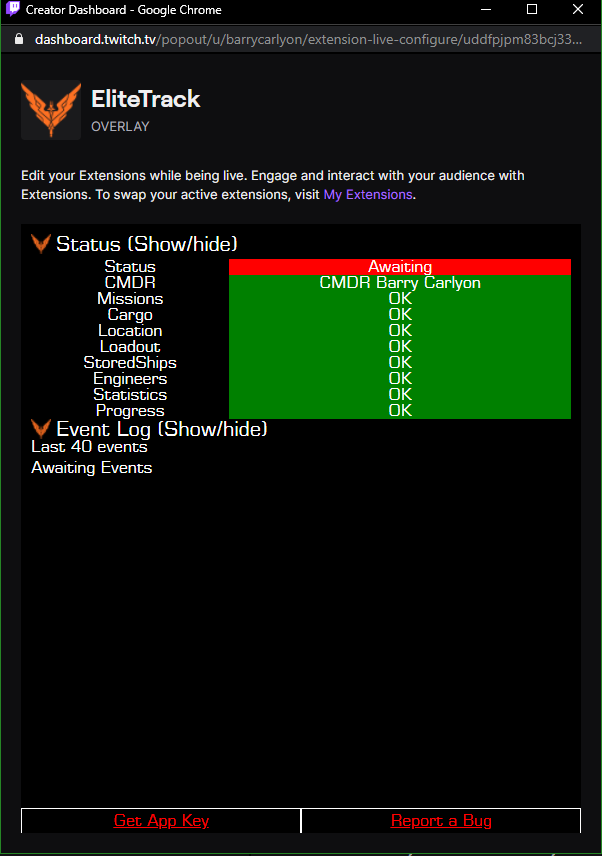
Live Configuration View
The Live configration view is to be used by the broadcaster for common tasks or things that need to be done during a Stream, examples of this would be to start a Poll for a poll extension, or a “I’m starting a round” in a mini games extension.
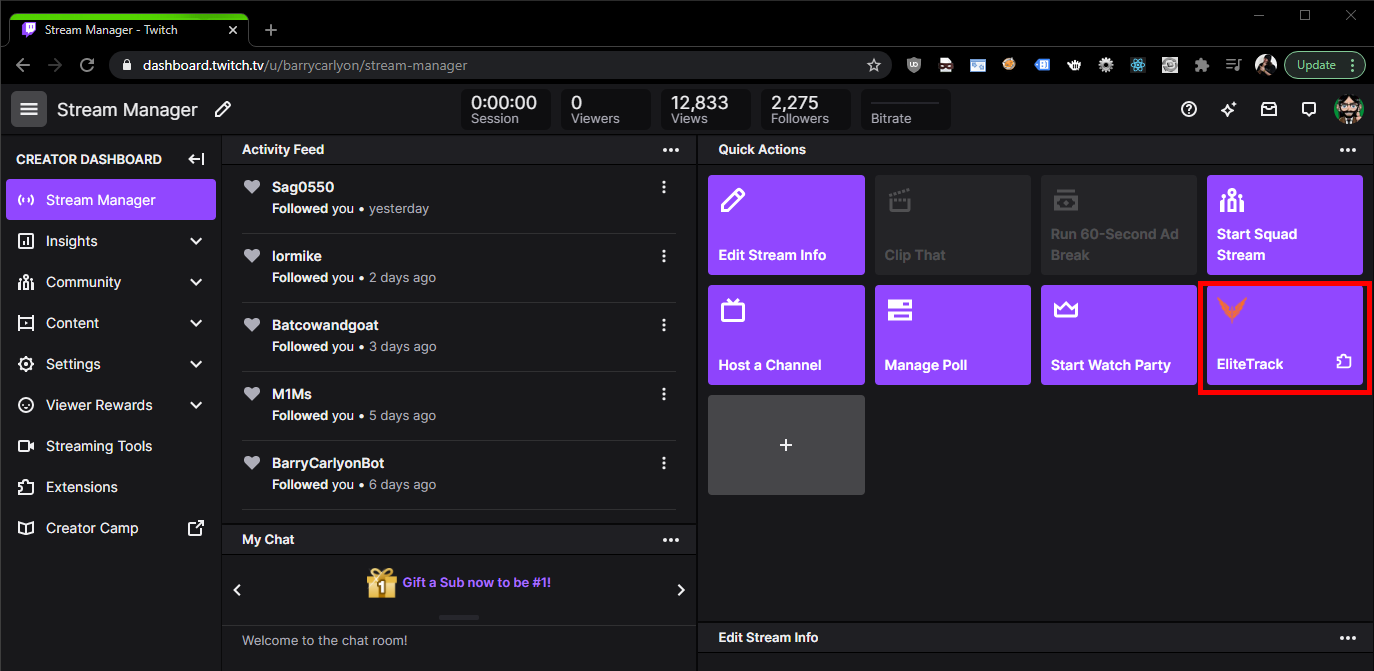
The Live configuration view is reached by the Broadcaster from the “Quick Actions” Section of their “Stream Manager”
An example of a Quick Action Extension Button
When clicked, a new window will open, which will contain the Quick Action/Live Configuration View, it’s resizable by the broadcaster so you’ll need to practice responsive design again here
EliteTrack’s Quick Action view provides easy access to a summary of the data sent, and prompts the user about Bug Reporting
Summary
And that covers the various integration points in a bit more depth compared to last weeks post!
Next week, we’ll be covering “Getting Started Building” I think and why every time I mention a HTML file did I follow it with: “the path and file name of the HTML file you wish to load, it is a relative path to the Testing Base URI/final upload URL”
BUT MOTHER I CRAVE VIOLENCE
Well, until I write the next part if you want to read more about the Developer Side of Extensions, you can pop a visit over the to the Documentation or take a look at Twitch’s Introductory Page and you can always join us on the “TwitchDev Discord Server”, visit the Developer Support Page for the current invite link!
This is the first part of a I don’t know how many parts series on Twitch Extensions. We’ll cover how to develop them, how to EBS them, some notes on Designing and what to avoid, some practices for after release care, and touch on some marketing ideas/things for your Extension Website.
So since this is the first part, we’ll cover the basics first. What, Where, Who, How, and Why of an Extension
Why is Gamora
What is a Twitch Extension
A Twitch Extension is basically an iFrame that allows a developer to create anything they want, as long as it fits within the Guidelines set out by Twitch, and of course it’s Terms of Service and Developer Agreements
This can range from MiniGames, to QnA/Polling extensions, to Community information extensions, to game information extensions, or play with the Streamer extensions
Some examples include
Sound Alerts – Lets users pick a sound to play on Stream, can be free or utilize bits/channel points
Crowd Control – Provides plugins for a variety of games, to allow people to interact with the game, make it easier/harder for the Broadcaster
Cardboard.live – Lets viewers see what cards are in your current deck, and check the state of the game board, without having to spam/ask in chat
Borderlands 3 ECHOcast – Lets viewers check out your Borderlands 3 character, and let viewers win extra loot for their own character when the Broadcaster opens Red Chests in game
Detroit: Community Play – Ask the community to pick/vote on the option when a multiple choice question appears during the game play of Detroit: Become Human.
The Cohhilition – A community interaction extension, that provides access to various Community things (in this case for a single channel), without having the viewer leave the comfort of the Twitch page
Some of these descriptions are super simple to cover the salient points and many will do more things than my summary covers
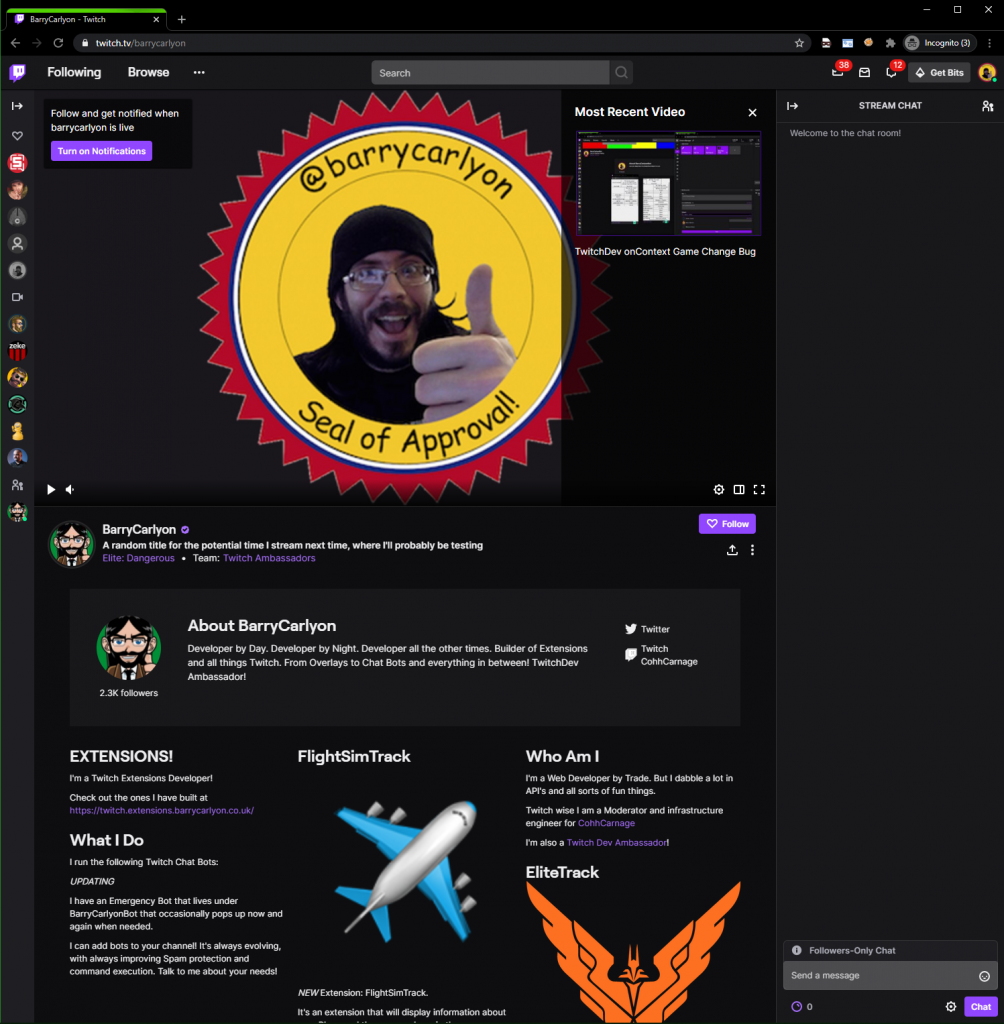
Twitch being a live streaming site, provides to the Broadcaster, a page, and that page will consist of a number of elements.
Depending on if the streamer is live or not the elements on the page will vary slightly. If the Broadcaster is live, you’ll land on the video/chat page, if the Broadcaster is not live, you’ll land on a “Home”/index style page
Now the part that we care about is the “Chat”/live view page, and on that page you will find a number of sections
An example of a Twitch Channel Page
The Video Player
The live Chat
The Stream information section – The Title and Category
A small about the Broadcaster section
The Panels section
A Twitch Extension can be added to a couple of these sections, and has 3 main (and two auxiliary) integration points.
The Main Integration points
Video Overlay – The Extension can cover/utilize the whole of the video player
Panel – The Extension appears in the panels section below the stream, and has width of 318px and a maximum height of 500px
Video Component – Basically a panel that appears over the video player but is locked to the right hand side of the player, it can utilize a varied amount of the player space
The “main” integration points are mutually exclusive, an Extension can only occupy any one of those slots at once
The Auxiliary Integration points
An example of a mobile extension on iOS
Mobile Panel – The Extension is available on mobile for mobile users to interact, it will replace the chat, and dimensions wise basically similar to a panel on PC (in terms of ratio), but you would have to consider landscape views on tablets as well.
Panel popout – Panel Extensions can be opened in a new window and can be resized by the user at will
An extension can be in one of the “main” integration points, and the mobile point.
Who is a Twitch Extension
As part of being on Twitch, extensions are able to use a number of Extension Features, as well as doing more “regular” Twitch stuff. You could run a regular chat bot that runs with your extension, the Twitch Extension Timeout with bits does this in order to run the actual timeout commands on users
So aside from the “regular” stuff like chat bots, Twitch Extensions have access to some additional features
Bits Support – Allow Viewers, to exchange bits (a digital good) for various “digital goods” inside Extensions, this could range from an extra vote in polling extensions, or picking a victim in “Timeout With Bits”, or a cool cloak for your character in a game. Revenue generate here is split 80/20 between the Broadcaster/Developer.
Subscription Support – Allows the Extension to check the subscription status of a viewer on the channel the extension is installed to, avoiding the need for the Extension Developer to get and maintain oAuth access tokens from the Broadcaster “separately” to the install process of the Extension
Identitiy Link – Allows viewers to “login’ to your extension, we’ll cover this more in a later post in the series
Chat Capabilities – Allow the Extension to send chat messages (via a HTTP POST request), usually used as a notification system to prompt viewers to perform an action in the extension, like a new poll has started, go vote, for example
The Configuration Service – We’ll cover this in a later post as well, but it’s a way to store data on Twitch’s server that you can use in the extension, this might be something like, the name of the Broadcasters Character in a game that you would use in an API request to get information about the character
Streamer Allowlist – allows the Extension Developer to restrict whom can install the Extension to their channel
We’ll cover each Capability/feature in future blog posts in the series
How is a Twitch Extension
We’ll cover this more, in depth in later posts, a Twitch Extension is a bundle of files uploaded to the Extension CDN (Content Delivery Network). This needs to include your HTML, JS, CSS, and any static images you want to store on the CDN (pretty handy for background images for panel extensions). Twitch has some restrictions on what an extension can load from external sources, but essentially images are fine, CSS/JS is not, CSS/JS must be local/included.
Those files are uploaded to a sub domain of Twitch, into a particular sub folder tree on that sub domain, which we will cover more in depth in a later post, when we talk about building extensions and a suitable way to test them and some related gotchas.
All Twitch Extensions have their bundles uploaded to the Twitch and before they are released (or updated) to the masses, the Twitch Extension Review team will review the Extension, to ensure it works as intended, there is no major bugs effecting activation, the Extension compiles with the Guidelines and Terms of Services, and most importantly contains nothing malicious to interfere with the Twitch website or the viewer using the extension Computer/device
A Twitch Extension is allowed to communicate offsite, the resource just has to be secured over SSL, this is commonly referred to as an EBS or Extension Backend Service, we’ll cover this more later as well!
Why is a Twitch Extensions?
But Why is a Twitch Extension (any use) I hear you cry?
A Twitch Extension provides ways for the Streamers Community to perform rich interactions, without leaving the Twitch Broadcasters page, which means you keep the Viewer watching the Stream or interacting with Chat, with relatively easy access to Twitch API’s, without long additional steps for Viewer Authentication
Summary
That is it for Part 1 in this series on Twitch Extensions, I’ve cover the basic What, Where, Who, How of Twitch Extensions
Parts will either be weekly or bi-weekly, we will see how we go!
BUT MOTHER I CRAVE VIOLENCE
Well, until I write the next part if you want to read more about the Developer Side of Extensions, you can pop a visit over the to the Documentation or take a look at Twitch’s Introductory Page and you can always join us on the “TwitchDev Discord Server”, visit the Developer Support Page for the current invite link!
Were the sub headings supposed to make sense? No not really.