This will be the first post in a two/three parter on this extension since it also serves as a good example on how to utilise a number of Twitch and IGDB products/API’s to achieve the end solution! But today just an announcement post!
One of the features of the Dropped Frames Extension, that is used during Dropped Frames on itmeJP’s channel on Wednesday’s, is that I’ll push a Game Information box to the extension that shows information about the game the panel is talking about. That information box will collect information from the IGDB.com API and then present that information to the viewer. Heres a quick example screenshot for Mind Scanners:
Dropped Frames example of the IGDB.com information widget
You can see on the left the “box” with the cover art appears on the left over the Game name that is baked into the overlay and on user mouse over of the box the game information box is then displayed. Title, brief synopsis, cover art and store information are presented.
When I showed this off in the IGDB discord (prior to E3), I was asked, if this was a publicly available thing, and I replied, sorta but not really. Which then led me to go and create a seperate extension for anyone to use, during a smidge of down time I had recently!
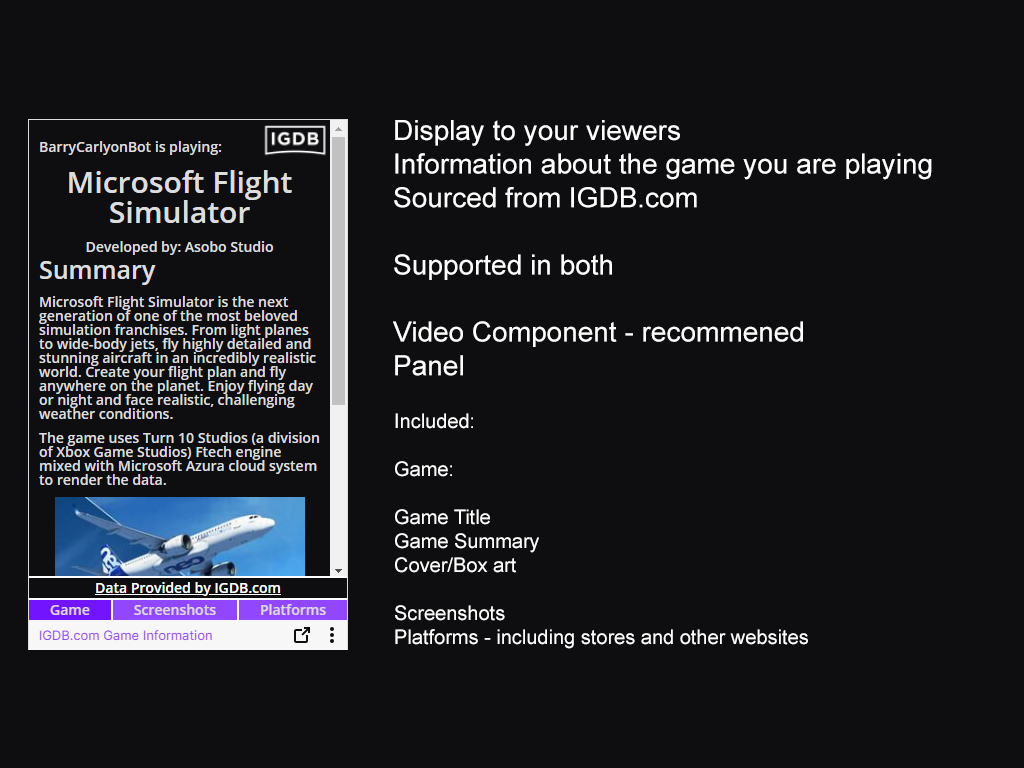
So I present the IGDB.com Game Information Extension!
The first IGDB.com Game Information Extension screenshot
It is availble to both Twitch Mobile and Desktop users. On Desktop both Component and Panel are supported. I usually recommend the Component slot as it saves users having to scroll down, and it’s auto collapsed out of the way until a user clicks on the [IGDB] taskbar icon. And generally speaking most streamers have the Component slots free anyway. ITS FREE REAL ESTATE MAN!
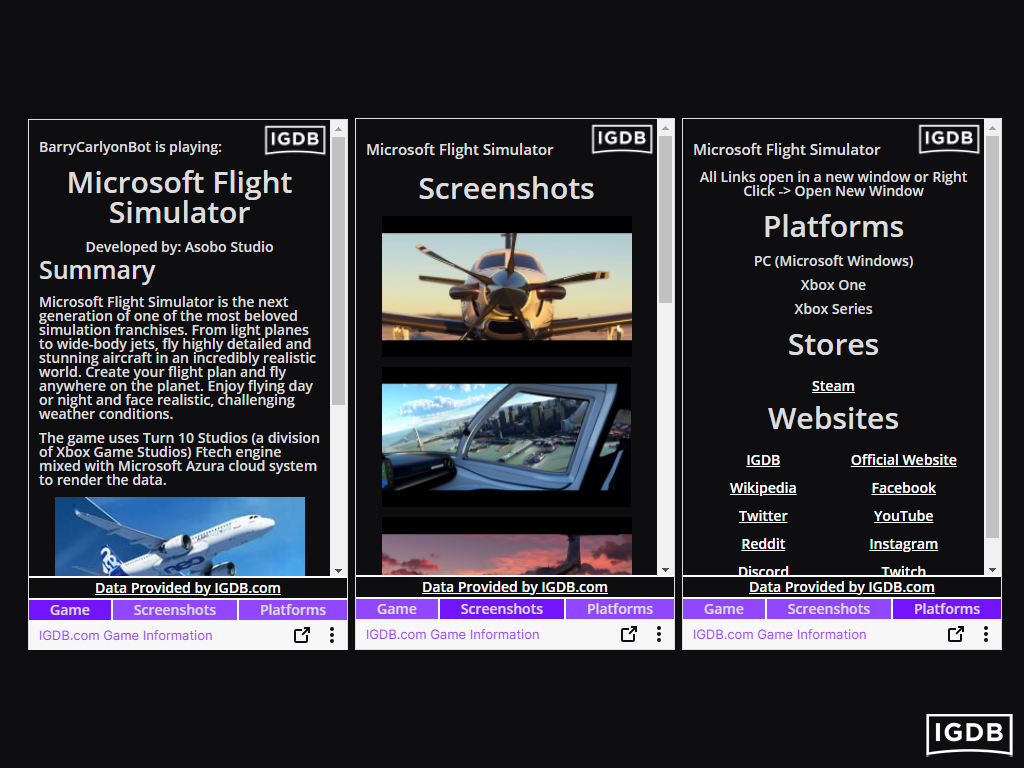
The three views of the Extension. Information, Screenshots, Stores and Platforms.
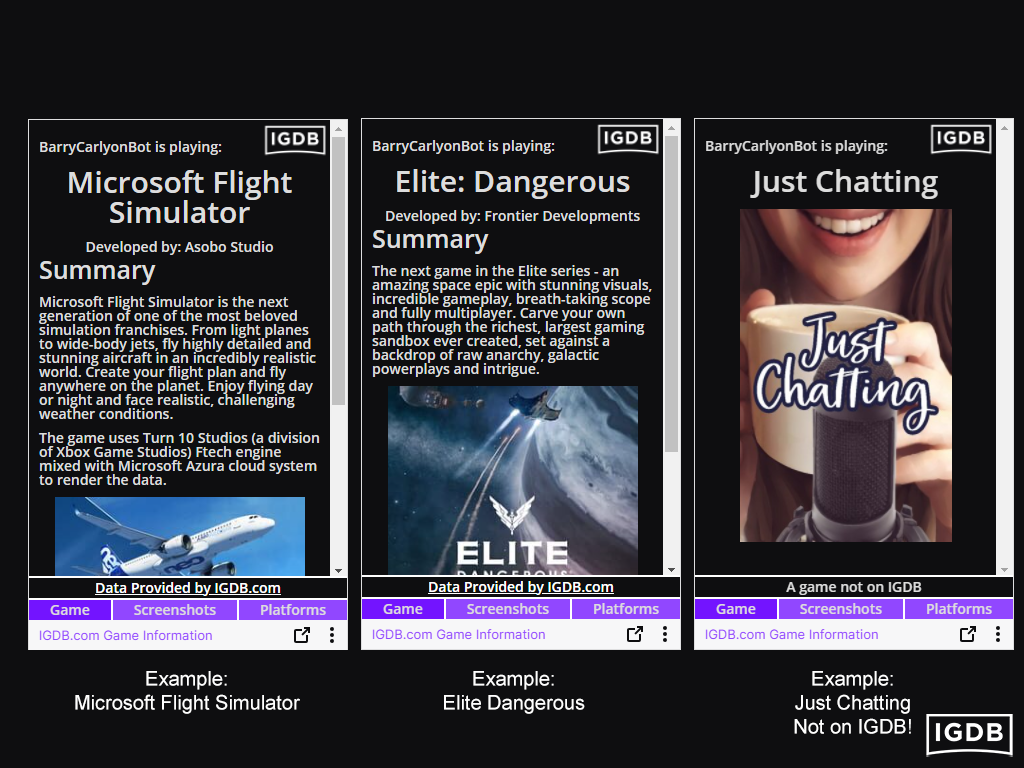
Via the power of Twitch EventSub, it will even automatically self refresh if you change games during a stream and will gracefully fail back if you pick a game that is not on IGDB.com or a category that is not a game, such as Special Events or Just Chatting, it’ll just show the Twitch Box art/title instead.
Streamers will just need to link their Twitch accounts via the Extensions Configuration view, or the Extension Mini site, to enable auto updating!
Examples using Microsoft Flight Simulator, Elite Dangerous and the non game category Just Chatting.
To checkout the extension, or to see live streamers running the Extension, and to see the install instructions pop over to the mini site for the extension over at twitch.extensions.barrycarlyon.co.uk/igdb/ or visit the extension directly on Twitch.
The beauty of IGDB.com is that it POWERS Twitch’s categories and being crowd sourced, if the information is wrong, outdated or missing, anyone can submit a fix or change and await an IGDB Admin to accept the change.
For many Developers using Twitch API products this means little beyond there being a date to make sure you have moved everything you need to to Helix/New API. And that date is February 28th 2022.
Twitch will also be running a phased Shutdown timeline with periodic outages on the Legacy API of increasing length during the start February starting on the 7th at 11am PDT, and full details of that are on the earlier linked blog post.
For NEW developers looking to work with the Twitch API products, as of last week you can’t access the Legacy API at all, if you have never used the Legacy Twitch API you just can’t access it.
and those that have not made requests to the v5 API before July 15, 2021 will no longer be able to access v5.
Other things to note is the end of WebSub based Webhooks as well, that ends in September! Details about that are also on the Twitch Blog
So now is the time to get your feature requests for the New API and/or any missing features into the Twitch Uservoice theres a few new ones popped up recently for “missing” New API features. So get your voice heard on missing things. Or you can check out my super exiting Google Doc I have for tracking a number of User Voices I’m intersted in and/or have created you can find that here!
And if you need help on Migration from the Legacy API to New Twitch API, check the migration guide or Join Us on the TwitchDev Discord or Forums, see the Developer Support page for those links!
Update: This also effects a number of Extension EBS endpoints! Thankfully this sort of update won’t require extension review, since it’s EBS endpoints! Todays Announcement on that is here on the forums
This week we are actually going to write some code! Amazing I know! We’ll be using nodeJS and some basic shell scripting, here just for some simplicity.
First off apologies for being 3 days late on this entry in the series!
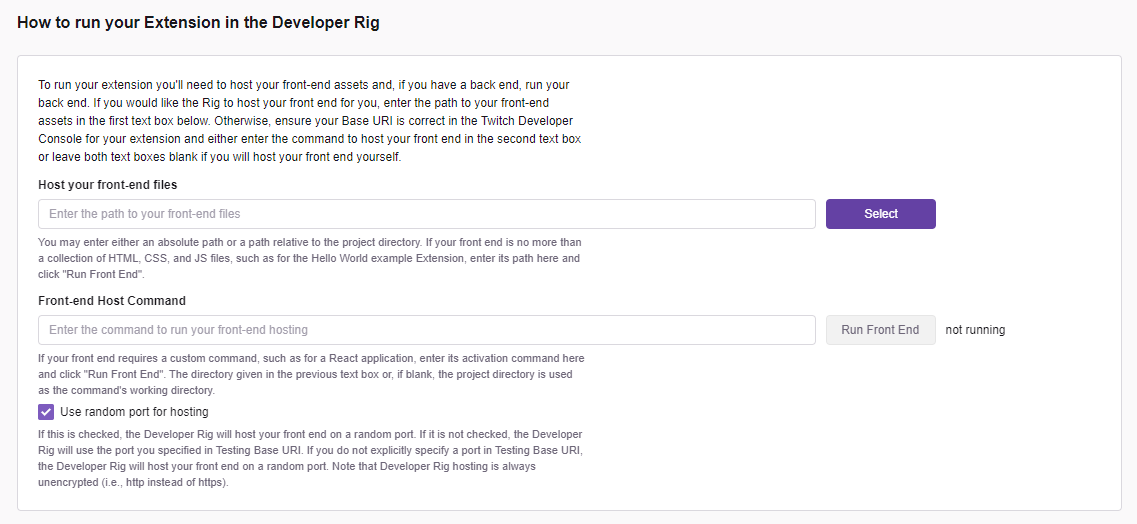
In Part 4 we wrote about the Twitch Developer Rig and what it can/can’t do. One of the useful thing’s it can do for you is “host your files” for you when your extension is in Local test.
The Hosting options in the Developer rig.
The Developer Rig, will either just “dumb serve” a folder of static files, or you can give it a full command to run, handy for WebPack/React/JS things that people need to pre-compile first.
But the big thing it won’t do is SSL Termination so whilst you can easily test your extension in the Rig, you won’t be able to easily test it on Twitch, which is the purpose of this little Dev Environment.
Personally at the moment I tend to write my Extensions in pure/vanilla JavaScript without libraries, since in most cases I’m just running a few fetch requests and drawing DOM elements, but the more interesting parts come with my compilation/bundling for hosting. The “rig” that I use is Developer Rig compatible since it is just a node command. But I’ve normally started it in a terminal as I’m testing on the actual Twitch website.
So what is the aim here?
To create a nodeJS Server that will
“static” host the HTML, JS and CSS for an extension,
do some clean up on JS/CSS, both for development and production,
work behind (a real) SSL for testing on the Twitch website (or rig)
be representative of Hosted test and above
What does that look like?
Well first we need to setup a bunch of folders, and we’ll set it up in a “nice” way for using Version control, some people may prefer to keep a separate repo for their EBS from their frontend for easier deploy. The choice is yours there! I use a mix, because being inconsistent is fun!
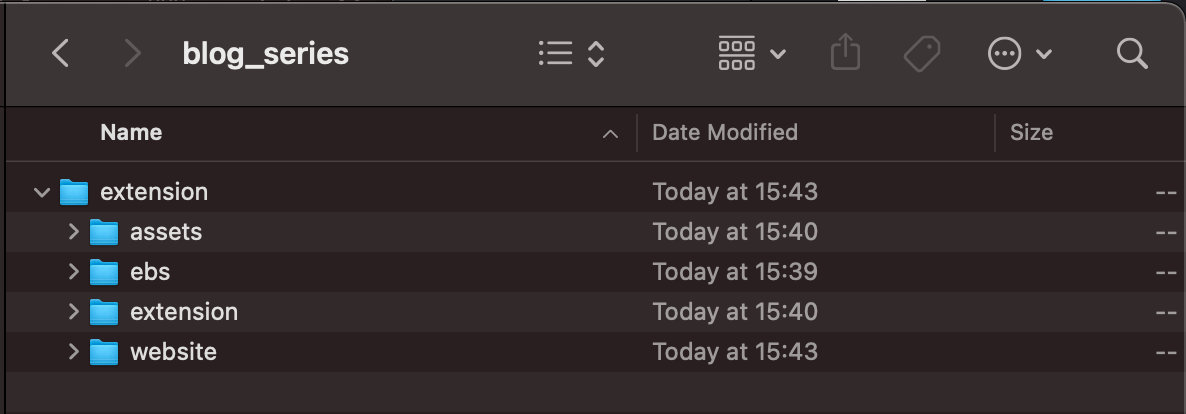
Proposed folder structure for your extension repository
assets – for storing your screenshots, discovery images, icons and other bits and pieces that live on “Version Details”
ebs – the folder for building you EBS in
website – the folder for building a website in if your Extension has/needs one, usually would include your Privacy Policy.
extension – this is where our extension actually lives and is the folder we’ll be poking about in today.
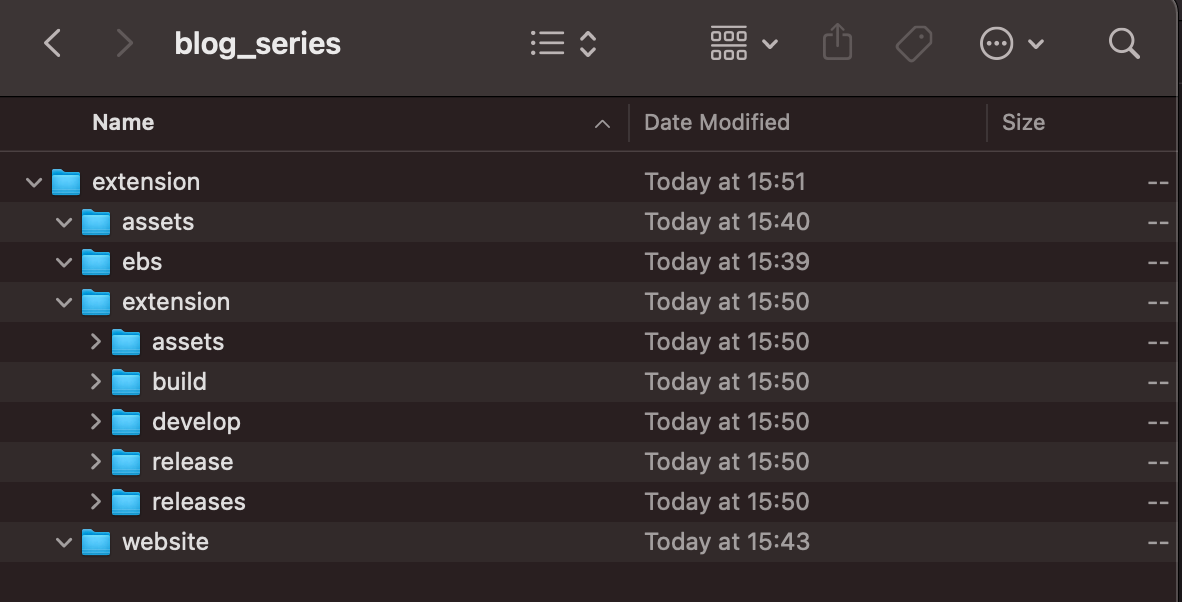
The Extension Folder
The Folders in the Extension Folder
assets – another assets folders? For storing any front end specific bits and pieces. You probably don’t need this.
build/release – build is where our “compiled” extension will sit
releases – I like to store my old/previous versions of the extension here for future reference
develop – the place we actually write our code
For Version Control, you would generally, touch build and release with a blank file (or .gitkeep if using Git) and then ignore those folders from version control.
We are going to be using the “static” part of NodeJS Express to serve the build folder, and use a super exciting bash script to populate the build folder from the develop folder.
Usually I’ll keep a dev folder in the develop folder, as I’ll keep the “pre-release” version of the extension in develop and the compiled/zip’ed version in releases.
The Bash Script though?
yeah, I use a bash script, it’s my preferred method, but anything it can do you can achieve in similar stuff such as WebPack, but you may want to run all sorts of things when you “deploy” you Extension Frontend during testing. And whilst I am considering other methods, I prefer the simple Bash script.
The Server
The server itself is relatively straight forward, you can refer to the Code on Github, but here is the key part we are interested in
const listen = 8050;

const express = require('express');
const app = express();

/*
Setup Express to Listen on a Port
*/
app.listen(listen, function () {
console.log('booted express on', listen);
})

/*
Setup a "Log" Event for file loading.
So you can see what is trying to be loaded
*/
app.use(function(req, res, next) {
console.log('received from', req.get('X-Forwarded-For'), ':', req.method, req.originalUrl);
next();
});
/*
Setup express Static to server those files
*/
app.use('/extension/', express.static(__dirname + '/build/'));
This will raise an express static server on port 8050, and then prepare to host the contents of build on the route extension.
So this will give us a URL of http://127.0.0.1/extension/ and if you remember in Part 3, we wrote about the structure of a URL of a Hosted test/Live extension being https://ClientID.ext-twitch.tv/ClientID/md5/yourHTML instantly our Development Environment is closer to the Production Environment.
To further this, I like to put my views into different folders. So the viewer will be in panel or video and if I offer both I’ll have both. The Config will be in config or something random for extra security on private Extensions. And Mobile in mobile if I need to serve different JS to the user.
Which then makes it even easier or a developer to remember to use relative links to their CSS/JS from the HTML, since my views are in sub folders, and the whole Dev Server is serving from a sub folder.
But what about the rest of the file? That is a basic Folder watcher, using Chokiar, that will watch for any change in the develop/dev directly and then run script.sh
This script will
dump the current contents of build,
copy the folder structure
copy over any “common” assets in the assets folder (background images/icons for example)
copy over each HTML file, in some cases run a minify process
compile each JS file and CSS file together into one file and run it thru minifies (but not mangles*)
*Twitch disallows manglification, except in some super limited cases
The script will call the NPM globally installed instances of:
html-minifier (not in this example but I use it on occasion)
uglify-es which provides uglifyjs
uglicfycss
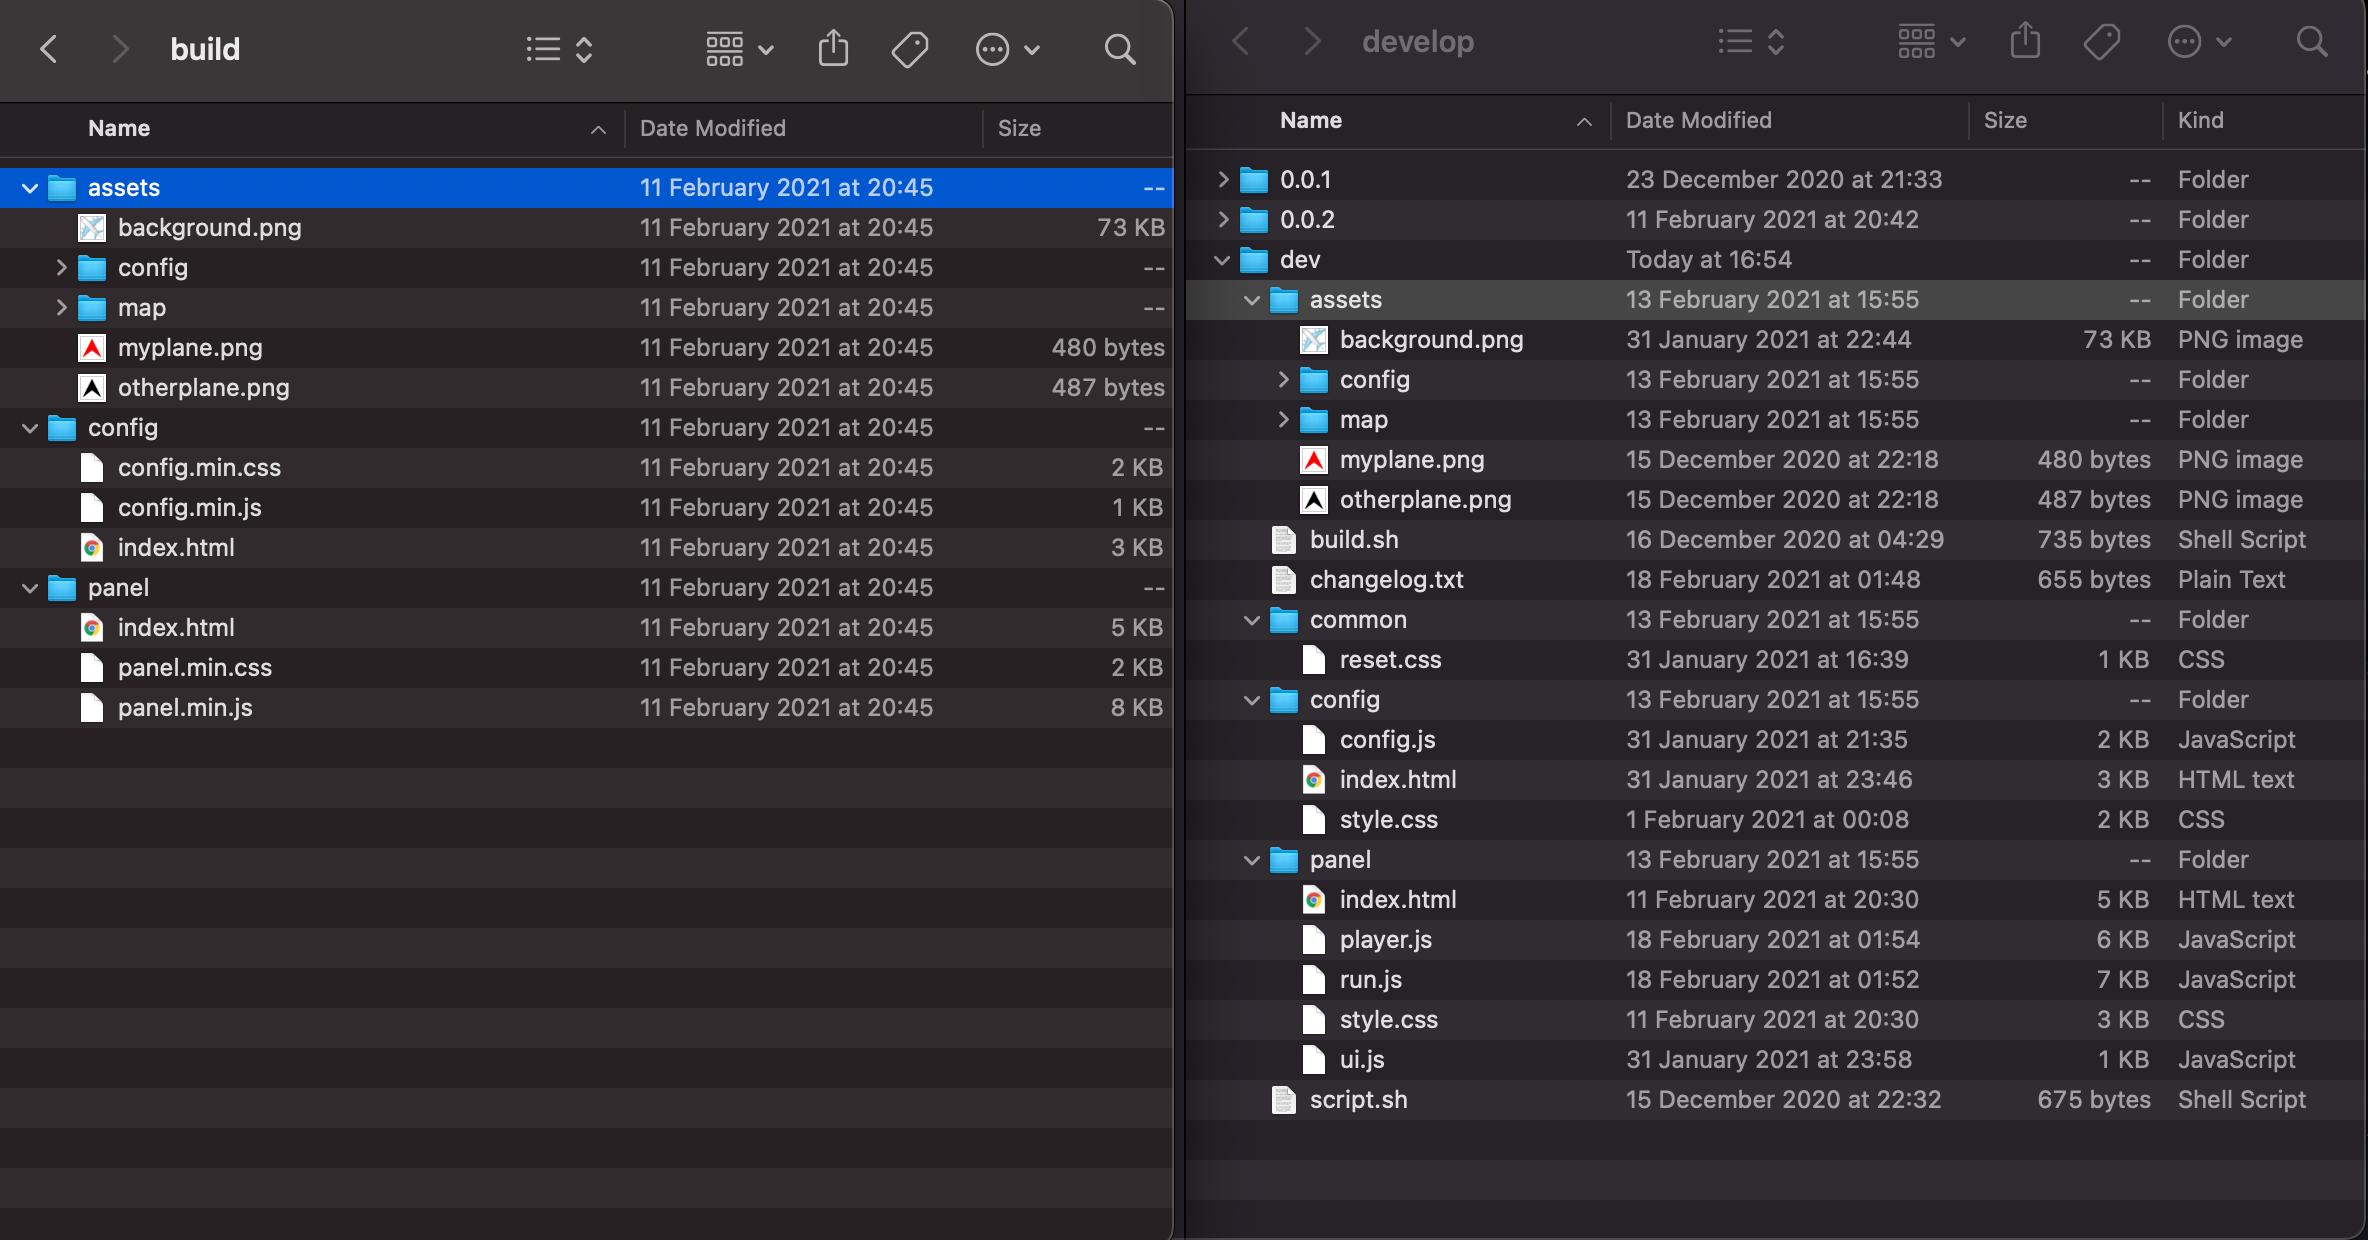
I like to build different parts of my extensions into different script/css files and then use my develop/build process to combine them into one file. Here is FlightSimTrack’s current layout for example. Left being the built/compiled and right being the Development version.
FlightSimTracks structure
You can see how my many JS/CSS on the right are folded down into singular files. And make it easy to include CSS Resets/grid systems into each view when loading/merging those files from a common folder, which only exists on the right/develop side.
FlightSimTrack, for example, has a few parts, such as
the maps,
the player information
Twitch Auth and PubSub handler
Which I’ve split into three files for ease of reading and modification, you can use one mega JS file or whatever compilation method you want, or not at all an include many script files! You just need to avoid magnification.
The only difference between my script.sh and my build.sh is build will generally HTML Minify where script doesn’t and build will compile the JS and drop and console.log commands, they don’t work on a released extension (and are disallowed by policy), so you may as well drop them from the files to keep the file size down! Great for Mobile users.
Summary
This will then give us a Development server, running on a Sub Folder, with files similar to what you would use in production. So this should be analogous to the Production result for your Extension.
Just one more thing
We forgot one thing, what about SSL? Oh that old chestnut! The final piece of the puzzle for if you want to test your Extension more realistically on the Twitch Website, rather than in the rig (where SSL is not required)!
There are two easy ways to provide SSL Termination, both have their nuances but I prefer the second.
Method 1
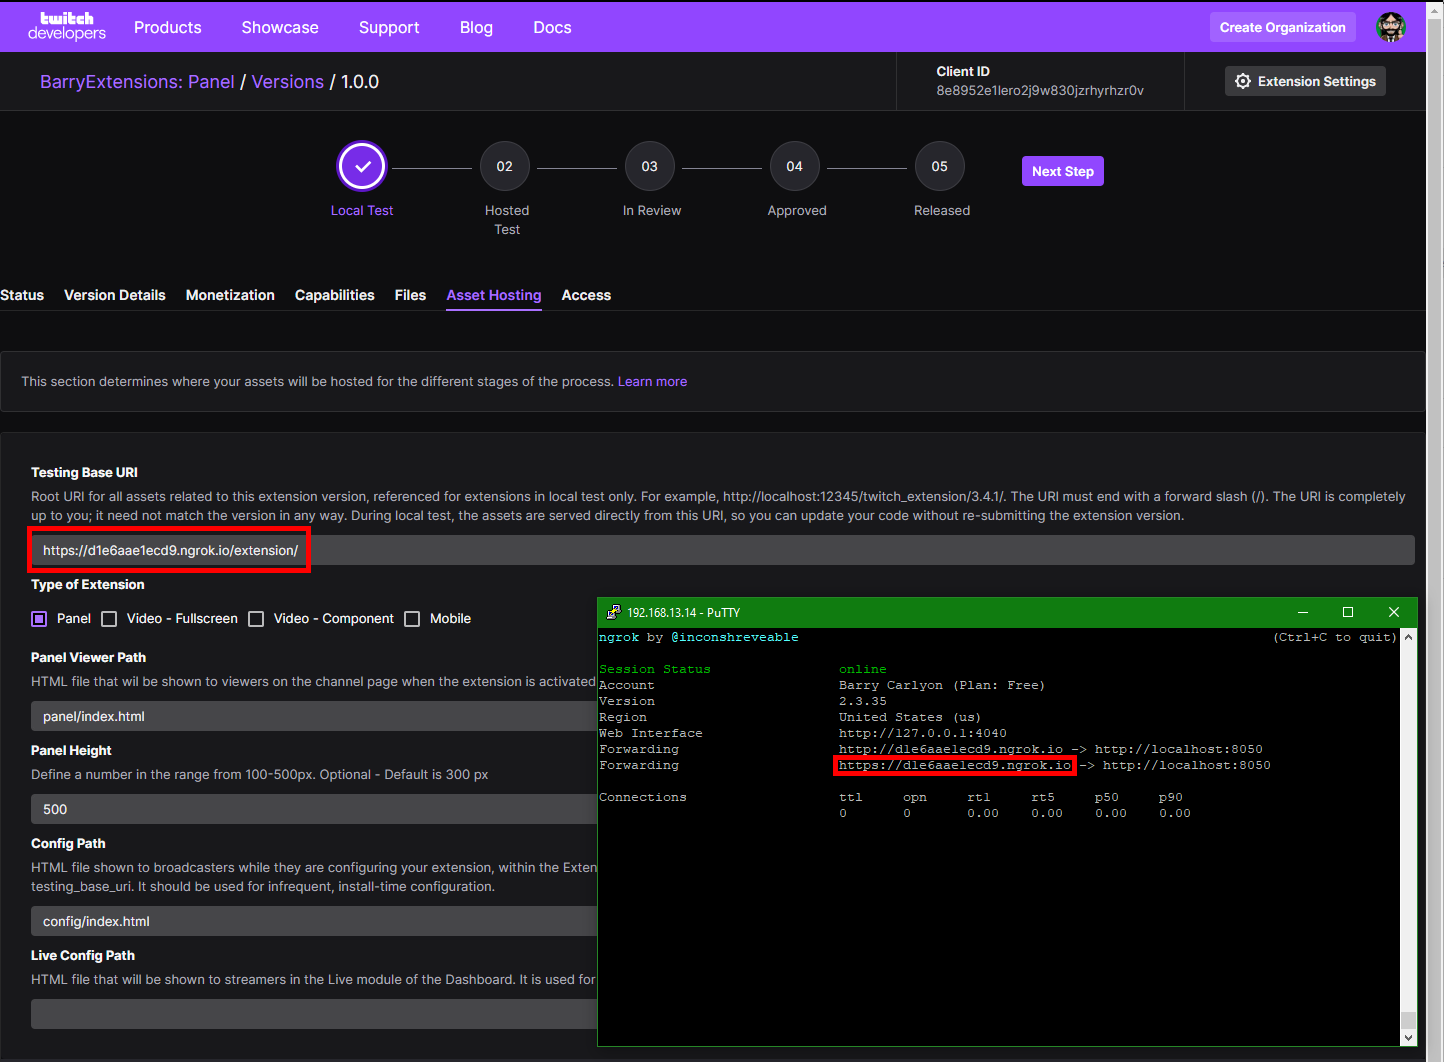
NGROK, is a Free (or paid for product), that will create a temporary public URL to a running service on your machine.
So in this example you’d just do ./ngrok http 8050 and then the UI will display a URL to copy/paste into the Twitch Developer Console for your “Testing Base URI” just remember to add /extension/ to the end, since that is the mount point for your build. And now you have SSL Termination!
The Dev Console configured with a NGROK URL
NGROK may have some other funnies such as rate limits, but for current limits please refer to their website and pricing structures.
Method 2
This is my preferred method, instead of using NGROK (or paying for a constant URL with NGROK).
I use a reverse SSH Tunnel, and get NGINX on a server to handle SSL Termination with a “real” free from LetsEncrypt Certificate.
Setup is the same on the user side, instead of running ngrok I ssh -R 8050:127.0.0.1:8050 username@example.com
This means I never have to update the Developer Console with a new URL, and for testing purposes all my Extensions use the Same URL. I just change the server running at the end of the tunnel. And if I start work on a new extension, I can use the exact same hosting settings.
NGINX is configured to do the normal SSL Termination stuff, then I just proxypass. Here is a config example from my live server that handles my Extension hosting.
I’ll usually use a second port/SSH tunnel/SSL’ed domain to talk to my EBS running locally. And my script.sh/build.sh can be configured to use different EBS URL’s in the fetch commands you may do. One less thing to forget to swap when building for release/review queuing.
Summary, for real
That is it for this weeks post, you can have a poke about in the GitHub Repository at BarryCarlyon/twitch_extension_blog_series both for the Server.js and script files and the folder structure.
Now you should be able to setup a local test server, that is similar in URL structure to a released Twitch Extension, and provide SSL to that test server, so you can test the Extension on Twitch, OR in the Rig, two of the most common pitfalls Developers face when starting to build extensions.
BUT MOTHER I CRAVE VIOLENCE
Well, until I write the next part if you want to read more about the Developer Side of Extensions, you can pop a visit over the to the Documentation or take a look at Twitch’s Introductory Page and you can always join us on the “TwitchDev Discord Server”, visit the Developer Support Page for the current invite link!
In Part 2 we spoke a fair bit about “the path and file name of the HTML file you wish to load, it is a relative path to the Testing Base URI/final upload URL”, and this week we will cover why I mentioned that every time!
So, this week The Architecture of a Twitch Extension!
We have covered before that essentially a Twitch Extension is a “Website” that is iFrame’ed onto the Twitch Page, into an integration slot, but what does that actually look like?
The Twitch Architecture Overview – According to Twitch
First we have the Twitch Channel page – the “Browser” above
Then the Twitch Extension “supervisor”, this basically handles any handshaking between the outer Twitch and the inner Extension, we can’t cover more about it as it’s not documented anywhere, and that is my theory on what it does! It is mentioned in passing in the documentation
Then the Extension itself – the “iFrame” above
Relative path? WHY?
So why “relative path”? Well here is what the URL to the Panel looks like for FlightSimTrack
The first thing we’ll notice is that the index.html is in a sub folder of the domain. And NOW you know why we said “the path and file name of the HTML file you wish to load, it is a relative path to the Testing Base URI/final upload URL”every, single, time. And it’s a common hiccup that Extension Developers run into, a number of people come into the Developer Discord needing extension help, and they either made a mistake packaging the Zip for upload (we’ll cover Upload procedure in a future post), or the developer has used an “absolute” link to a JS/CSS file (starting /style.css or https://example.com/style.css for example, instead of juststyle.css).
The most important one to be aware of right now is anchor which tells you which integration slot this is. In this example it’s a panel, and FlightSimTrack’s panel is configured to load panel/index.html for this integration slot.
extClientID is obvious, it’s the ClientID of your Extension
Extensions live on the domain extClientID.ext-twitch.tv, why a different domain for each extension and separate to Twitch? This prevents any issues with Cookies from the “main” Twitch Website, so there won’t be any session hijacking or other crazy things, you can read a little more on that in the documentation
Version – the version of the extension that these files are for
md5 of the zip file that was uploaded, during testing you might go to Hosted test/local test (two Stages of the Extension Lifecycle that we’ll cover next week) a few times, so the md5 will change, this is a easy “cache defeat” when you are Hosted testing
Final part is the path and html file you specified in the console to load for this integration slot
Asset Hosting for FlightSimTrack
The URL structure is the same for every integration point, and all files are considered “public”, which is something to consider when building in things for Channel Moderators to use.
That about covers everything for the frontend
Well, what about the Backend?
Oh you want the backend to do you?
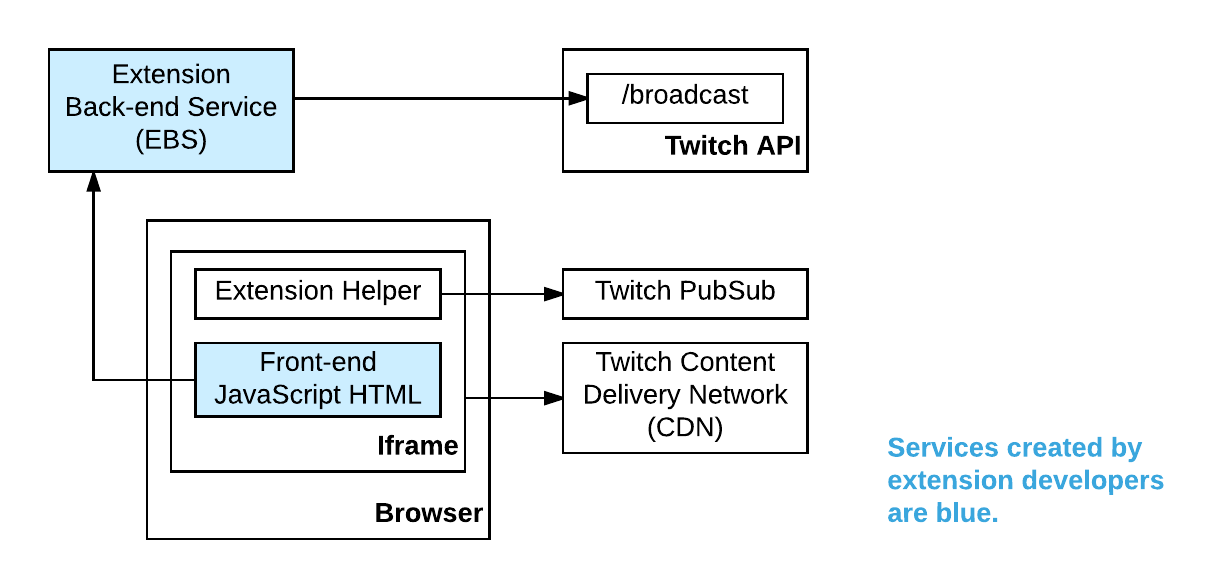
The Twitch Architecture Overview – According to Twitch again!
First of all it’s important to note than a Backend, also referred to as EBS or Extension Backend Service, is entirely optional, depending on your Extension, what/how it functions or what it does, it might not even need an EBS, either from calling Public API’s or from it being completely self contained.
The SSL Requirement
But for those Extensions that need an EBS, there is essentially one rule, it must serves it’s contents over SSL, this isn’t just good for Security, but is required as the Twitch Website is over SSL and browsers will reject Mixed Content (loading non SSL content from SSL).
So
Loading from the EBS? Needs to be https://urltoyourebs/
Loading from a Public API? Needs to be https://someapi/
Loading from a Websocket? Needs to be wss://somesocket/
Loading an image from a CDN? Needs to be https://somecdn/image.png
To illustrate some examples:
FlightSimTrack viewer, nothing at all (images are on the Twitch Extensions CDN and map tiles come from map tile vendors over SSL)
FlightSimTrack config, EBS lives at https://twitch.extensions.barrycarlyon.co.uk/
CohhCarnage Panel Extension, uses an API at https://extensions.cohhilition.com/ and a socket at wss://extensions.cohhilition.com/
Dropped Frames video Extension, no API or socket at all, but images from a CDN, usually Twitter/Twitch avatars directly from Twitter/Twitch over HTTPs, it receives from Twitch PubSub only.
You can see that they all all work over endpoints/routes protected by SSL.
We’ll cover how to build a “custom” EBS, and verifying identity in a future post, this week it’s just “Architecture”, the long and short of it, is you are basically just building a Custom API to interact between your front end and backend. A common way I describe Extensions, is as follows
Extensions are a website, where the front end is on a different server to the backend, and you can’t do server side rendering
– Barry Carlyon on “Well what is an Extension anyway!”
Languages
Whilst a Twitch extension is “limited” to HTML and JavaScript, your EBS/Backend API can be in any language you want. But when it comes to examples, samples and boilerplates you’ll generally find them in JavaScript (via NodeJS) or Go, (since Twitch is a “Go House”). We’ll be using NodeJS in this series, merely because it’s potentially the easiest for people to understand and convert knowledge between different languages.
If you want to jump ahead, you can check out the Developer Rig, which will provide you access to a number of Extension Examples, which are also available on the TwitchDev GitHub, or my own Twitch Profile Extension (which demonstrates how to call the Twitch API via an “EBS” proxy), these examples are designed to highlight a specific function of Twitch Extensions, rather than a “practical” example.
Real Certificates only
Naturally this needs to use “real” SSL Certificates, as apposed to self signed, which is “bearable” for testing with. Generally you’ll find Extension Developers will whip out LetsEncrypt as it’s free and easy to setup, and straightforward to setup a testing system.
Summary
So that covers the Architecture of an Extension
Not really sure what else to add, here is a photo of my cat, Sprite.
Sprite has invaded this Blog Post
What about next week?
Next week we will be looking at the Developer Rig and how/when to use it and setting up a Dev environment suitable for developing a Twitch Extension!
BUT MOTHER I CRAVE VIOLENCE
Well, until I write the next part if you want to read more about the Developer Side of Extensions, you can pop a visit over the to the Documentation or take a look at Twitch’s Introductory Page and you can always join us on the “TwitchDev Discord Server”, visit the Developer Support Page for the current invite link!
Twitch provides developers with three main, two auxiliary, and two Broadcaster only integration points, and of these integration points Twitch lets us pick the HTML (and thus Javascript or CSS) file(s) we wish to load for all of these. (Well except Panel Popout, screw that guy, it owes me a tenner).
Hang on just a minute
What? OH! You want to know how to create an Extension first or where to set the HTML to be loaded for each view? Yes, that would make a little more sense, wouldn’t it!
Extensions can be created, configured, and release via the Twitch Developer Console.
After logging in you’ll generally land on the Summary page that will list you current Extensions, Applications and any Games/Categories you may “own” on Twitch from being part of an organization
An example of the Twitch Developer Dashboard Overview
We’ll ignore everything else since we are only interested in Extensions.
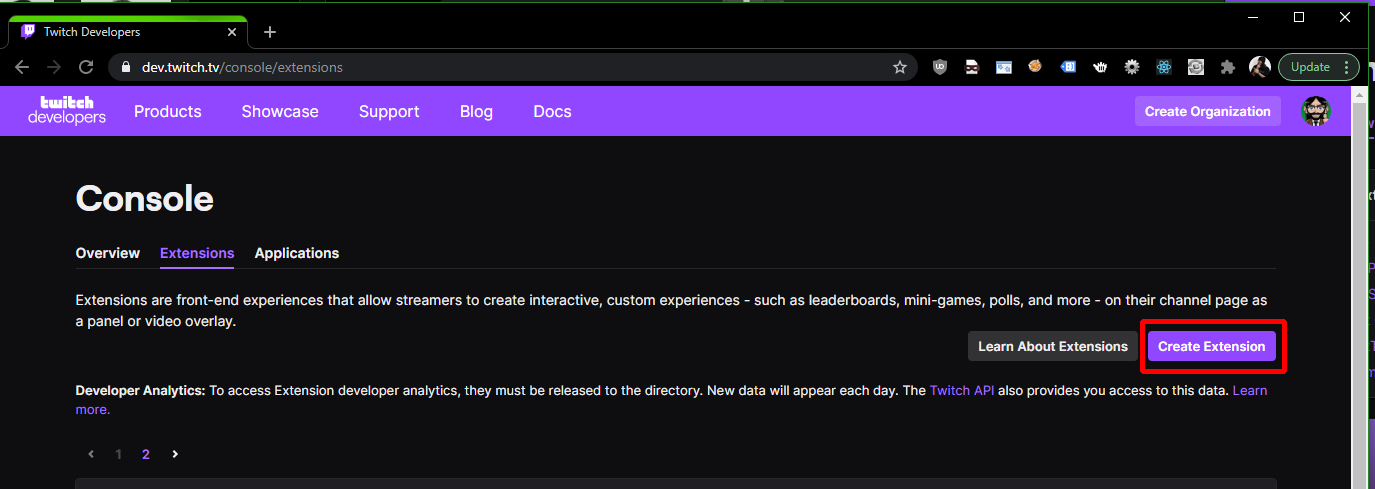
Twitch Developer Console for Extensions
If you click Extensions then “Create Extension” it’ll take you through a short “Setup Wizard” before presenting you with your ClientID for the Extension. We’ll do that now so we have an Extension to play with during this series!
PRO TIP: After starting the Wizard, please finish the wizard, even if you intend to change everything later.
Asks for your Extension Name, then Click Continue
Asks you to pick the views/integration points you want, which you can change later
Provide a Version number, 0.0.1 will suffice for now
Add additional details such as the Extension description and contact details for you
Now hit “Create Extension Version”
Twitch will send you an email to verify the provided contact details, so click the link in those email(s).
We’ll cover most of the other fields in a future post, but today we are interested in integration points.
Twitch will now have dropped us on the status page for our Extension
It’s important to note that you cannot use “Twitch” in the name of you Extension, and the name needs to be unique across Extensions and Applications across all of Twitch
So Integration Points?
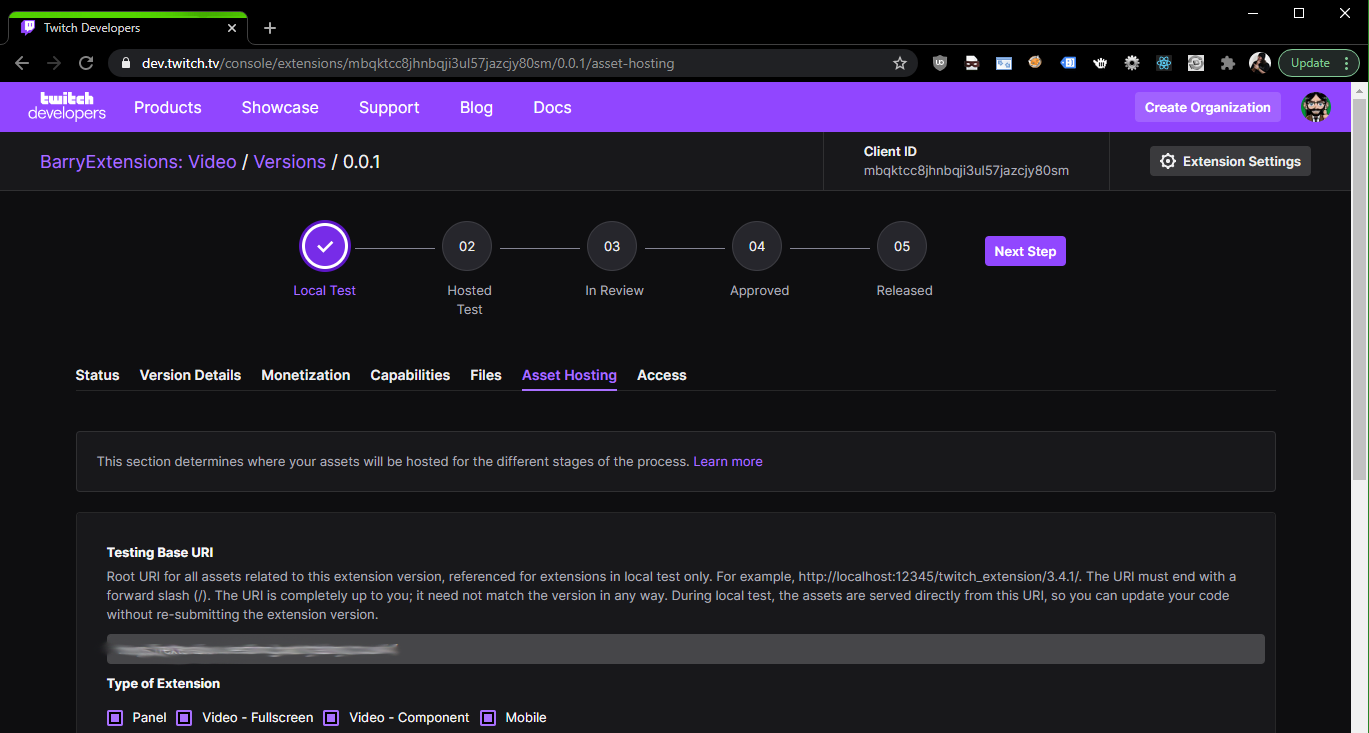
On the Extension Status page, hit “Asset Hosting”, this will take us to the page to configure our “Extension Views” and what html to load. Twitch will prefill with something sensible, but you can use anything you want
“Asset Hosting” section of a Twitch Extension Console
At the top is the Testing Base URI, we are going to ignore this for now, but we’ll be covering it next week, when we might actually start building.
Below that comes the section that lets you pick via Checkbox, which views (for the viewer) you wish to enable. And the settings for each view.
Panel
A Panel is rendered below the stream, in the panels section, Broadcasters have “some” control over where a panel extension will appear in relation to the other panels, Twitch liks to jumble things round sometimes, but generally Panel Extensions are pretty sticky and reflect the broadcasters choice.
A panel has the following settings available
Panel Viewer Path – the path and file name of the HTML file you wish to load, it is a relative path to the Testing Base URI/final upload URL
Panel Height – a panel extension is fixed Width (318px), but the developer can choose what height to use, ranging from 100px to 500px
A Panel extension, can be popped out (one of the Auxiliary Integration points we mentioned), which will start at 318px wide and the specified height, but the Viewer can then resize this window. It’s something to be aware of when building your extension, and offers the ability to use Responsive design
Video – Fullscreen
A Video Fullscreen extension will cover the whole stream, so the developer and designer can utilize the whole stream. Usually it’s safe to assume that the size is 1920px x 1080px, and you can scale as needed, we’ll cover some ways to handle this in a future post
A video Fullscreen only has one setting, the HTML file you wish to load, it is a relative path to the Testing Base URI/final upload URL
Mobile
YES, THE CHECKBOXES GO: Panel, Video – Full, Video – Comp, Mobile but the page goes in a different order
The Mobile view is presented to Viewers using a Mobile device in the Twitch App for that device, such as an Apple iPhone, Apple Table, Android phone and so on.
Like Video Fullscreen there is only one option here, the HTML file to load, it is a relative path to the Testing Base URI/final upload URL
Mobile you’ll need to practice Responsive design as dimensions will vary by device and orientation of the device
Video – Component Viewer Path
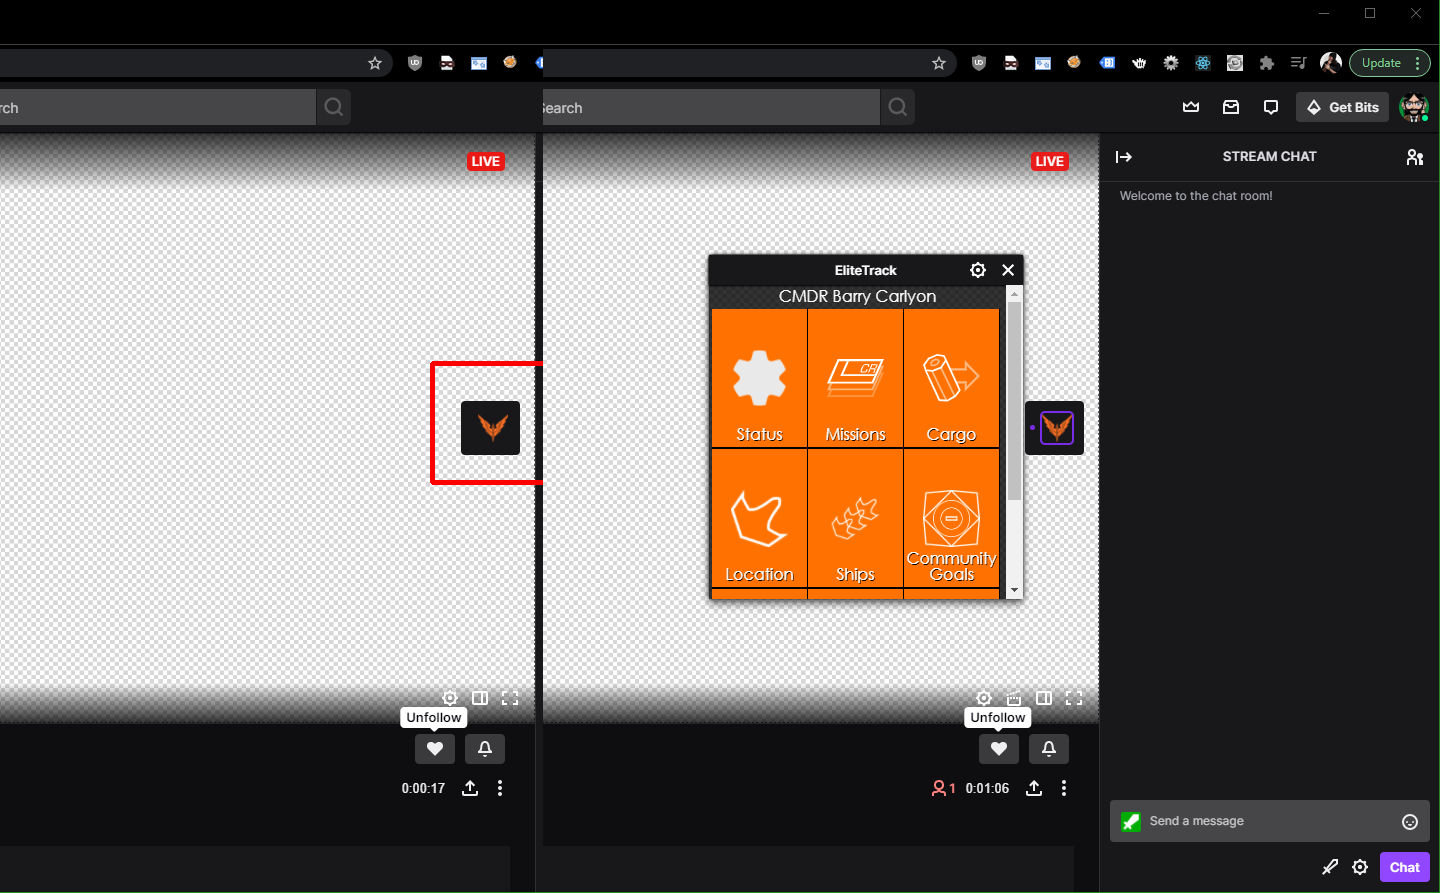
A video Component roughly works similar to a Panel, but it defaults to being “closed” and can be manually opened by the Viewer by clicking the relevant icon in the “taskbar”, the Taskbar is presented to the viewer on the right of a Live Stream.
The Extensions Taskbar, left is shown a Video Component Extension in the closed state and right is the open state
The following options are available
Video Component Viewer Path – the path and file name of the HTML file you wish to load, it is a relative path to the Testing Base URI/final upload URL
Video Component Sizing Parameters – there are a number of options here we’ll cover this more in depth at a future post as it can get fun!
Non Viewer integration Points
That covers all the Viewer intergration points and their options in summary
Next we have the “Broadcaster” Integration points, there are two of them, both have the same available settings, the path and file name of the HTML file you wish to load, it is a relative path to the Testing Base URI/final upload URL
Configuration view
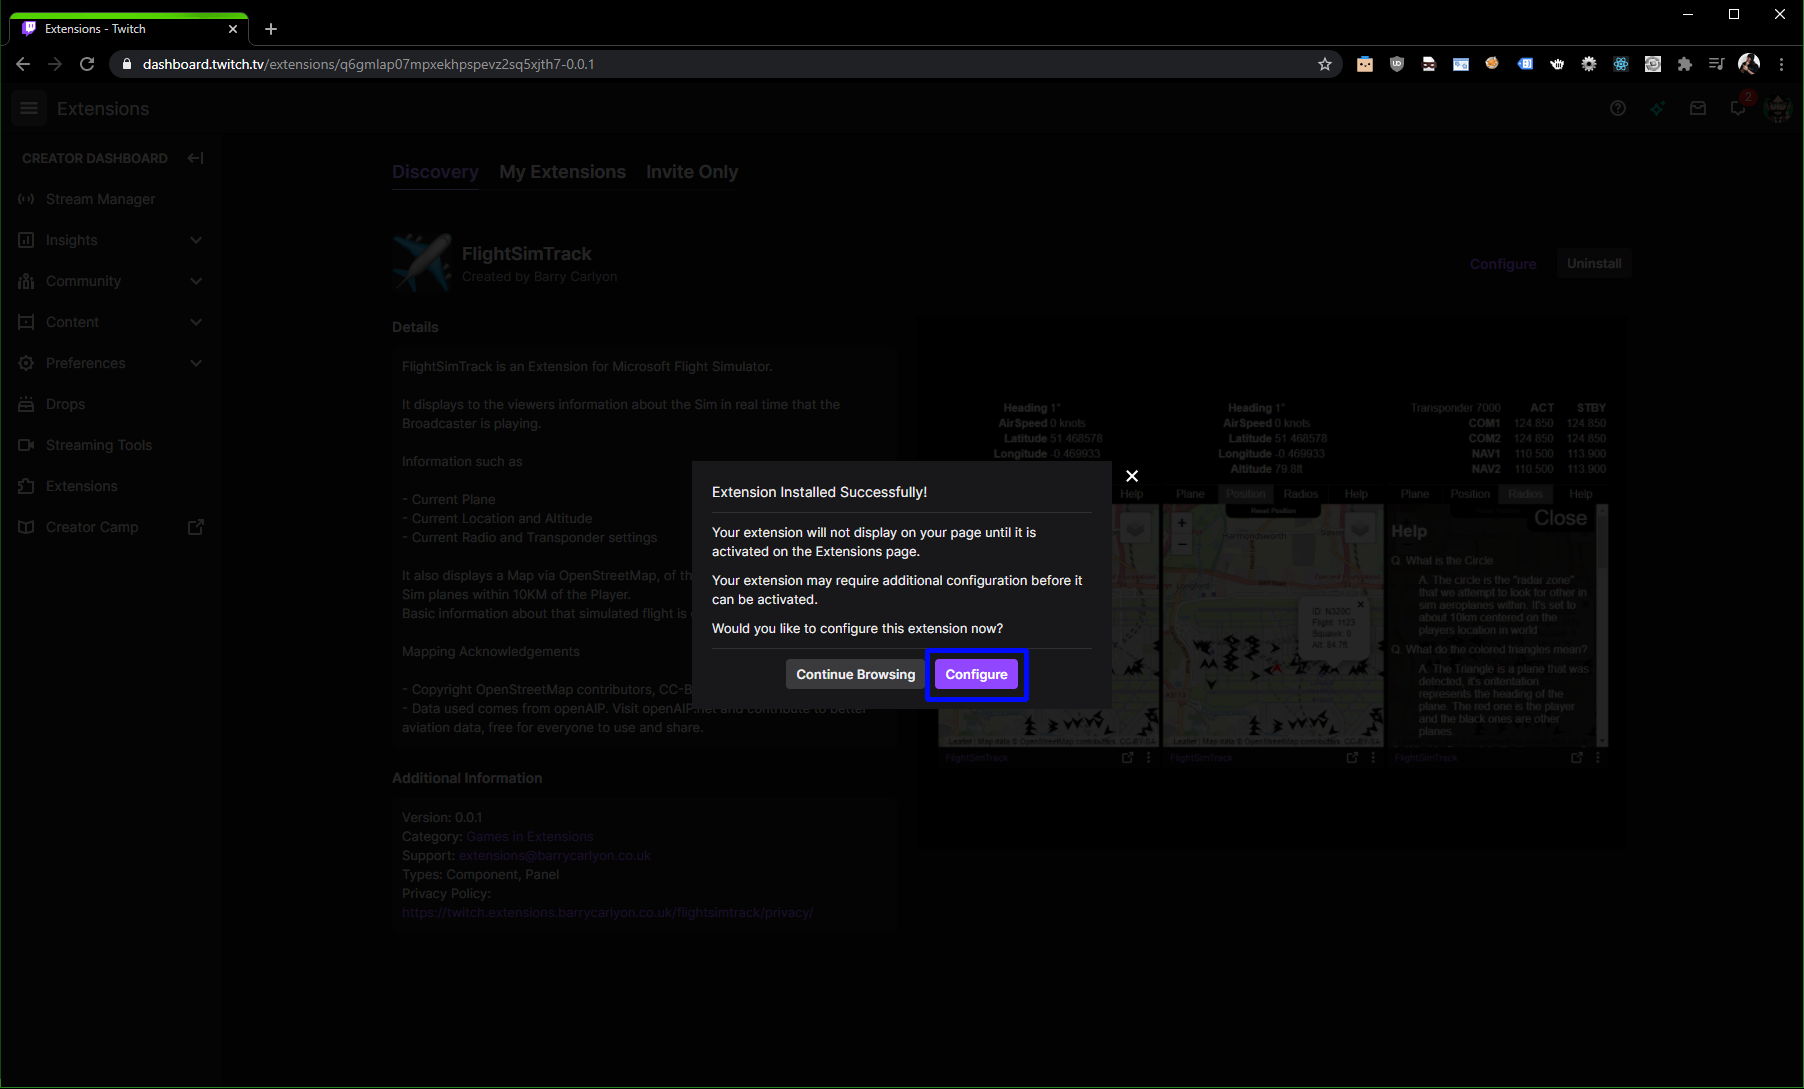
This is the main/one off configuration view, when a broadcaster first installs your Extension they will be prompted to ask if they want to visit the Configuration page or not. This page is used for one off or infrequent configuration
The Extension Config prompt during install
In some cases, developers can also block an extension being activated if the configuration has not been done, usually this would be used for things such as providing an API key to access another API, or asking the broadcaster what their Destiny 2/other game Character name is (for example)
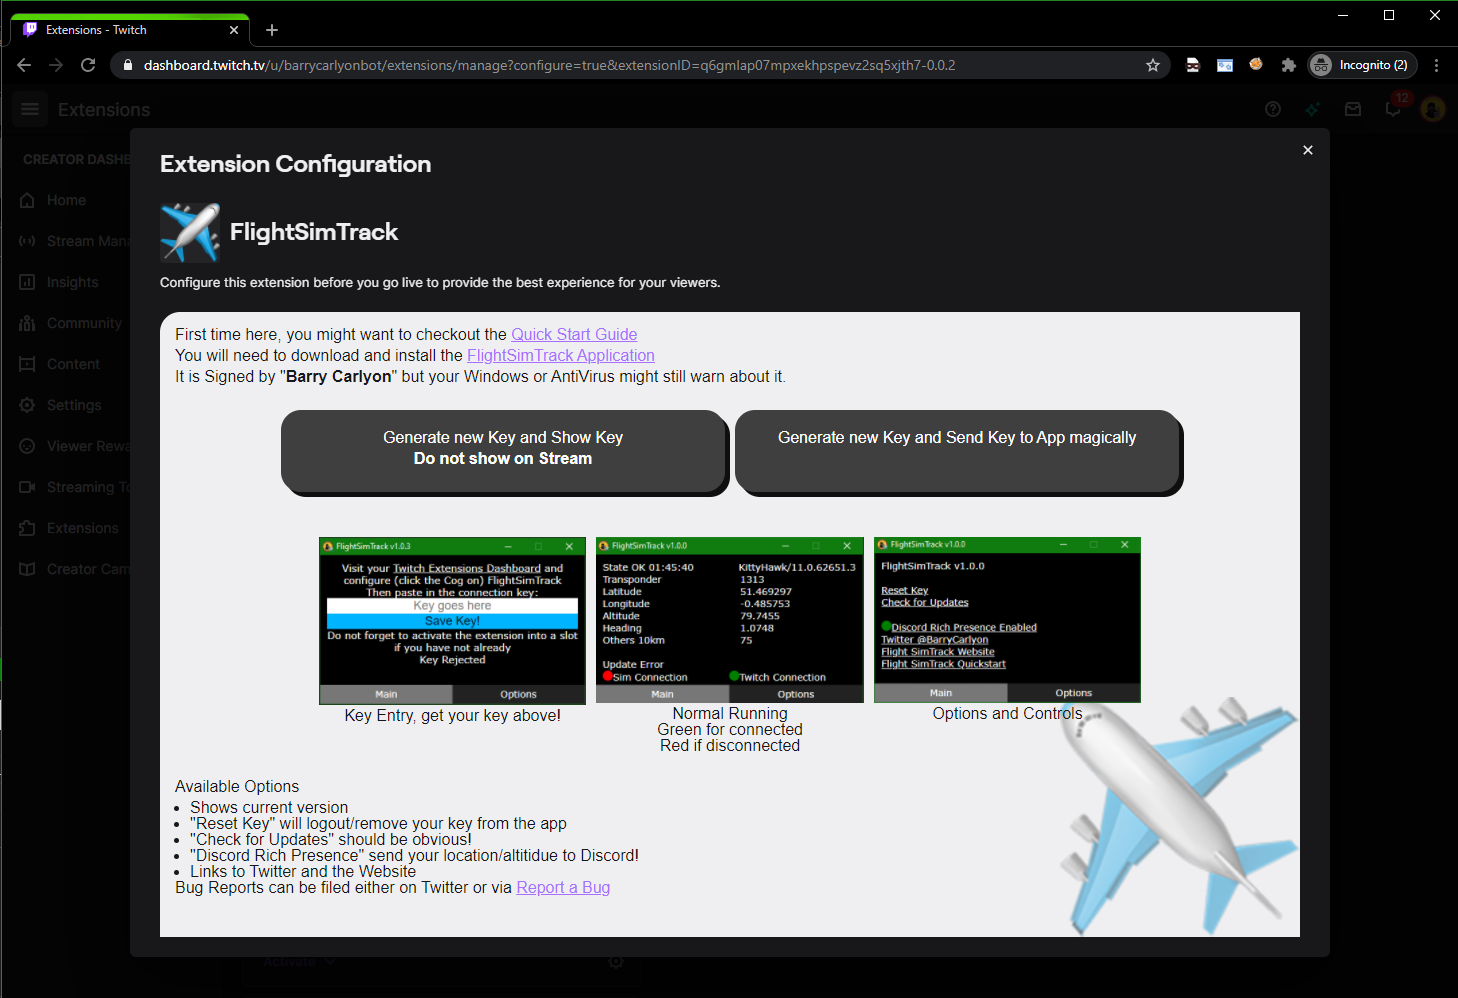
The Twitch Extension configuration page for FlightSimTrack, this example provides additional setup instructions and the API Access Key for the Companion Desktop App
It can be reached from the install flow for an extension and from the “Cog” Icon on an Extension in the Extension Manager section of the Dashboard
In terms of Dimensions it’s usually Landscape but a broadcaster can resize it pretty narrow, so you’ll need to be responsive or provide a minimum width
Live Configuration View
The Live configration view is to be used by the broadcaster for common tasks or things that need to be done during a Stream, examples of this would be to start a Poll for a poll extension, or a “I’m starting a round” in a mini games extension.
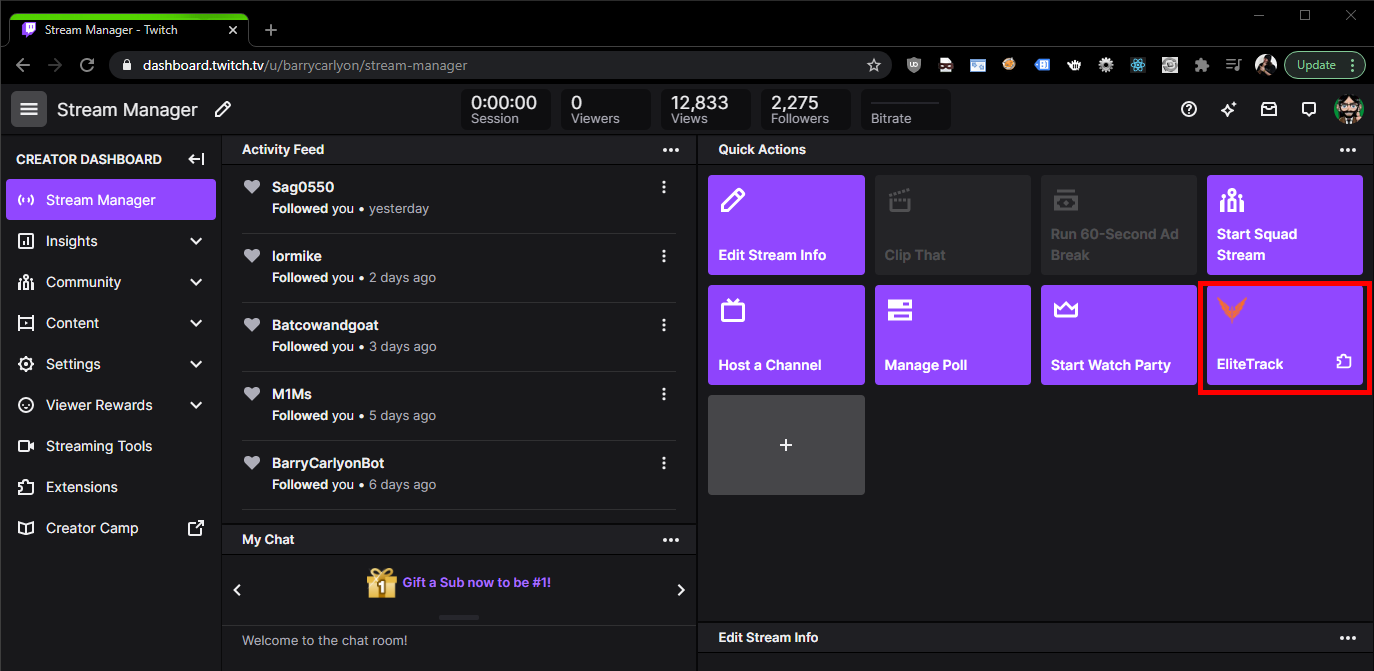
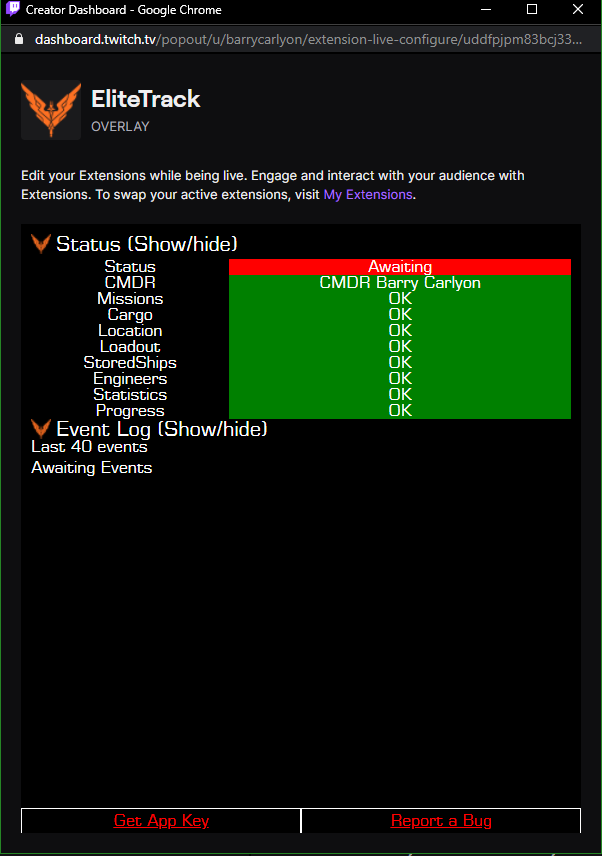
The Live configuration view is reached by the Broadcaster from the “Quick Actions” Section of their “Stream Manager”
An example of a Quick Action Extension Button
When clicked, a new window will open, which will contain the Quick Action/Live Configuration View, it’s resizable by the broadcaster so you’ll need to practice responsive design again here
EliteTrack’s Quick Action view provides easy access to a summary of the data sent, and prompts the user about Bug Reporting
Summary
And that covers the various integration points in a bit more depth compared to last weeks post!
Next week, we’ll be covering “Getting Started Building” I think and why every time I mention a HTML file did I follow it with: “the path and file name of the HTML file you wish to load, it is a relative path to the Testing Base URI/final upload URL”
BUT MOTHER I CRAVE VIOLENCE
Well, until I write the next part if you want to read more about the Developer Side of Extensions, you can pop a visit over the to the Documentation or take a look at Twitch’s Introductory Page and you can always join us on the “TwitchDev Discord Server”, visit the Developer Support Page for the current invite link!